

In part 1 of this mini series, Using Nutanix Calm & eScript, we simulated calling a third party API to get an IPAM-issued IP address. The intention behind that article was to look at something that’s more common than you might think – assigning an IP address to a VM in an environment that doesn’t use DHCP. Don’t worry, if you use DHCP in your environment, the same approaches can be used to start automating any third party API call using Nutanix Calm and eScript.
Nutanix Calm “HTTP” Tasks
Introduced in Calm version 2.6.0 (release notes) was the concept of HTTP tasks. This is a new task type that changes the way you can, for example, interact with a third party API. Supporting the most common HTTP verbs (GET, PUT, POST, DELETE) this is now even easier than before. Before we begin, please note a couple of points.
- We’ll use the Prism Central v3 API for this article.
- The API we’ll use is the “vms” API, i.e. get information about and interact with virtual machines.
- For simplicity’s sake, we’ll use the v3 “vms” API to get information about the first VM returned from a list of VMs.
Creating the Blueprint
The blueprint for this quick demo doesn’t need to be complex, at all. The brief steps below will walk you through creating a very basic blueprint that will work just fine. These steps assume you have Nutanix Calm running and that it is at least version 2.6.0.
- Create a new Multi VM/Pod Blueprint. This demo uses a task named HTTP Task Demo.
- Add a single service to the blueprint. The demo uses a service named HTTPTaskService configured as a CentOS Linux 7 VM and deployed on Nutanix AHV.
- Configure the VM’s credentials. I’m using Cloud-Init to configure public/private key authentication for the VM, although it’s perfectly valid to use username/password authentication.
- Make sure the VM has at least 1x NIC that has access to the IP address of your Prism Central CVMs or virtual IP address. This is required as we’ll be using one of those IP addresses to access the Prism Central v3 API. For reference only, the network I’m using is 10.133.16.0/24.
- Save the blueprint and ensure you don’t get any validation errors.
Optional Steps
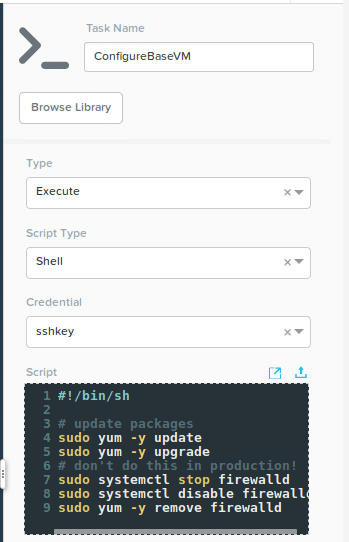
- Add an Execute Shell task to the HTTPTaskService service named ConfigureBaseVM.
- Use the bash script below as the contents of the execute shell task.
#!/bin/sh

# update packages
sudo yum -y update
sudo yum -y upgrade

# don't do this in production!
sudo systemctl stop firewalld
sudo systemctl disable firewalld
sudo yum -y remove firewalld
Here’s what the ConfigureBaseVM task looks like, if you have chosen to add it.
- Add an Execute Shell task to the HTTPTaskService service named InstallPackages.
- Use the bash script below as the contents of the execute shell task.
#!/bin/sh

# install some useful packages
sudo yum -y install bind-utils net-tools vim git
Creating the HTTP Task
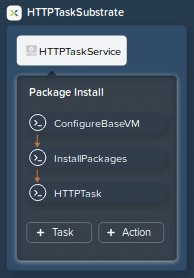
At this point we have a basic blueprint that will deploy a single Linux VM and, optionally, update the VM’s packages after deployment before installing some useful additional packages. Continue below to complete the main part of this demo – the HTTP Task.
- Add a task to the HTTPTaskService service named HTTPTask.
- Set the task type to HTTP Task.
- If you are following along with this demo, use the following settings for the HTTP Task.
- Type: HTTP Task
- Request URL: https://:9440/api/nutanix/v3/vms/list
- Request Method: POST
- Request Body: {“kind”:”vm”}
- Content Type: JSON (application/json)
- Connection Timeout (sec): 10 (but will depend on your connection’s capabilities)
- Authentication: BASIC
- Username and Password: As appropriate for your cluster
- SSL Certificate Validation: As appropriate for your cluster, or leave unchecked if using the default self-signed certificate
- Retry Count: 1
- Retry interval (sec): 1
- Headers: Add a header named Accept and set the value to application/json
- Expected Response Codes: Add an entry with Response Code set to 200 and Response Status set to SUCCESS. For our quick demo this is sufficient, although in production environments you would like watch for HTTP error codes, too.
- Set variables from response: Add an entry named FIRST_VM and set the value to $.entities[0].status.name. This looks for the first VM’s name in the response generated by our Prism Central v3 API request. Please see step 11 in the HTTP Task documentation for more information on the formatting requirements.
With our tasks added, here’s what the HTTPTaskService service looks like. This example assumes you have also completed the optional steps.
Now what?
We have now configured the VM and added the HTTP task, but we aren’t doing anything with the FIRST_VM variable. This variable, as outlined above, holds the name of the first VM returned from our Prism Central v3 “vms” API list request. However, because we are making the request and then assigning the results to the FIRST_VM variable, that variable’s value can be used in other tasks. Our demo will simply print the VM name to the console, but you are free to use it any way you see fit. Let’s do that now.
Showing the VM Name
- Add an Execute Shell task to the HTTPTaskService service named PrintVMName.
- Use the bash script below as the contents of the execute shell task.
#!/bin/sh
# print the VM name to the console
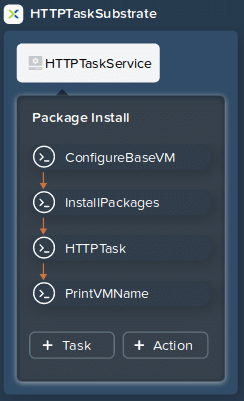
echo @@{FIRST_VM}@@That’s it! The final view of all our tasks added and configured will look like this, if you have followed along with all the steps above.
Testing our Blueprint
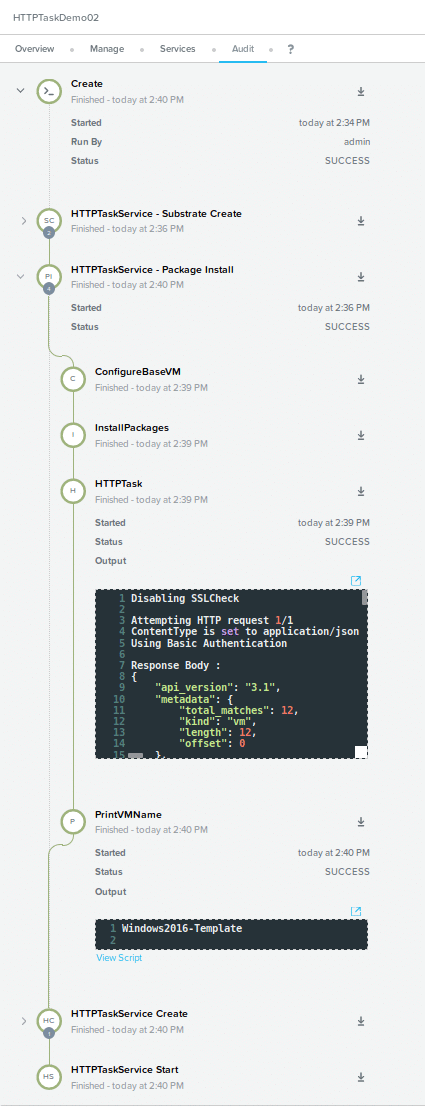
We are now ready to test everything we’ve done. Within the Nutanix Calm UI (assuming you have the blueprint editor open), click the Launch button. Fill in the required fields as normal and click Create. This demo has created an application named HTTPTaskDemo02. The audit log of a successful launch will look like this. Note that I’ve only expanded the task that shows the VM name (Windows2016Template) and the task that demonstrates the output of the HTTP task itself, i.e. the API request.
Takeaways
Although this demo is about as simple as it gets, the possibilities are almost endless. For example, here’s a sample workflow that implements an HTTP Task as part of its deployment.
- Deploys a Linux or Windows virtual machine.
- Installs the VM with MySQL or MSSQL.
- Gets database configuration scripts from Github or some other source control repository and uses them to create application databases.
- Installs Apache or Nginx.
- Clones web server configuration scripts from Github and deploys a new instance of an enterprise web application.
- Wraps up the deployment by calling a CMDB API and adds new virtual machine records when the deployment is successful.
Something like that seems simple, and it is, but it takes a step that could be potentially time consuming (or get missed) and automatically makes sure the CMDB step is completed.
Wrapping Up
Hopefully this article has shown how easy Nutanix Calm makes it to carry out API requests as part of an overall application deployment task. If you have any questions or comments, please feel welcome to get in touch with us by emailing developer@nutanix.com. See you next time!