

Working with the Nutanix REST APIs will require authentication. The reasons for this are simple and exactly as you’d expect. The information and actions exposed by the APIs will contain and give access to things you don’t want falling into the wrong hands.
Admittedly, that’s a pretty obvious thing to say, right? What it means, though, is that you as the developer need to consider how you’ll authenticate your API requests. Whether they be GET, POST or anything else, authentication will always be a consideration.
Authentication & Nutanix REST APIs
For this article we’re going to concentrate on HTTP Basic Authentication. The Prism v3 API documentation lists HTTP Basic Authentication as one of the supported methods. With that in mind, here is an important part of the Wikipedia article linked above:
In the context of an HTTP transaction, basic access authentication is a method for an HTTP user agent (e.g. a web browser) to provide a user name and password when making a request. In basic HTTP authentication, a request contains a header field in the form of
https://en.wikipedia.org/wiki/Basic_access_authenticationAuthorization: Basic <credentials>, where credentials is the base64 encoding of id and password joined by a single colon:
Let’s look at what that means.
The Authorization Header
Those familiar with API requests made using the HTTP protocol will be aware that most requests, especially those made to the Nutanix REST APIs, are made with an accompanying HTTP header. An extremely simplified explanation is to say that HTTP headers define the operating parameters for an HTTP transaction (source: List of HTTP header fields).
Throughout articles on the Nutanix Developer Portal, you’ll see a number of headers used almost every time.
- Content-Type. For Nutanix REST API requests, you’ll see this set to application/json. For example, this tells our client to expect responses in JSON format.
- Authorization. A key/value pair that includes the base64-encoded username and password used to authenticate the requests.
Shown below is an example of a key/value pair Authorization header:
Authorization: Basic YWRtaW46bnV0YW5peC80dQ==When to create Authorization headers
You won’t always need to manually create the HTTP Authorization headers. For example, the command line tool cURL provides the -u (or –user) parameter. This can be used to directly specify the username and password and will work without issue.
The same can be said when passing usernames and passwords in many scripts and languages. Another example is the Python Requests library. This library allows you to specify the username and password directly, as shown below:
>>> from requests.auth import HTTPBasicAuth
>>> requests.get('https://api.github.com/user', auth=HTTPBasicAuth('user', 'pass'))
However, if you are in a situation where the Authorization header needs to be created in code, the steps will vary depending on the language in use.
Before creating our own Authorization header …
For this article we’ll ignore everything but the Authorization header. We’ll also assume the following:
- The Prism Central username will be admin
- The password will be nutanix/4u
- The Prism Central IP address will be 192.168.1.131 – this is the IP address of my Nutanix Community Edition Prism Central instance. By the way, if you haven’t downloaded Nutanix Community Edition, you should! It’s free! 🙂
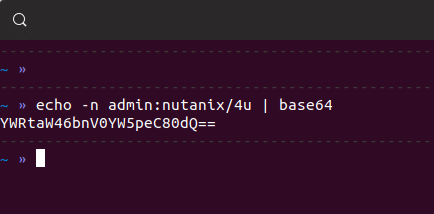
Many scripts and languages, including many others not mentioned above, will provide ways to take the username and password combination and generate the base64-encoded header (we’ll look at a few shortly). Here’s an example from a Linux system that has the base64 command available:
echo -n admin:nutanix/4u | base64And here is the result from running the above command:
There are even online tools that allow you to enter your username and password and generate the Authorization header in one step.
There are very clear security considerations to take into account before using any public service with your credentials. Please think about these before using public or online services with anything security-related, especially usernames and passwords and confidential and/or proprietary information.
Today’s Basic Scenario
It’s taken a while to get to this point but, in today’s article, we have a requirement to generate an HTTP Authorization header in code. We also have a requirement that says we must be able to do this in the following languages/scripts:
- Python 3.7
- Microsoft C#
- PowerShell
Thankfully, each of these common scripts and languages provide native/built-in methods to do exactly what we need. I mentioned some of this before but, just to make sure, here are the settings we’ll work with today.
- The Prism Central username will be admin
- The password will be nutanix/4u
- The cluster IP address will be 192.168.1.131 – the IP address of my Nutanix Community Edition Prism Central instance.
- Using the credentials above, we want to generate an in-code HTTP Basic Authorization header that can be used in our scripts and applications.
Create the Authorization Header
Finally, we’ve reached the point where we can look at the code required to generate the header. Each of the code samples below is completely stand-alone, although won’t do anything useful until integrated into an app that makes an API request.
Python 3.7
#!/usr/bin/env python3.7
import urllib3
import requests
from base64 import b64encode
username = 'admin'
password = 'password'
encoded_credentials = b64encode(bytes(f'{username}:{password}',
encoding='ascii')).decode('ascii')
auth_header = f'Basic {encoded_credentials}'
# the auth_header above can now be used in our API request
# we'll look at that shortly
# just for testing, let's print the auth_header variable (this step will be removed later)
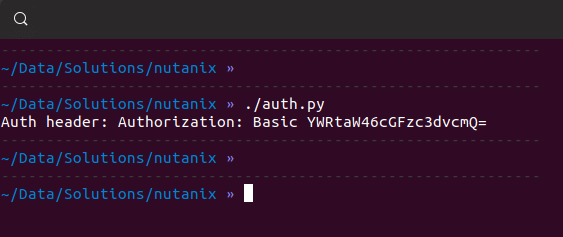
print(f'Auth header: {auth_header}')Running that small script produces the following output:
Microsoft C#
Please note the C# example is intended to run as a console application and can be created using Microsoft Visual Studio (for example)
using System;
using System.Net;
using System.Text;

namespace ConsoleApp1
{
    class Program
    {
        static void Main(string[] args)
        {
            string ClusterUsername = "admin";
            string ClusterPassword = "nutanix/4u";
            string AuthHeader = System.Convert.ToBase64String(System.Text.ASCIIEncoding.ASCII.GetBytes(ClusterUsername + ":" + ClusterPassword));
            // the AuthHeader variable above can now be used in our API request
            // we'll look at that shortly
            // just for testing, let's print the AuthHeader variable
            // this step will be removed later
            Console.WriteLine("Auth header: " + AuthHeader);
            Console.ReadLine();
        }
    }
}
Running the app from Visual Studio Community 2019 produces the following output:

Windows PowerShell
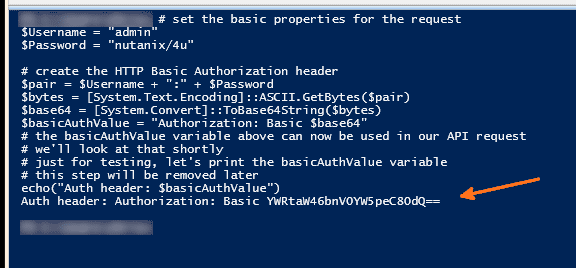
# set the basic properties for the request
$Username = "admin"
$Password = "nutanix/4u"

# create the HTTP Basic Authorization header
$pair = $Username + ":" + $Password
$bytes = [System.Text.Encoding]::ASCII.GetBytes($pair)
$base64 = [System.Convert]::ToBase64String($bytes)
$basicAuthValue = "Basic $base64"

# the basicAuthValue variable above can now be used in our API requests
# we'll look at that shortly
# just for testing, let's print the basicAuthValue variable
# this step will be removed later
echo("Auth header: $basicAuthValue")
Running the app from Windows PowerShell ISE in Windows 10 produces the following output:
In each of our three examples above, you’ll see the HTTP Basic Authorization header string.
Where can we use this for real?
Because of the unlimited number of ways this code could be used, this article won’t include embedded apps or scripts to make API requests.
Instead, I encourage all readers to check out our Nutanix Developer Portal code samples page. Below are links to code samples that make direct use of the HTTP Basic Authorization approach above.
- Python 3.7 – Create basic VM using the Nutanix REST API v3
- C# – List the first 20 VMs managed by a specified Prism Central instance
- PowerShell – Create basic VM using the Nutanix REST API v3
Wrapping Up
Hopefully this slightly more detailed article has shown how you can use Python 3.7, C# or PowerShell to generate Basic HTTP Authorization headers. This information will come in useful when writing scripts and apps that make Nutanix REST API requests.
Thanks for reading!