

If you’ve taken the time to go through our Python API Lab, you may have finished with a question.
How do I add more API calls to my custom dashboard?
Mrs Joan Q. Labtaker
A quick note for those who aren’t familiar with the lab being talked about here – the link above takes you through detailed steps to create a custom Nutanix Prism monitoring dashboard. It is based entirely on Python Flask + JavaScript and creates a great foundation for building your own dashboards later. For the complete collection of Nutanix Developer labs, please see the Nutanix Developer Labs page.
Constructing the API Request
Here’s an example of the API requests being used in the current version of the lab. This GET request uses the vms API and lists the VMs that are available on the selected cluster.
https://{{cluster_virtual_ip}}:9440/api/nutanix/v2.0/vms
The results of that API request are returned in JSON format and parsed using JavaScript. This is a very common way of consuming API responses and works well for our use case.
The API request we want to add to the dashboard is a list of AHV-hosted images. These images are typically ISO or QCOW2 files that can be used as virtual machine templates. In almost the exact same way as the VMs request above, the images GET request looks like this.
https://{{cluster_virtual_ip}}:9440/api/nutanix/v2.0/images
Submitting that API request to my demo cluster returns the expected JSON response, but this time, instead of a list of VMs, contains a list of AHV-hosted images. Part of the response is as follows:
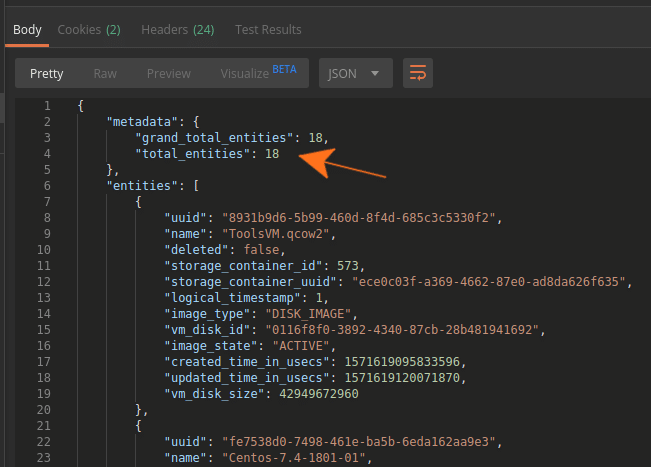
Note the total_entities value? This is the single value we’ll display in our dashboard, in addition to the existing information shown there.
Modifying the Dashboard Defaults
The dashboard’s default layout is dictated by a file named dashboard.json that is stored in the lab/static/layouts directory. However, to make sure this file and its contents are preserved and arrive for processing without modification, the “layout” property of dashboard.json is stored in base64 format. This means we need to decode it before use.
The default base64-encoded data is as follows:
W3siaWQiOiJjbHVzdGVyU3VtbWFyeSIsImNvbCI6MSwicm93IjoxLCJzaXplX3giOjIsInNpemVfeSI6MX0seyJpZCI6Im5vc1ZlcnNpb24iLCJjb2wiOjMsInJvdyI6MSwic2l6ZV94IjoyLCJzaXplX3kiOjF9LHsiaWQiOiJtaXNjMSIsImNvbCI6NSwicm93IjoxLCJzaXplX3giOjEsInNpemVfeSI6MX0seyJpZCI6Im1pc2MyIiwiY29sIjo2LCJyb3ciOjEsInNpemVfeCI6MSwic2l6ZV95IjoxfSx7ImlkIjoiaG9zdHMiLCJjb2wiOjEsInJvdyI6Miwic2l6ZV94IjoxLCJzaXplX3kiOjF9LHsiaWQiOiJiaWdHcmFwaCIsImNvbCI6Miwicm93IjoyLCJzaXplX3giOjIsInNpemVfeSI6Mn0seyJpZCI6InZtSW5mbyIsImNvbCI6NCwicm93IjoyLCJzaXplX3giOjIsInNpemVfeSI6MX0seyJpZCI6ImNvbnRhaW5lcnMiLCJjb2wiOjYsInJvdyI6Miwic2l6ZV94IjoxLCJzaXplX3kiOjJ9LHsiaWQiOiJibG9ja3MiLCJjb2wiOjEsInJvdyI6Mywic2l6ZV94IjoxLCJzaXplX3kiOjF9LHsiaWQiOiJoaW50cyIsImNvbCI6NCwicm93IjozLCJzaXplX3giOjIsInNpemVfeSI6MX0seyJpZCI6ImZvb3RlcldpZGdldCIsImNvbCI6MSwicm93Ijo0LCJzaXplX3giOjYsInNpemVfeSI6MX1d
After decoding, the base64 data can be seen below. We can clearly see the JSON, now.
[{"id":"clusterSummary","col":1,"row":1,"size_x":2,"size_y":1},{"id":"nosVersion","col":3,"row":1,"size_x":2,"size_y":1},{"id":"misc1","col":5,"row":1,"size_x":1,"size_y":1},{"id":"misc2","col":6,"row":1,"size_x":1,"size_y":1},{"id":"hosts","col":1,"row":2,"size_x":1,"size_y":1},{"id":"bigGraph","col":2,"row":2,"size_x":2,"size_y":2},{"id":"vmInfo","col":4,"row":2,"size_x":2,"size_y":1},{"id":"containers","col":6,"row":2,"size_x":1,"size_y":2},{"id":"blocks","col":1,"row":3,"size_x":1,"size_y":1},{"id":"hints","col":4,"row":3,"size_x":2,"size_y":1},{"id":"footerWidget","col":1,"row":4,"size_x":6,"size_y":1}]
Note there is an object with an id of misc1 and an object with an id of misc2.
Before carrying on, take a quick look at how the dashboard looks before we send any API requests to our cluster:
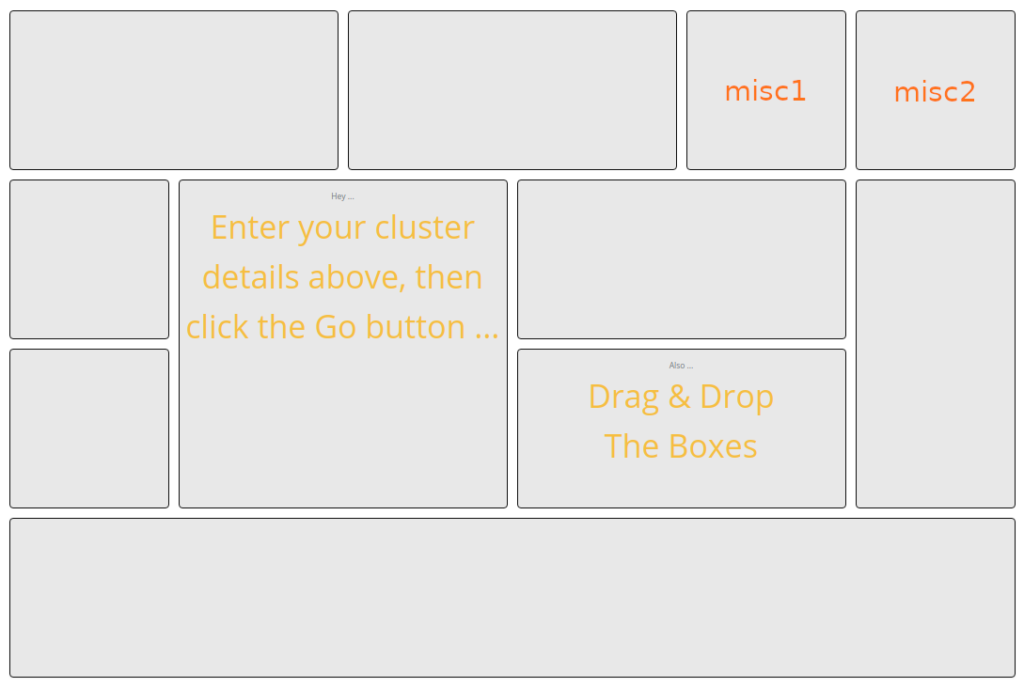
The section labelled misc1 is where we will display the results of the images API request.
From a functionality perspective it makes no difference what this section is named. However, it makes sense that all sections are labelled with a name we can understand. The misc1 section shown above will be renamed to images, meaning our encoded JSON data will need to modified then re-encoded to base64. There are many online tools that can do this e.g. base64encode.org. Likewise, base64decode.org can be used for the decode step.
To save a little time, the modified and re-encoded JSON is shown below. This data needs to replace the existing value of layout in lab/static/layouts/dashboard.json.
W3siaWQiOiJjbHVzdGVyU3VtbWFyeSIsImNvbCI6MSwicm93IjoxLCJzaXplX3giOjIsInNpemVfeSI6MX0seyJpZCI6Im5vc1ZlcnNpb24iLCJjb2wiOjMsInJvdyI6MSwic2l6ZV94IjoyLCJzaXplX3kiOjF9LHsiaWQiOiJpbWFnZXMiLCJjb2wiOjUsInJvdyI6MSwic2l6ZV94IjoxLCJzaXplX3kiOjF9LHsiaWQiOiJtaXNjMiIsImNvbCI6Niwicm93IjoxLCJzaXplX3giOjEsInNpemVfeSI6MX0seyJpZCI6Imhvc3RzIiwiY29sIjoxLCJyb3ciOjIsInNpemVfeCI6MSwic2l6ZV95IjoxfSx7ImlkIjoiYmlnR3JhcGgiLCJjb2wiOjIsInJvdyI6Miwic2l6ZV94IjoyLCJzaXplX3kiOjJ9LHsiaWQiOiJ2bUluZm8iLCJjb2wiOjQsInJvdyI6Miwic2l6ZV94IjoyLCJzaXplX3kiOjF9LHsiaWQiOiJjb250YWluZXJzIiwiY29sIjo2LCJyb3ciOjIsInNpemVfeCI6MSwic2l6ZV95IjoyfSx7ImlkIjoiYmxvY2tzIiwiY29sIjoxLCJyb3ciOjMsInNpemVfeCI6MSwic2l6ZV95IjoxfSx7ImlkIjoiaGludHMiLCJjb2wiOjQsInJvdyI6Mywic2l6ZV94IjoyLCJzaXplX3kiOjF9LHsiaWQiOiJmb290ZXJXaWRnZXQiLCJjb2wiOjEsInJvdyI6NCwic2l6ZV94Ijo2LCJzaXplX3kiOjF9XQ==
The complete contents of lab/static/layouts/dashboard.json are shown below.
{"version":"1.0","layout":"W3siaWQiOiJjbHVzdGVyU3VtbWFyeSIsImNvbCI6MSwicm93IjoxLCJzaXplX3giOjIsInNpemVfeSI6MX0seyJpZCI6Im5vc1ZlcnNpb24iLCJjb2wiOjMsInJvdyI6MSwic2l6ZV94IjoyLCJzaXplX3kiOjF9LHsiaWQiOiJpbWFnZXMiLCJjb2wiOjUsInJvdyI6MSwic2l6ZV94IjoxLCJzaXplX3kiOjF9LHsiaWQiOiJtaXNjMiIsImNvbCI6Niwicm93IjoxLCJzaXplX3giOjEsInNpemVfeSI6MX0seyJpZCI6Imhvc3RzIiwiY29sIjoxLCJyb3ciOjIsInNpemVfeCI6MSwic2l6ZV95IjoxfSx7ImlkIjoiYmlnR3JhcGgiLCJjb2wiOjIsInJvdyI6Miwic2l6ZV94IjoyLCJzaXplX3kiOjJ9LHsiaWQiOiJ2bUluZm8iLCJjb2wiOjQsInJvdyI6Miwic2l6ZV94IjoyLCJzaXplX3kiOjF9LHsiaWQiOiJjb250YWluZXJzIiwiY29sIjo2LCJyb3ciOjIsInNpemVfeCI6MSwic2l6ZV95IjoyfSx7ImlkIjoiYmxvY2tzIiwiY29sIjoxLCJyb3ciOjMsInNpemVfeCI6MSwic2l6ZV95IjoxfSx7ImlkIjoiaGludHMiLCJjb2wiOjQsInJvdyI6Mywic2l6ZV94IjoyLCJzaXplX3kiOjF9LHsiaWQiOiJmb290ZXJXaWRnZXQiLCJjb2wiOjEsInJvdyI6NCwic2l6ZV94Ijo2LCJzaXplX3kiOjF9XQ=="}
Adding the “images” API Request
Now that our dashboard’s default layout has been modified and is ready for use, we can move on to adding our images API request to the app.
Python API Requests
Each API request submitted by the app is carried out by a dedicated function. All these functions are part of lab/ajax.py and are called by the application’s JavaScript via AJAX. In order to add our images request, we first need to make sure there’s a function that will make the API request for us.
Opening lab/ajax.py will allow you to see all the functions that currently exist. For example, there are functions for:
- Listing storage containers
- Listing VMs
- Getting storage container performance
At the bottom of ajax.py, we can add a new function specifically for listing our AHV images:
"""
get the image list e.g. # of images
"""
@bp.route('/image-list',methods=['POST'])
def images():
    # get the request's POST data
    get_form()
    client = apiclient.ApiClient('get',cvmAddress,f'images','',username,password,'v2.0')
    results = client.get_info()
    return jsonify(results)
This function makes use of a class called ApiClient provided by lab/util/apiclient/__init__.py. We won’t look into this class during this article as the lab itself goes into detail on how that works.
However, the images function doesn’t do anything useful on its own. This is because all the functions in ajax.py are called via JavaScript in lab/static/js/ntnx.js.
JavaScript AJAX Functions
Opening lab/static/js/ntnx.js we can see a set of “matching” JavaScript functions; essentially one for each of the API requests in ajax.py.
Developers reading this will easily identify that this isn’t a particularly efficient way of managing our requests. This is true but this lab and application were created for demo purposes only. 🙂
Each function is a member of an object named NtnxDashboard, meaning that all new functions must be a member of the same object.
The JavaScript function that displays the results of our images API request and makes the API request itself (via ajax.py) is shown below.
imageInfo: function( cvmAddress, username, password )
    {

        vmData = $.ajax({
            url: '/ajax/image-list',
            type: 'POST',
            dataType: 'json',
            data: { _cvmAddress: cvmAddress, _username: username, _password: password },
        });

        vmData.success( function(data) {
            NtnxDashboard.resetCell( 'images' );
            $( '#images' ).addClass( 'info_big' ).append( '<div style="color: #6F787E; font-size: 25%; padding: 10px 0 0 0;">Image(s)</div><div>' + data['metadata']['total_entities'] + '</div><div></div>');
        });

        vmData.fail(function ( jqXHR, textStatus, errorThrown )
        {
            console.log('error getting image info')
        });
    },
If you are following this article after completing the lab, it is suggested the imageInfo method is added after the storagePerformance method. This is on or around line 216 if you have followed each lab step.
Looking at this method, you’ll notice something familiar, too. The $( ‘#images’ ) JavaScript matches the new section label we setup earlier. Using jQuery, we have targeted the #images section and, after completing the images API request, displayed the number of images on the page.
Hooking it all together
The last step is also an addition to lab/static/js/ntnx.js. Scrolling down towards the end of ntnx.js, you’ll see the following line and others similar to it:
NtnxDashboard.containerInfo( cvmAddress, username, password );
Again, this is a fairly inefficient way of carrying out multiple similar requests, but makes it much easier to see what’s happening. Using the exact same approach, we can add an additional line very similar to that one. The only difference is that we’ll be calling the imageInfo function this time.
NtnxDashboard.imageInfo( cvmAddress, username, password );
Testing the new request
If you have the application already running, you’ll need to hard refresh the browser to see the changes. This makes sure the JavaScript updates will take effect.
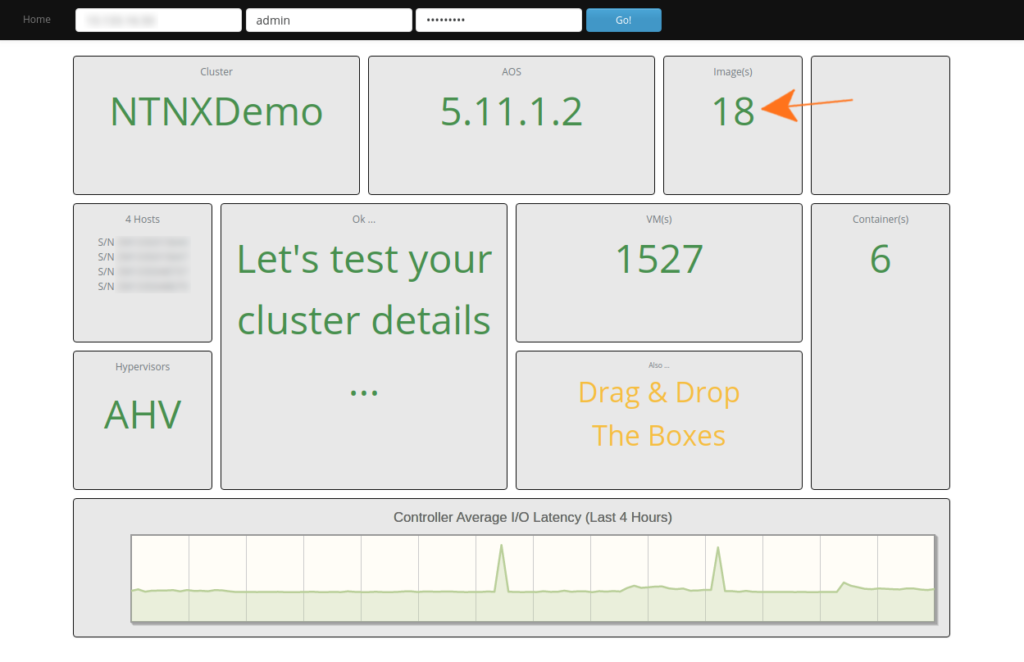
Before making these updates, the misc1 and misc2 sections shown above contained no data at all. We’ve updated our custom dashboard and added an API request to show the number of images on our cluster.
Wrapping Up
Hopefully this long-ish article provided useful info on how to add API requests to your dashboard.
If you haven’t yet checked out the Python API Lab 1.0 lab, it is strongly recommended to do so. You’ll learn how quickly a custom dashboard can be created while also getting familar with some of the APIs available on the Nutanix Platform.
Have a great day and thanks for reading. 🙂