

Nope, we’re not talking about the well-known internet connection type here. 🙂 The Nutanix Calm DSL and others like it can be partially defined as follows.
A domain-specific language (DSL) is a computer language specialized to a particular application domain. This is in contrast to a general-purpose language (GPL), which is broadly applicable across domains.
– Wikipedia DSL Page
To put some context around that so we can learn about the Nutanix Calm DSL specifically, let’s think about a DSL as a way of simplifying programming tasks that are specific to a domain or product. In this case, the Nutanix Calm DSL, as suggested by the name, is specifically written to work with the Nutanix Calm product. It won’t interact with an operating system from the perspective of writing a custom application and it certainly won’t create a dinner recipe.
A general-purpose (GPL) language, from a usage point of view, can be described as deliberately missing features that are specific to a product or technology. With that in mind, they are therefore much better suited to working with a broad-range of technologies. Some examples of general-purpose languages could be:
- HTML (markup)
- Python (programming)
- C# (programming)
How do I use the Nutanix Calm DSL?
The official Nutanix Calm DSL page covers how to install the DSL on Mac OS X. For this article let’s assume we’re working with Ubuntu Linux. My dev system here is based on the following configuration.
- Ubuntu Linux 19.10
- “Essential” development tools e.g. Git, Python 3.7, code editors
- Postman for API testing
- “Oh My Zsh” because I like my terminal to tell me what’s going on at all times
There’s nothing special about this setup and that’s a good thing. The Calm DSL and the way it is packaged means it’ll work pretty much “out of the box” without any unusual or proprietary dependencies. Let’s get it installed now. The steps below assume you’re reasonably comfortable navigating around a Linux terminal.
Note: While it is true that this information could be considered a partial repeat of the official repository readme, it’s also true that this article will form part of a larger series on the Calm DSL.
Installing the Nutanix Calm DSL on Ubuntu
Local Binary
The first thing we’ll need is a location for our Nutanix development “stuff”.
mkdir ~/nutanix
cd ~/nutanix
We then need to make sure the Calm DSL dependencies are met by installing them if they aren’t already present. There are a couple of additional packages specified here that aren’t in the documentation, but they’re useful for other tasks of this nature, too.
sudo apt-get install git python3 python3-venv openssl build-essential make libssl-dev python3-pipIf you are installing the Nutanix Calm DSL on CentOS Linux 7, yum should replace apt-get throughout this article. For example:
sudo yum install git python3 python3-venv openssl build-essential make libssl-dev python3-pipOnce the dependencies are installed, we need to grab the Calm DSL itself. Note I am using SSH to clone the Calm DSL repository, but cloning via HTTPS may be required on some systems.
git clone https://github.com/nutanix/calm-dsl.gitWe then need to create a Python3 virtual environment (venv) and activate it. Note the (venv) annotation that tells us we’re now working within a Python virtual environment (screenshot at the end of this section).
cd ~/nutanix/calm-dsl
python3 -m venv venv
. venv/bin/activate
pip3 install wheel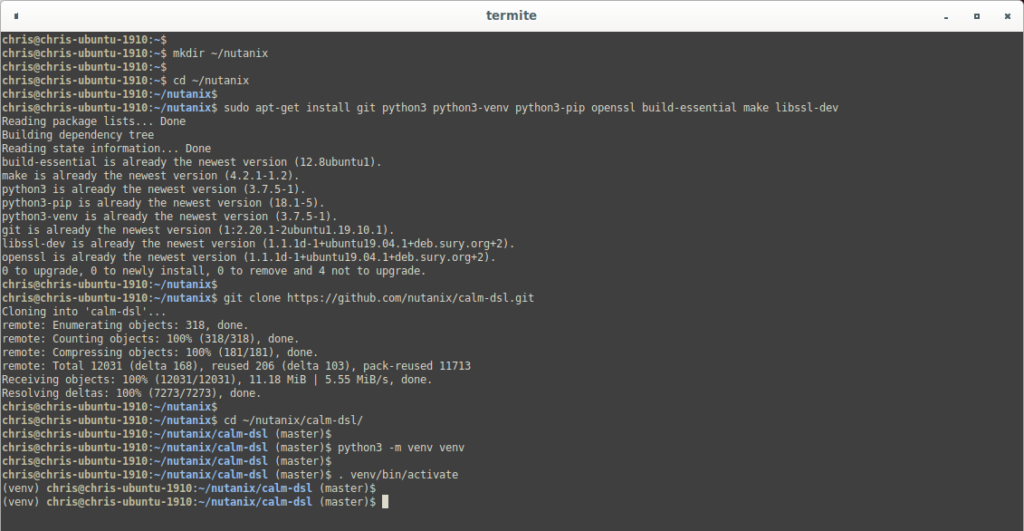
While there are tests provided with the Nutanix Calm DSL, we’re not going to use them in this specific article. For that reason, the next step is to setup our development environment.
# if necessary, upgrade pip
pip install --upgrade pip
# upgrade setuptools
pip install --upgrade setuptools
export LC_ALL=en_US.utf-8
export LANG=en_US.utf-8
# build development instance of the Calm DSL
make dev
This has created our local development version and allows us to run the Calm DSL locally. If you are only going to use the Calm DSL locally, please now skip ahead to the “Initialisation & Testing” section.
Calm DSL inside Docker Container
In today’s environments, it’s common to carry out development, testing and production tasks with containerised systems. While this particular article won’t go into detail about what containerisation is, I’ll quickly go over the commands I ran to get Docker installed and running and then the Calm DSL container built on my Ubuntu system.
Note: These commands are taken directly from the Docker installation page for Linux. There is a step on that page that specifies how to run Docker as a non-root user, but I’m not including that step here. Please be aware of the security implications if you choose to do this.
The steps we are following achieve the following results:
- Remove existing versions of various docker packages
- Make sure our package cache is up to date
- Install some dependencies before installing Docker itself
- Add Docker’s official GPG key. This allows us to check the validity of any downloaded Docker files against that key.
- Verify that we have the correct key
- Add the official Docker repository
- Update package caches once more then install Docker Engine (Community)
- Run a quick test to ensure Docker is working
sudo apt-get remove docker docker-engine docker.io containerd runc
sudo apt-get update && sudo apt-get install apt-transport-https ca-certificates curl gnupg-agent software-properties-common
curl -fsSL https://download.docker.com/linux/ubuntu/gpg | sudo apt-key add -
sudo apt-key fingerprint 0EBFCD88
sudo add-apt-repository "deb [arch=amd64] https://download.docker.com/linux/ubuntu $(lsb_release -cs) stable"
sudo apt-get update
sudo apt-get install docker-ce docker-ce-cli containerd.io
sudo docker run hello-world
Now that Docker is installed we can use the provided build scripts to make our Calm DSL container. Yes, the keen-eyed amongst you may notice I jumped between Gnome Terminal and Termite occasionally white writing this article. 🙂
The **docker** daemon may need to be restarted before Docker can be used:
sudo systemctl start docker
sudo systemctl enable docker
Then it’s simply a case of building the docker container, as follows.
sudo make docker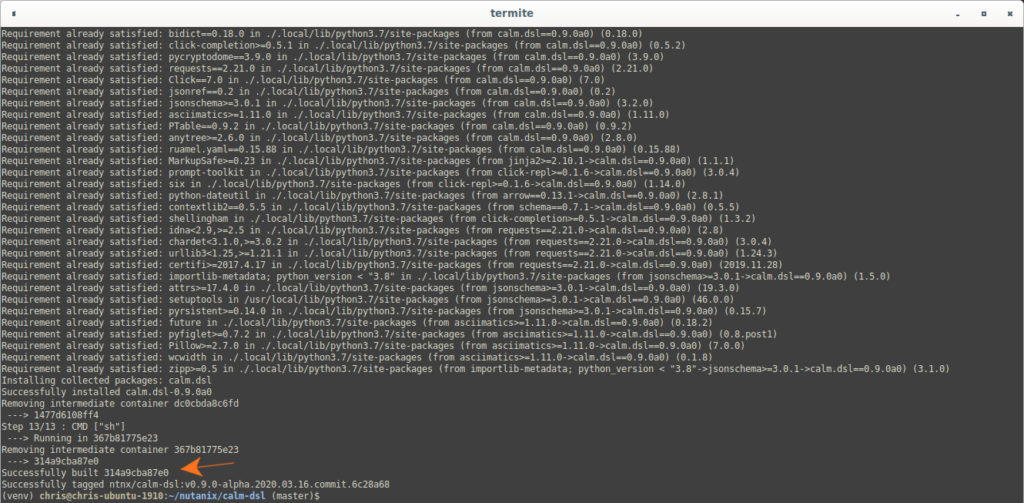
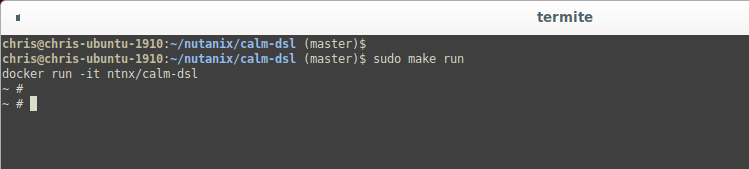
With the dependencies installed and the container built, we can now run the container itself:
sudo make runAs the final Docker container step, we can simply run our container:
Initialisation & Testing
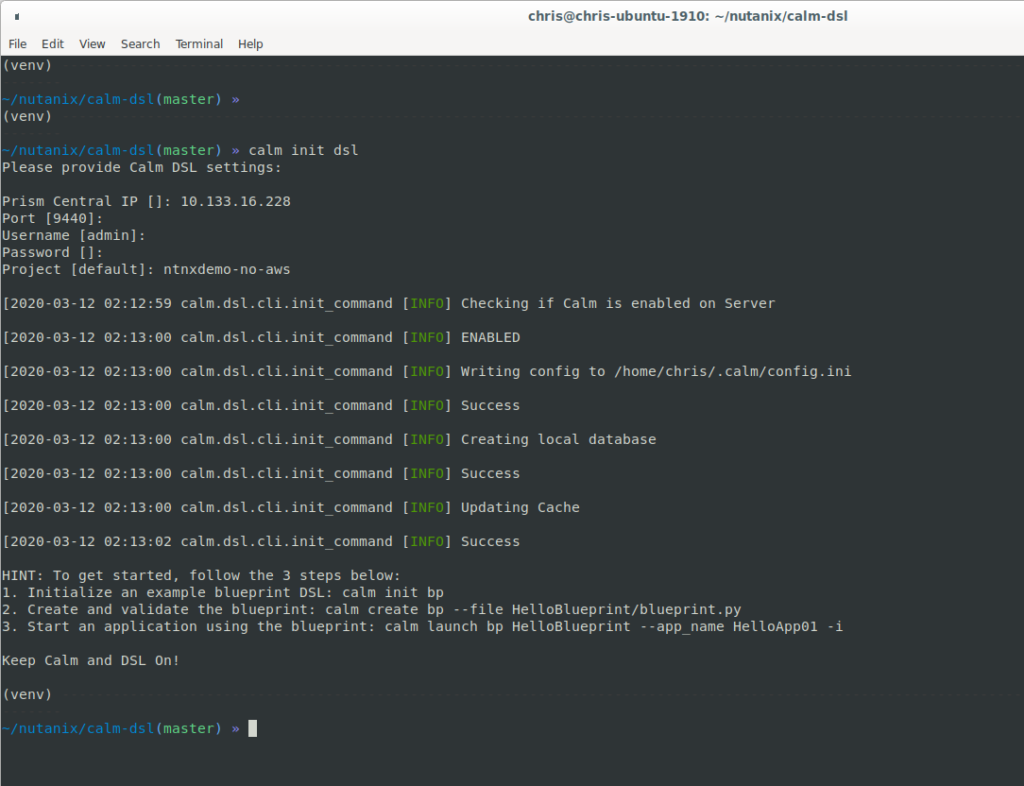
With the development environment or docker container available, we’re now ready to initialise the Calm DSL itself. From the same directory as the Calm DSL or from within your container, run the command below and follow the prompts.
calm init dslAs shown in the following screenshot, we’ve provided some information about our environment including the IP address of our Prism Central (PC) instance, credentials and the project we’ll be working with. There are no errors in this example so we can start using the DSL now!
A Quick Usage Example
With the Nutanix Calm DSL now installed and our development environment ready, let’s look at the most basic example there – listing the Calm blueprints available in our specified Prism Central instance.
Proceed as shown below.
calm get bpsRunning this command will return a list of all blueprints available in our PC instance and some information about each of them.
Note: To allow for correct formatting, the screenshot below has had some content trimmed out. Running this command in a real environment will show the full blueprint description, UUID etc.
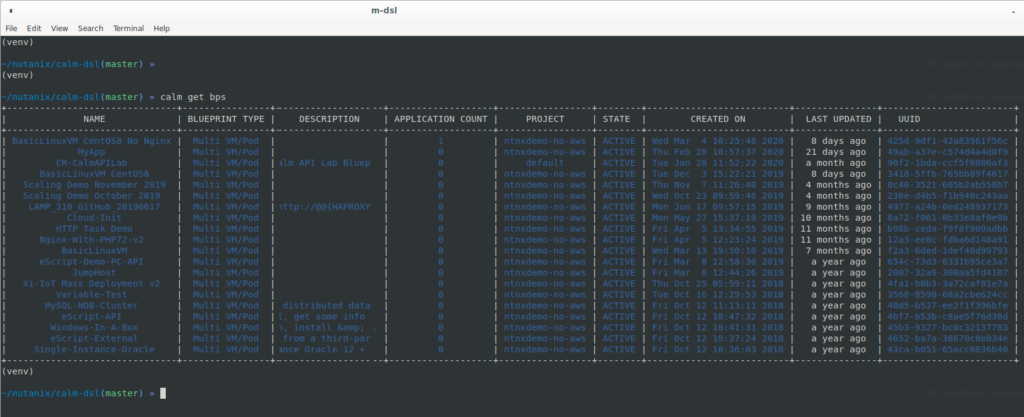
As you can see, all our blueprints are listed along with their details. What else can we do with the Nutanix Calm DSL, though?
Initialise a new Calm Blueprint
With our setup and basic usage example out of the way, let’s now use the Calm DSL to create a new blueprint. The engineering team behind the Calm DSL has made this extremely easy for us and built-in a way to create a demo blueprint with about as close to no effort as possible.
Run the following command.
calm init bp
But what exactly has happened here? The Calm DSL has created called HelloBlueprint and, within that folder, has created a file called blueprint.py plus all the accompanying files required to generate a Calm blueprint on our Prism Central instance.
At this point, the blueprint is only on our local/development system only and has not yet been uploaded to Prism Central. That’s partially why, if you were to run “calm get bps” again, you wouldn’t see HelloBlueprint listed. We now have the opportunity to edit the blueprint.py file and any of the other accompanying files so that the blueprint does exactly what we need it to. With that completed, we can then create an upload-able JSON specification that Prism Central will know how to use. Let’s take a quick look at the blueprint.py file.
blueprint.py – Quick Look
One of the great things about the generated blueprint.py file is that it documents a lot of itself within itself. Documentation inception, maybe? 🙂 Anyway, poor movie references aside, we can also note the following points.
- The required Python modules and libraries are imported right the start.
- An SSH credential with username “centos” and the public key contained in “keys/centos_pub” is created. This is a good example of one of the files we can modify to suit our needs i.e. the credential’s public key file.
- A Calm “configuration” is defined that specifies where Calm can look for this blueprint’s disk images. In this context, a disk image can be used as the base disk when creating our application VMs.
- We’re then defining the Calm “service” actions i.e. the tasks that Calm will go through when deploying our application VMs. The default generated example even includes a custom action that can be run any time after the application is up and running.
- In a similar way, we are then defining the packages that run during application deployment. Packages, in this example, are the installation and uninstallation scripts that run when the application is either created or destroyed.
- The blueprint’s single VM specifications are defined, i.e. the number of vCPUs, RAM and disks, as well as a Cloud-Init script that creates our previously-defined CentOS credential.
- The VM itself is defined based on the previous VM specifications. One good thing about doing it this way is we can specify a set of specifications that can be applied to multiple VMs e.g. those that all have the same spec. This is very common in applications that use clustered services, for example.
- Our main deployment is then defined. Note that the deployment inherits the previously-created package and substrate definitions.
- The application profile is created, including items such as profile variables that can be specified by the user at runtime.
- As a final step, the main blueprint item is defined as an instance of the Blueprint type. This blueprint instance has properties that is created using the credentials etc that were in previous steps. The method shown here nicely packages everything into a clean and easy-to-read object, making the blueprint specification very easy to understand.
blueprint.py – Upload
Now that we have a slightly better idea of how our blueprints can be written as Python code, we can generate the JSON blueprint ready for upload. To do this, run the following command.
calm compile bp --file HelloBlueprint/blueprint.pyThe output of this command is the JSON that can be uploaded to Prism Central. This method is useful for piping the complete JSON specification into a separate command, for example a Prism Central v3 API call that creates a blueprint from a third party application.
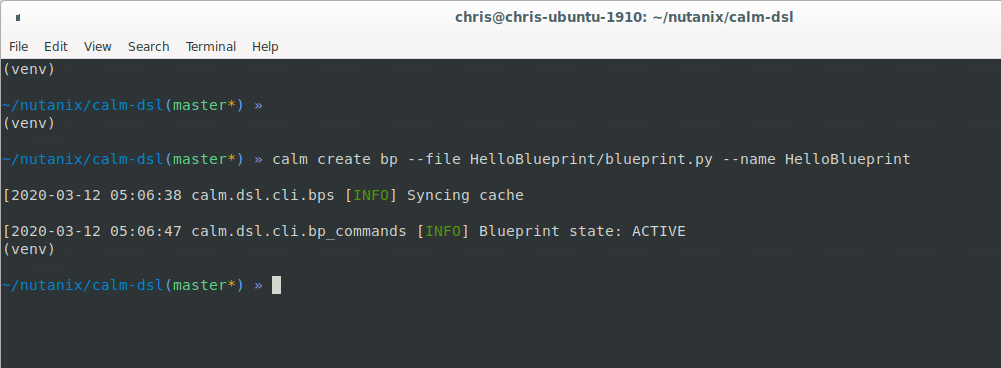
In our example, though, we’re using the Calm DSL for everything, so let’s upload our new blueprint the “proper” way. The following command shows how to do this. Please note the value of “–name” must be unique and not be in use already.
calm create bp --file HelloBlueprint/blueprint.py --name HelloBlueprintLooking at the results, we can see that our blueprint has been created and has been automatically set to a state of ACTIVE. This indicates the blueprint is ready to be launched.
If we wanted to, we could now login to Prism Central and check that our blueprint has been created, but let’s stay in the terminal and complete the last steps there.
The Calm DSL GitHub repo tells is we can use the DSL itself to get help on various things. In this example, we want work with listing blueprints, but we’re not yet sure how to do it. Let’s try this:
calm get bps --helpOk, that shows us that the “–name” parameter can be used to search for blueprints by name. Logically, we can now use this command to look for our new blueprint.
calm get bps --name HelloBlueprintLet’s look at the results!
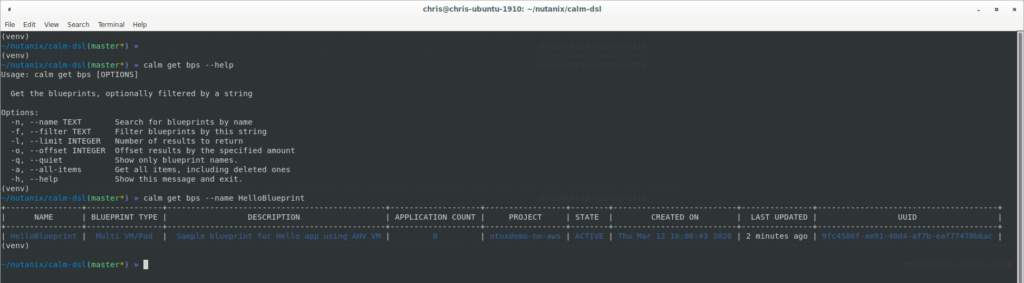
This screenshot is quite large but we can see exactly what we were expecting. The help that shows us how to search by name and then the results of the search itself.
blueprint.py – Launch!
As a last and final step, it’s worth considering that our blueprint isn’t much if it just sits there and isn’t used. With that in mind, let’s finish up by launching the blueprint and getting our sample application up and running.
In the same terminal we’ve used throughout today’s article (or your Calm DSL container), we’ll use the following command. This also shows how we can get info about our application after launching it. Note that because I’ve done this on my cluster numerous times, I’m using a number on the end so that I don’t get application name conflicts.
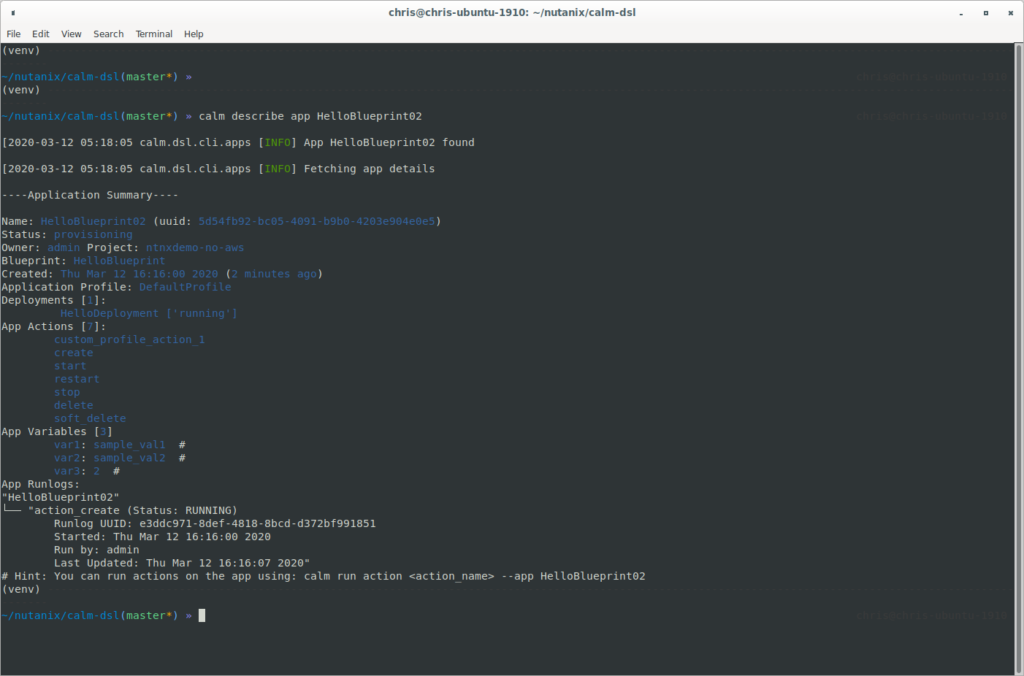
calm launch bp HelloBlueprint --app_name HelloBlueprint02 -i
calm describe app HelloBlueprint02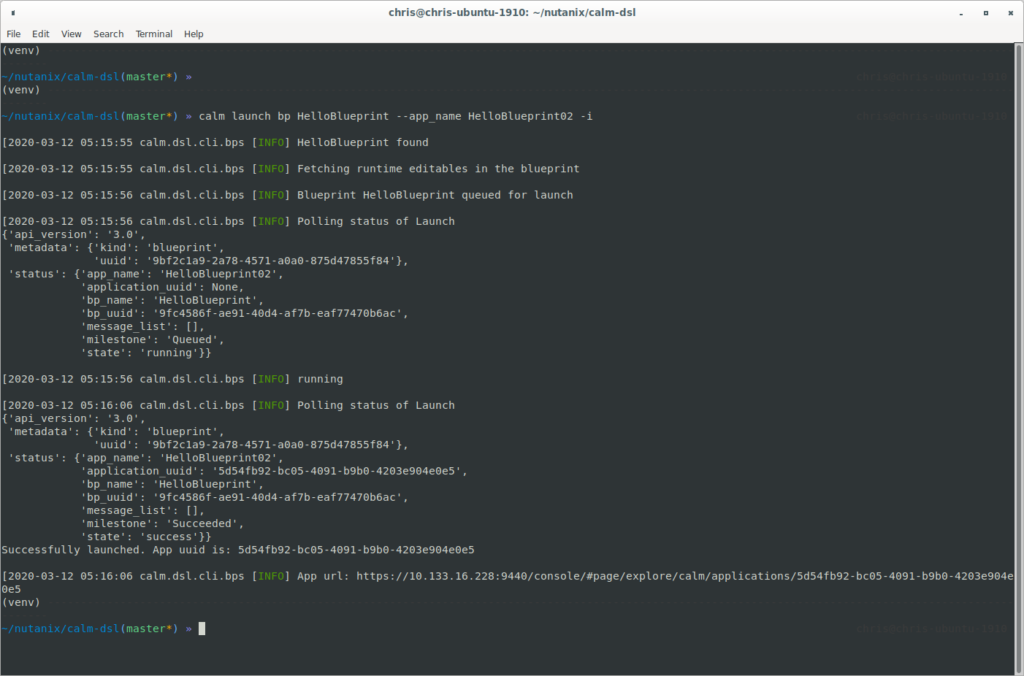
Wrapping Up
Of course, this only scratches the surface of what we can do with the Calm DSL, so next time we’ll dig a little deeper and look at creating our own custom blueprint from scratch.
Hopefully this brief look into the Nutanix Calm DSL has provided another example of how the Nutanix platform and ecosystem can be manipulated via code.
Don’t forget to check out the official resources below.
Official Resources
- Nutanix Calm DSL on GitHub, including video content from Michael Haigh, Technical Marketing Engineer at Nutanix. Michael’s videos are clear, easy to understand and may help those that prefer to consume content in video format. Thanks Michael!
- Nutanix Developer re-launched code samples
- Nutanix Developer re-launched labs
Thanks for reading and have a great day! 🙂