

In our recent post, titled Introducing the Nutanix Calm DSL, we did exactly what the title says and introduced the Nutanix Calm DSL. The DSL, to summarise really quickly for our use case, is a domain-specific language that allows interaction with Calm specifically, by way of a local binary simply called “calm” or with the same binary running inside a Docker container.
Just a heads-up: this article may end up being quite long so settle in and prepare to get nerdy. 🙂
Blueprint Architecture
To get started, I’ll introduce this article by pointing you to the Nutanix Calm DSL documentation. This contains the “official” version of the blueprint architecture, along with a video that outlines a number of the architecture’s main constructs.
However, because we’re going to be creating our own blueprint in this article, I’ll go into a little more depth on the parts specific to our requirements.
We’ll go through every section of the blueprint Python code, explaining what each section does as we go.
What will our blueprint do?
Those with exposure to Nutanix Calm in the past will likely be familiar with the ubiquitous LAMP blueprint. This blueprint carries out the following main steps.
- Deploys four servers, default:
- 1x HAProxy for our web application entry point
- 2x Apache web servers to serve our application
- 1x MySQL database server to store our application’s persistent state
- Configures each of the four servers with installation scripts that install HA Proxy, Apache HTTP and MySQL, respectively
- Deploys a basic website and a single custom page to demonstrate the operation of our application
This application is also very common in application design content as it demonstrates the concept of a 3-tier application, that is, an application where each individual component of the application (HAProxy, Apache HTTP, Database) is broken into discrete tiers or servers.
Dev System
Please note I will be continuing this article on the same system I used in the introductory article:
- Ubuntu 19.10 Desktop
- Visual Studio Code as the code editor
- A connection from here to my Prism Central 5.11 instance
I’m also assuming that you’re familiar with basic operating system navigation i.e. creating new files, opening a terminal, changing directories within that terminal and that the tilde (~) means your home directory.
Creating the Blueprint
For this blueprint to function as expected, we need to setup a few things first. I’ll go through each part in relatively high detail but will dig a little deeper into the parts that need it.
SSH keys
This blueprint requires authentication via an SSH key pair credential. When required, Nutanix Calm can operate quite happily with username/password credentials. On Ubuntu and on many other Linux-based systems, we can generate our SSH key pair with a single command. You are free to use your own key if you choose but let’s generate a new key now.
Note: Please don’t password-protect your SSH key at this stage. I’m using noreply@acme.com for my email address and won’t be giving this key any permissions on any system. It is for demo purposes only and will be generated as follows. In the screenshot you can see I’ve explicitly told the key generator to save the new key as ~/.ssh/demo.
ssh-keygen -t rsa -b 4096 -C noreply@acme.com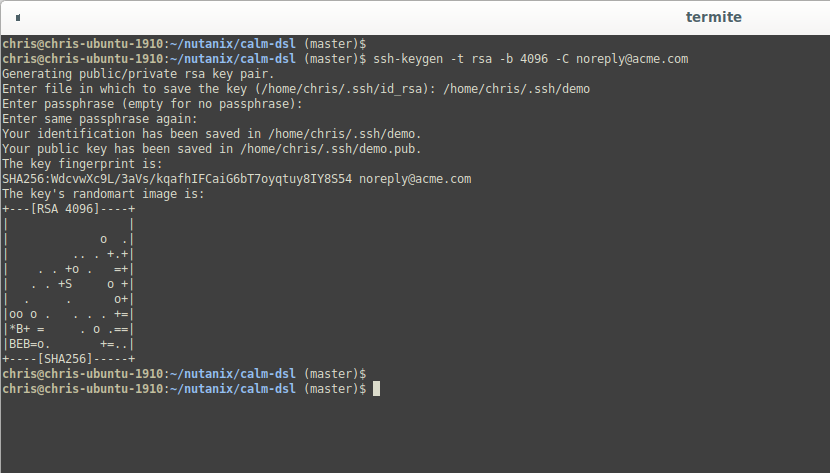
Placing SSH Keys
This part is important. 🙂 When using credentials with any system, it is critical that you don’t push those credentials to public source control. There are plenty of cases where someone’s accidentally pushed their username/password to GitHub and then found those credentials have been compromised.
When working with the Nutanix Calm DSL, we’re going to make sure our credentials are stored outside the blueprint directory structure. This ensures they can’t be accidentally pushed to source control in the event that you create a public repository for your blueprints.
However, and this is the important part, the Nutanix Calm DSL will look for local files in a specific locations. My blueprint is located here:
~/data/solutions/nutanix/dsl-samples/lamp-v4We’ll get to this shortly, but there’s a DSL statement called read_local_file that will look in the following directories, in this order:
- Blueprint root, in a folder named .local/
- Based on the blueprint location above that would be ~/data/solutions/nutanix/dsl-samples/lamp-v4/.local/
- In ~/.calm/.local/
This means that if you do end up storing your credentials in the .local/ folder within the blueprint structure, it’s possible you could accidentally push those to source control. Don’t do that. 🙂
Luckily, the way around this is simple. When generating our keys above, we ended up with a private key and public key. To place the keys, here’s what I did.
- Created a folder named ~/.calm/local/keys/ (note the ~/.calm folder may already exist)
- Copied ~/.ssh/demo to ~/.calm/.local/keys/centos_priv
- Copied ~/.ssh/demo.pub to ~/.calm/.local/keys/centos_pub
Creating lamp-v4.py and supporting files
This Nutanix Calm DSL blueprint will be written using Python 3. I’m also completing these steps within a virtual environment as outlined in the Introducing the Nutanix Calm DSL article.
- Create a folder to store your blueprints. For this article, the files are located in ~/data/solutions/nutanix/dsl-samples/lamp-v4.
- Within your blueprint’s folder, create a single file named lamp-v4.py. This Python file is the blueprint itself and is what the Calm DSL will use to create the blueprint on Prism Central.
- Although it’s not strictly necessary, we are also going to structure our VM specs and the related deployment scripts in easily identifiable folders. Create those now:
- <blueprint_root>/specs
- <blueprint_root>/scripts
MySQL Server Spec – specs/mysql-spec.yaml
While we can specify our VM specifications directly in the blueprint’s Python code, this blueprint is going to be laid out using a modular structure. That means breaking our services’ specs into standalone YAML files. Take a look at the YAML spec below.
categories: {}
name: MYSQL
resources:
  boot_config:
    boot_device:
      disk_address:
        adapter_type: SCSI
        device_index: 0
  disk_list:
  - data_source_reference:
      kind: app_package
      name: CENTOS_7_CLOUD
    device_properties:
      device_type: DISK
      disk_address:
        adapter_type: SCSI
        device_index: 0
    disk_size_mib: 0
  guest_customization:
    cloud_init:
      user_data: |
        #cloud-config
        users:
        - name: centos
          ssh-authorized-keys:
          - '@@{CENTOS.public_key}@@'
          sudo:
          - ALL=(ALL) NOPASSWD:ALL
  memory_size_mib: 4096
  nic_list:
  - ip_endpoint_list: []
    network_function_nic_type: INGRESS
    nic_type: NORMAL_NIC
    subnet_reference:
      kind: subnet
      uuid: f5606fed-2c33-45e8-9ccf-303db6eb93d8
  num_sockets: 2
  num_vcpus_per_socket: 1
Although this will be new to those just getting started with the Nutanix Calm DSL, the information above is actually quite self-explanatory. Some of the highlights are as follows.
- Line 2: The VM name will be set as MYSQL.
- Lines 9-18: The VM will have will have a single SCSI disk attached at device index 0, and that disk will be created from the downloadable blueprint image named CENTOS_7_CLOUD. More on that shortly.
- Lines 19-28: The Linux VM will be created and then customised using Cloud-Init based on the embedded YAML spec above
- Lines 29, 37 and 38: The VM will have 4GiB RAM and 2x single-socket CPUs.
- Lines 30-36: The VM will be configured with a single network interface card connected to the Acropolis network with UUID f5606fed-2c33-45e8-9ccf-303db6eb93d8.
Based on this information, we can create specs/mysql-spec.yaml and copy/paste the above YAML into it. If you haven’t done so already, please do that now.
Apache PHP, HAProxy and MySQL Server Spec files
However our LAMP blueprint doesn’t just contain a single VM; it contains 4x VMs (by default). For the sake of simplicity all will be configured based on appropriately-named YAML files. Rather than include each file directly in this article, links to all the required files are available below; please grab copies of each file and place them as indicated. At this point you have already created specs/mysql-spec.yaml. If so, you don’t need to create it again.
- <blueprint_root>/specs/apache-php-spec.yaml
- <blueprint_root>/specs/haproxy-spec.yaml
- <blueprint_root>/specs/mysql-spec.yaml
In another upcoming article I’ll go into a bit more detail about generating these YAML specs using the DSL itself.
Mini quiz: Why are there only 3 files but 4 total servers?
Package Installation Scripts
When creating a blueprint using Nutanix Calm, you can quickly configure the scripts and tasks that run on each deployed VM. These tasks run at various stages of the deployment and can also be configured to run on-demand or when the application is destroyed, for example.
Each of our 4 servers has its own package installation script that runs as part of the VM’s creation process. These scripts can do almost anything you like, but in this case they do the following:
- MySQL Server: Installs, enables and starts the MySQL database, sets the root password based on a variable we’ll define shortly, then runs some quick SQL commands to configure some database settings.
- Apache PHP Server: Installs, enables and starts the Apache HTTP web server, installs and configures PHP 5.6, creates a simple default website and creates a basic info.php file that shows information about the server’s PHP configuration.
- HAProxy Server: Installs, enables and starts the HA Proxy services, configures HA Proxy by enabling the /stats page on port 8080 and adding the array of Apache PHP web servers as available hosts. This part is important as it shows a great example of how to work with Calm “array” services.
To get these all working, continue as follows.
- Download apache-php-install.sh and save it as scripts/apache-php-install.sh
- Download haproxy-install.sh and save it as scripts/haproxy-install.sh
- Download mysql-install.sh and save it as scripts/mysql-install.sh
Because these scripts are generic Linux terminal commands, we won’t go into detail about each command contained in them.
Additional Scripts
Those of you that may have had a look around the repository will have noticed there are other scripts available in addition to those mentioned above. They will be explained in a little more detail shortly but let’s save a little time and add them to our folder structure now.
- Download haproxy-scalein.sh, haproxy-scaleout.sh, mysql-backup.sh and mysql-restore.sh
- Copy or save each downloaded file into the scripts/ folder, making sure to preserve the original filenames
The workhorse – lamp-v4.py
Just for a moment, let’s a pause and look over what we’ve done so far.
- Generated our SSH key pair and moved the files to ~/.calm/.local
- Created and placed our service/VM specs into appropriate YAML files in the specs/ directory
- Placed our service/VM package installation scripts into the scripts/ directory
- Downloaded some supplemental scripts that will be explained shortly (yep, I’m saying that a lot but I promise it’s true!)
In this context, none of these files are particularly useful on their own. We’ll change that now by going through almost the entire lamp-v4.py file and looking at each important part. Please feel free to copy/paste each part of the file into your own as we go through it, although a completed version of lamp-v4.py is also available on GitHub.
First, to ensure our Python blueprint produces as few flake8 warnings as possible, we’ll format the file according to typical best practices.
Pro tip: The following command can be used to quickly format a DSL Python file using flake8 best practices:
calm format bp --file [blueprint.py file]Let’s start creating lamp-v4.py now.
"""
    LAMP v4
    Nutanix Calm DSL blueprint designed to replicate
    the Calm Marketplace "LAMP" blueprint
"""

import os

from calm.dsl.builtins import (
    ref,
    basic_cred,
    CalmTask,
    action,
    CalmVariable as Variable
)
from calm.dsl.builtins import Service, Package, Substrate
from calm.dsl.builtins import Deployment, Profile, Blueprint
from calm.dsl.builtins import (
    read_local_file,
    vm_disk_package,
)
from calm.dsl.builtins import read_ahv_spec<br>
The opening section of our Python blueprint ensures we have the required modules and libraries this specific blueprint needs. The DSL provides additional references for tasks we don’t use in this blueprint, but flake8 requires that we don’t reference those unless they’re used.
"""
Use the locally-stored private and public key files to generate
an SSH-based credential
This credential will be used as the default credential within the blueprint
Note the Calm DSL will look in .local in the Blueprint root
then ~/.calm/.local when using read_local_file (in that order)
"""
CENTOS_USER = "centos"
CENTOS_KEY = read_local_file(os.path.join("keys", "centos_priv"))
CENTOS_PUBLIC_KEY = read_local_file(os.path.join("keys", "centos_pub"))
default_credential = basic_cred(
    CENTOS_USER, CENTOS_KEY, name="CENTOS", type="KEY", default=True,
)
In one of the setup steps for this blueprint, we setup centos_priv and centos_pub in ~/.calm/.local/keys. This is where you can see those files being accessed with read_local_file as mentioned earlier. With those keys, we are creating a basic_cred object of type key and are setting this new credential to be the default for the blueprint. At this time, we are only defining the credential and haven’t actually used it, yet. The credential will be used in a very short time when we link it to the service deployments.
class MySQLService(Service):
    """
    Service definition for our MySQL server
    Note the VM's installation package is specified further down within this
    blueprint spec and the VM's specifications (CPU/RAM etc) are specified
    in the external files stored in specs/
    """
    @action
    def __create__():
        """Application MySQL database server"""


class APACHE_PHP(Service):
    """
    Similar to the MySQL server, this is the definition for our Apache PHP
    server.  All VM specs are provided the same way, but note the Apache PHP
    servers have an explicit dependency on the MySQL server, indicated by
    the "dependencies" statement.  These dependencies instruct Calm to "wait"
    until the dependent service is completely deployed before beginning to
    deploy this one.
    """

    dependencies = [ref(MySQLService)]

    @action
    def __create__():
        """Application web servers"""


class HAProxyService(Service):

    dependencies = [ref(APACHE_PHP)]

    @action
    def __create__():
        """HAProxy application entry point"""
After creating the credential, we can start setting up the structure for the VMs that will be part of our application. As you can see above, these are essentially “shells” in this example i.e. there’s really not a lot going in each of them.
The one key thing to notice, however, is that our application does contain dependencies. In Nutanix Calm, a service dependency defines the order in which VMs must be created, that is, “this VM must be created successfully before that VM can be created”. The word “successfully” is key there, as Calm will make sure an application doesn’t just continue to be blindly deployed unless certain things are successful along the way. Here are the dependencies that defined above:
- The HA Proxy server needs to know the IP addresses of the Apache PHP servers
- The Apache PHP Servers need to know the IP address of the MySQL server
- By creating these dependencies, we can ensure this information is available to each relevant server at the time of deployment.
class HAProxyPackage(Package):
    """
    Here we are specifying the packages that will run at various steps during
    the deployment.  In this example, we are configuring a Package Install Task
    that will have its code pulled from the scripts/haproxy-install.sh script.
    At the same time, we are also specifying which Calm service (VM) this
    package will be associated with
    """

    services = [ref(HAProxyService)]

    @action
    def __install__():
        """Package installation tasks for the HAProxy server"""

        CalmTask.Exec.ssh(
            name="PackageInstallTask",
            filename="scripts/haproxy-install.sh",
            target=ref(HAProxyService)
        )


class ApachePHPPackage(Package):

    services = [ref(APACHE_PHP)]

    @action
    def __install__():
        """Package installation tasks for the Nginx web servers"""

        CalmTask.Exec.ssh(
            name="PackageInstallTask",
            filename="scripts/apache-php-install.sh",
            target=ref(APACHE_PHP)
        )


class MySQLPackage(Package):

    services = [ref(MySQLService)]

    @action
    def __install__():
        """Package installation tasks for the MySQL database server"""

        CalmTask.Exec.ssh(
            name="PackageInstallTask",
            filename="scripts/mysql-install.sh",
            target=ref(MySQLService)
        )
With the VM “shells” defined, we can move on to defining the packages that will apply to each of our services. A package can include multiple things but in many cases will simply be used to define package install and uninstall tasks. That’s exactly what is happening here i.e. each of the packages above is being configured with a single “Package Install” task and then being told which script to run as part of that task.
As promised earlier, this is where we finally start connecting more of the application’s “dots” – the additional scripts we downloaded earlier and saved into the ./scripts/ folder.
"""
Disk image that will be used as the base images for all services/VMs
in this application
"""
CENTOS_7_CLOUD = vm_disk_package(
    name="CENTOS_7_CLOUD",
    description="",
    config={
        "image": {
            "name": "CentOS-7-x86_64-1810.qcow2",
            "type": "DISK_IMAGE",
            "source": "http://download.nutanix.com/calm/CentOS-7-x86_64-1810.qcow2",
            "architecture": "X86_64",
        },
        "product": {"name": "CentOS", "version": "7"},
        "checksum": {},
    },
)
When a VM is deployed using Nutanix Calm, it is fairly typical for the VM to have an attached disk of some sort. This could be an OS image e.g. Linux that is configured with Cloud-Init or Windows that is then configure with Sysprep, or even an entire VM if an appropriate image has been prepared.
Throughout Nutanix Calm marketplace apps like LAMP and others, you’ll often see the Linux VMs have been initially created based on an image from download.nutanix.com. In this case that’s what is happening although we’re currently just defining the configuration for a downloadable Calm image. Calm will check to see if this image exists and, if it doesn’t, will create an image that can be used for disk cloning purposes when ready.
Here, we have defined the configuration for a downloadable image to use as the base disk for our services. You’ll recall that the downloadable CENTOS_7_CLOUD image was defined in our VM’s YAML spec earlier.
class MySQLSubstrate(Substrate):
    """
    The Calm Substrate outlines the "wrapper" for our VM, e.g. the VM's
    operating system, the VM spec from specs/mysql-spec.yaml, the disks
    the VM will have attached etc.
    """

    os_type = "Linux"
    provider_type = "AHV_VM"
    provider_spec = read_ahv_spec(
        "specs/mysql-spec.yaml", disk_packages={1: CENTOS_7_CLOUD}
    )
    readiness_probe = {
        "connection_type": "SSH",
        "connection_port": 22,
        "connection_protocol": "",
        "timeout_secs": "",
        "delay_secs": "60",
        "retries": "5",
        "address": "@@{platform.status.resources.nic_list[0].ip_endpoint_list[0].ip}@@",
        "disabled": False,
    }
    readiness_probe["credential"] = ref(default_credential)


class ApachePHPSubstrate(Substrate):

    os_type = "Linux"
    provider_type = "AHV_VM"
    provider_spec = read_ahv_spec(
        "specs/apache-php-spec.yaml", disk_packages={1: CENTOS_7_CLOUD}
    )
    readiness_probe = {
        "connection_type": "SSH",
        "connection_port": 22,
        "connection_protocol": "",
        "timeout_secs": "",
        "delay_secs": "60",
        "retries": "5",
        "address": "@@{platform.status.resources.nic_list[0].ip_endpoint_list[0].ip}@@",
        "disabled": False,
    }
    readiness_probe["credential"] = ref(default_credential)


class HAProxySubstrate(Substrate):

    os_type = "Linux"
    provider_type = "AHV_VM"
    provider_spec = read_ahv_spec(
        "specs/haproxy-spec.yaml", disk_packages={1: CENTOS_7_CLOUD}
    )
    readiness_probe = {
        "connection_type": "SSH",
        "connection_port": 22,
        "connection_protocol": "",
        "timeout_secs": "",
        "delay_secs": "60",
        "retries": "5",
        "address": "@@{platform.status.resources.nic_list[0].ip_endpoint_list[0].ip}@@",
        "disabled": False,
    }
    readiness_probe["credential"] = ref(default_credential)
Here are we are creating the blueprint substrate and configuration for the application’s services (VMs).
For each, you’ll notice the specification of:
- VM operating system
- Provider type i.e. where the VM will live (a Nutanix AHV cluster in this instance)
- The YAML spec file that will tell Calm how to configure the VM’s hardware specification. You’ll recall these YAML spec files included things like CPU, RAM and disk configuration (etc) for the VM.
- Lastly, Calm is being told how to test to make sure the VM is ready for post-creation actions as well as the credential to use for these tests.
class MySQLDeployment(Deployment):
    """
    The Calm DSL "Deployment" will allow us to specify things like min and max
    replicas, a key setting that will be used when a VM array is required.
    In our application example, this is critical because the Apache PHP servers
    can be scaled in or out when we add our scaling scripts later.
    """

    min_replicas = "1"
    max_replicas = "1"

    packages = [ref(MySQLPackage)]
    substrate = ref(MySQLSubstrate)


class ApachePHPDeployment(Deployment):

    min_replicas = "2"
    max_replicas = "3"

    packages = [ref(ApachePHPPackage)]
    substrate = ref(ApachePHPSubstrate)


class HAProxyDeployment(Deployment):

    min_replicas = "1"
    max_replicas = "1"

    packages = [ref(HAProxyPackage)]
    substrate = ref(HAProxySubstrate)
This is where things get interesting as it’s the one of the first points where the previously defined services, substrates, packages and deployments start getting tied together.
In each of the 3 Calm DSL deployment definitions above, you’ll see that each has been told which of our previously-defined packages and substrates to use.
However, take specific note of the ApachePHPDeployment definition. Unlike the MySQLDeployment and HAProxyDeployment definitions, the ApachePHPDeployment definition doesn’t create a single VM and then stop there. It creates at least 2 Apache PHP servers and is then told that the array of services (VMs) can grow to a maximum of 3. Why? In cluster scenarios, it may be important to control the minimum number of servers an application requires to run, while also making sure an environment’s resources aren’t exhausted by deploying an infinite number of servers.
Earlier in the article I posed a quick question i.e. Why are there only 3 files but 4 total servers? This is why. 1x MySQL server, 1x HA Proxy server and 2x Apache Web Servers running as a Calm array.
We’re making good progress now and have defined a whole lot of the requirements for our overall blueprint. The next section is reasonably long, so let’s dig right in.
class Default(Profile):
deployments = [MySQLDeployment, ApachePHPDeployment, HAProxyDeployment]
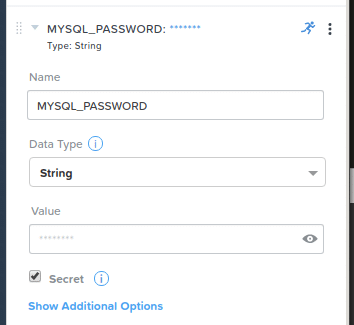
# runtime variable for user to provide MySQL database password
MYSQL_PASSWORD = Variable.Simple.Secret("", runtime=True)
"""
These custom profile actions control our ScaleOut and ScaleIn
requirements
"""
@action
def ScaleOut():
"""Profile action for scaling out our web servers"""
"""
Custom action variable that allows the user to specify the
ScaleOut value i.e. how many new Apache PHP web servers to deploy
"""
COUNT = Variable.Simple.int("1", runtime=True)
CalmTask.Scaling.scale_out(
"@@{COUNT}@@", target=ref(ApachePHPDeployment), name="Scale Out"
)
"""
Specify which script will be setup to run when the custom
action is run, then specify which services/VMs this script
will run on
"""
CalmTask.Exec.ssh(
name="ConfigureHAProxy",
filename="scripts/haproxy-scaleout.sh",
target=ref(HAProxyService),
)
@action
def ScaleIn():
"""Profile action for scaling in our web servers"""
"""
Custom action variable that allows the user to specify the
ScaleIn value i.e. how many new Apache PHP web servers to destroy
"""
COUNT = Variable.Simple.int("1", runtime=True)
CalmTask.Scaling.scale_in(
"@@{COUNT}@@", target=ref(ApachePHPDeployment), name="Scale In"
)
"""
Specify which script will be setup to run when the custom
action is run, then specify which services/VMs this script
will run on
"""
CalmTask.Exec.ssh(
name="ConfigureHAProxy",
filename="scripts/haproxy-scalein.sh",
target=ref(HAProxyService),
)
@action
def DBBackup():
"""Profile action for backing up the MySQL database"""
"""
Custom action variable that allows the user to specify the
ScaleIn value i.e. how many new Apache PHP web servers to destroy
"""
BACKUP_FILE_PATH = Variable.Simple("~/db_backup",
runtime=True)
"""
Specify which script will be setup to run when the custom
action is run, then specify which services/VMs this script
will run on
"""
CalmTask.Exec.ssh(
name="BackupDatabase",
filename="scripts/mysql-backup.sh",
target=ref(MySQLService),
)
@action
def DBRestore():
"""Profile action for restoring the MySQL database"""
"""
Custom action variable that allows the user to specify the
ScaleIn value i.e. how many new Apache PHP web servers to destroy
"""
RESTORE_FILE_PATH = Variable.Simple("~/db_backup/db_dump.sql.gz",
runtime=True)
"""
Specify which script will be setup to run when the custom
action is run, then specify which services/VMs this script
will run on
"""
CalmTask.Exec.ssh(
name="RestoreDatabase",
filename="scripts/mysql-restore.sh",
target=ref(MySQLService),
)
By defining the application profile, we’re doing a number of things. At the simplest level we are:
- Defining which deployments are part of this application (the deployments were defined in the previous section)
- Starting to add variables that allow for the collection of information from the user at the time of application launch
- In this example, we are defining a simple string variable named MYSQL_PASSWORD that will collect the root user password. This password will be assigned to the root user when the database is configured.
- In an upcoming article we’ll cover a little more on the various variable types available to us in the Calm DSL.
- Defining custom service actions that can be launched after the application is running. In our application, we have 4 custom service actions:
- ScaleOut
- ScaleIn
- DBBackup
- DBRestore
The definition of each custom service action is quite similar in this case, so let’s use the ScaleOut action as our example. The ScaleOut custom service action definition is setting up the following things:
- A variable named COUNT. This variable is runtime i.e. allows the user to specify the variable’s value at the time of application launch. Unlike the MYSQL_PASSWORD variable defined earlier, this variable is an integer and defines the scaling value to use when scaling our application up.
- Telling the ApachePHPDeployment to scale the number of servers up by the value of COUNT.
- Running the scripts/haproxy-scaleout.sh script on the HAProxy server.
Note: The order in which you specify these steps is critical. For example, if you defined the CalmTask.Exec.Ssh task before the scale_out task, the HAProxy configuration script would run before the scale out action has even started. In the context of this specific application, it would be deployed and would contain 2 Apache PHP servers. If the HA Proxy configuration script ran before scaling out has completed, it would “think” there are only 2 Apache PHP servers in total. While this is accurate at the time the script ran, this would result in unexpected behaviour. In this instance, we want to make sure the scale out action is complete before the HA Proxy configuration script runs, thereby ensuring the total number of Apache PHP servers is correct, including the new ones. Again in the context of this specific application, this is important because HA Proxy must be configured to work with all members of the Apache PHP server array.
class lamp_v4_bp(Blueprint):
    """Application entry point: http://<haproxy_address>,
    HA Proxy Stats: http://<haproxy_address>:8080/stats"""

    services = [MySQLService, APACHE_PHP, HAProxyService]
    packages = [MySQLPackage, ApachePHPPackage, HAProxyPackage, CENTOS_7_CLOUD]
    substrates = [MySQLSubstrate, ApachePHPSubstrate, HAProxySubstrate]
    profiles = [Default]
    credentials = [default_credential]
The very last part of our blueprint Python is to link everything together. The blueprint itself has a description but also needs to know which services, packages, substrates, profiles and credentials are required during the deployment.
Those with previous exposure to almost any type of development will quickly recognise that the modular nature of this example is not 100% mandatory. The services, substrates, packages etc could be easily defined in-line, resulting in a deployment that would be created the exact same way as our example. In this context, however, “packaging” each definition makes the overall design much cleaner.
Create Blueprint on Prism Central
This is where we can finally see the results of our work – the blueprint can be created and uploaded to Prism Central, all in one simple step.
Making sure you have a terminal open and have access to the calm command (see Introducing the Nutanix Calm DSL if you are yet to do that), let’s do it now. Please change the blueprint path and the name of your application to suit your environment.
calm create bp --file ~/data/solutions/nutanix/dsl-samples/lamp-v4/lamp-v4.py --name LAMP_From_DSL
Our new blueprint has now been parsed by the Nutanix Calm DSL and, because there were no errors, has been uploaded to Prism Central. It is now available for launch at any time we choose. The launch of the blueprint from the Calm UI or from the Calm DSL is slightly outside the scope of this particular article, although an upcoming article will cover an entire DSL workflow in more depth.
Check the Calm UI
As a last step before wrapping up, let’s take a look at our custom blueprint within the Calm UI and see how it looks. Ignore the pricing in the screenshot below.
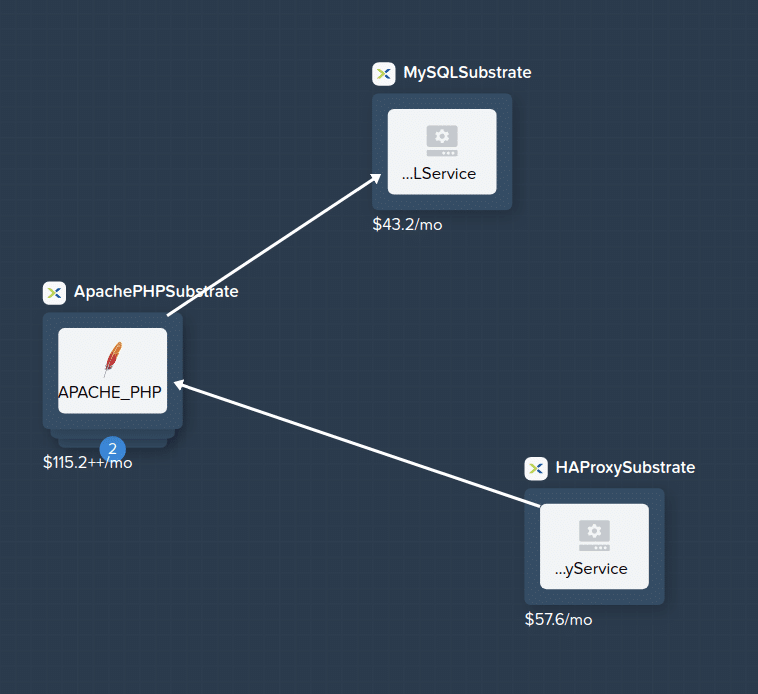
As you can see, our HA Proxy, Apache PHP and MySQL services have been created and are linked to each other as per our dependencies.
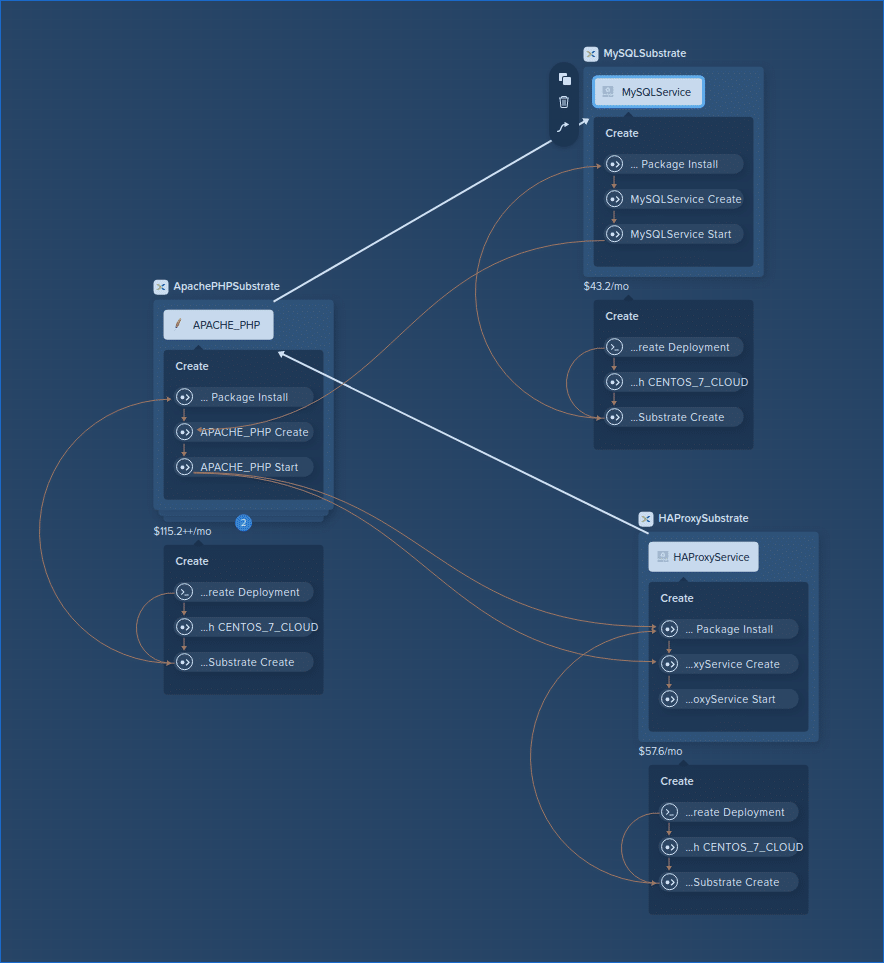
The screenshot below may look a little daunting at first, but it shows how Calm has automatically setup the application deployment workflow. This workflow is the order things will happen as the application is created, including VM deployment and package installation scripts.
Wrapping Up
Hopefully this quick-ish look into the Nutanix Calm DSL and custom blueprint creation has been interesting and informative.
Stay tuned as more DSL-related content is published in the coming days/weeks. As a new way of interacting with Nutanix Calm it’s a great way of automating everything from app creation to deployments.
Thanks for reading and have a great day! 🙂