

In previous weeks I’ve talked a lot about the Nutanix Calm DSL. In conjunction with that, a “home page” of sorts for the Calm DSL was released – a collection of all the articles on Nutanix.dev that relate to that subject.
Today, however, we’re looking at something quite different. While it’s true that the DSL does make heavy use of the Nutanix APIs behind the scenes, this article is going to look at something that is likely part of every automation workflow – creating a VM. Why do that, though? Haven’t we talked about that before? Yes, but today’s example will be slightly different – we’re going to customise that VM using Cloud-Init.
If you aren’t familiar with Cloud-Init, think of it as the rough equivalent of Windows Sysprep i.e. the ability to create and customise a Linux VM during the creation process.
Create a shell VM
While there is other existing material on the basics of creating the a VM using the Nutanix v3 APIs, I’ll quickly go over it again. Hopefully this will help the community get started and use Cloud-Init all in one article.
First, take a look at the Nutanix v3 API POST request and JSON payload below – it will create a basic VM with only the mandatory parameters.
https://<prism_central_ip>:9440/api/nutanix/v3/vmsAlong with this request we need to send a JSON payload that specifies the mandatory parameters required when creating a VM.
{
    "spec": {
        "name": "vm_from_v3_api",
        "resources": {}
    },
    "metadata": {
        "kind": "vm"
    }
}
The highlights of this request are as follows:
- A new VM named “vm_from_v3_api” will be created.
- We haven’t specified the VM specs e.g. vCPU, cores per vCPU, RAM, storage etc. The v3 APIs have some sensible defaults built-in that will still allow a VM to be created, though.
- We’ve specified that the “kind” of entity being created is a “vm“.
There’s no need to run this request just yet – we’re about to expand on this idea and create a VM that’s a bit more useful.
Create a detailed VM
In the real world, it may not be overly useful to create a VM without specifying any sort of spec. Typically, a VM will need to carry out some sort of task, whether it be a web server, a database server, or any number of tasks that can’t even be imagined at this point. Each type of server will likely have some sort of recommended specification based on what it will do – let’s look at how to do that now.
First, the Nutanix v3 API endpoint is exactly the same as what we used above – at the simplest level we’re still doing the same thing i.e. sending an API POST request to create a new VM.
https://<prism_central_ip_address>:9440/api/nutanix/v3/vmsThe other differences begin immediately, though – the JSON payload that is sent along with this request is significantly more detailed than what we used before.
{
	"spec":{
		"name":"{{vm_name}}",
		"resources":{
			"power_state":"ON",
			"num_vcpus_per_socket":1,
			"num_sockets":1,
			"memory_size_mib":1024,
			"disk_list":[{
				"device_properties":{
					"device_type":"DISK",
					"disk_address": {
						"device_index": 0,
						"adapter_type": "SCSI"
					}
				},
				"data_source_reference": {
					"kind": "image",
					"uuid": "{{cloud_init_image_uuid_pc}}"
				}
			},
			{
				"device_properties":{
					"device_type":"CDROM"
				}
			}],
			"nic_list":[{
				"nic_type":"NORMAL_NIC",
				"is_connected":true,
				"ip_endpoint_list":[{
					"ip_type":"DHCP"
				}],
				"subnet_reference":{
					"kind":"subnet",
					"name":"{{subnet_name}}",
					"uuid":"{{subnet_uuid}}"
				}
			}],
			"guest_tools":{
				"nutanix_guest_tools":{
					"state":"ENABLED",
					"iso_mount_state":"MOUNTED"
				}
			}
		},
		"cluster_reference":{
			"kind":"cluster",
			"name":"{{cluster_name}}",
			"uuid":"{{cluster_uuid}}"
		}
	},
	"api_version":"3.1.0",
	"metadata":{
		"kind":"vm"
	}
}
Here are the highlights of this request – please replace the {{placeholder}} variables with values that match your environment.
- Creates a VM named the same as the first request i.e. “vm_from_v3_api“
- Configures the VM with 1x vCPU, 1x core per vCPU, 1GiB RAM
- Adds a SCSI disk at device index 0, cloned from Prism Central image with UUID matching “{{cloud_init_image_uuid_pc}}”
- Important note – Prism Element (API v2.0) and Prism Central (API v3) store images with different UUIDs. Please use the Prism Central image UUID with the payload above.
- Configures the VM with 1x NIC, connected to an AHV network specified by {{subnet_name}} and {{subnet_uuid}}
- Specifies the VM should reside on a cluster specified by {{cluster_name}} and {{cluster_uuid}}
- Powers the VM on after creation
Sending this request now would result in a VM that matches our specification above.
Create a VM the “Cloud-Init” way
Up this point we’ve created VMs using both the “shell” method (minimal parameters) and the detailed method (extended VM specs). What we haven’t done yet is create a VM with Cloud-Init customisation. Let’s do that now.
Cloud-Init Data
Before building our request, here is the Cloud-Init YAML data we’ll use for the request.
#cloud-config
users:
  - name: nutanix
    ssh-authorized-keys:
      - ssh-rsa KEY
    sudo: ['ALL=(ALL) NOPASSWD:ALL']
    groups: sudo
    shell: /bin/bash

packages:
  - httpd
The Cloud-Init user data above carries out the following tasks:
- Create a user named “nutanix” and gives it SUDO access
- Adds the “nutanix” user to the “sudo” group
- Sets the “nutanix” user’s shell to /bin/bash
- Installs the “httpd” package. This is done simply to make Cloud-Init take a bit longer; Cloud-Init can complete very quickly, otherwise.
Note the SSH key has been removed and replaced with “ssh-rsa KEY”. You’ll need to replace “ssh-rsa KEY” with your SSH public key if you plan to use this payload as-is.
Building the API request
It’s worth noting that the API endpoint still does not change for any of these POST requests:
https://<prism_central_ip_address>:9440/api/nutanix/v3/vmsWhat does change again is the JSON payload sent with the request. The payload below is identical to the payload in the previous request but with the addition of the Cloud-Init guest customisation data.
- The Cloud-Init guest customisation section begins with “guest_customization“
- The “cloud_init” and “user_data” parameters instruct AHV to configure the VM with Cloud-Init Config Drive v2 spec and to use the following user data. Note the “user_data” must be supplied in base64-encoded format. Many public tools exist for this purpose, e.g. https://www.base64encode.org/.
And here is the now complete JSON payload, including the guest customisation data.
{
	"spec":{
		"name":"{{vm_name}}",
		"resources":{
			"power_state":"ON",
			"num_vcpus_per_socket":1,
			"num_sockets":1,
			"memory_size_mib":1024,
			"disk_list":[{
				"device_properties":{
					"device_type":"DISK",
					"disk_address": {
						"device_index": 0,
						"adapter_type": "SCSI"
					}
				},
				"data_source_reference": {
					"kind": "image",
					"uuid": "{{cloud_init_image_uuid_pc}}"
				}
			},
			{
				"device_properties":{
					"device_type":"CDROM"
				}
			}],
			"nic_list":[{
				"nic_type":"NORMAL_NIC",
				"is_connected":true,
				"ip_endpoint_list":[{
					"ip_type":"DHCP"
				}],
				"subnet_reference":{
					"kind":"subnet",
					"name":"{{subnet_name}}",
					"uuid":"{{subnet_uuid}}"
				}
			}],
			"guest_tools":{
				"nutanix_guest_tools":{
					"state":"ENABLED",
					"iso_mount_state":"MOUNTED"
				}
			},
			"guest_customization": {
				"cloud_init": {
					"user_data": "I2Nsb3VkLWNvbmZpZwp1c2VyczoKICAtIG5hbWU6IG51dGFuaXgKICAgIHNzaC1hdXRob3JpemVkLWtleXM6CiAgICAgIC0gc3NoLXJzYSBLRVkKICAgIHN1ZG86IFsnQUxMPShBTEwpIE5PUEFTU1dEOkFMTCddCiAgICBncm91cHM6IHN1ZG8KICAgIHNoZWxsOiAvYmluL2Jhc2gKCnBhY2thZ2VzOgogIC0gaHR0cGQ="
				},
				"is_overridable": false
			}
		},
		"cluster_reference":{
			"kind":"cluster",
			"name":"{{cluster_name}}",
			"uuid":"{{cluster_uuid}}"
		}
	},
	"api_version":"3.1.0",
	"metadata":{
		"kind":"vm"
	}
}
Sending the request
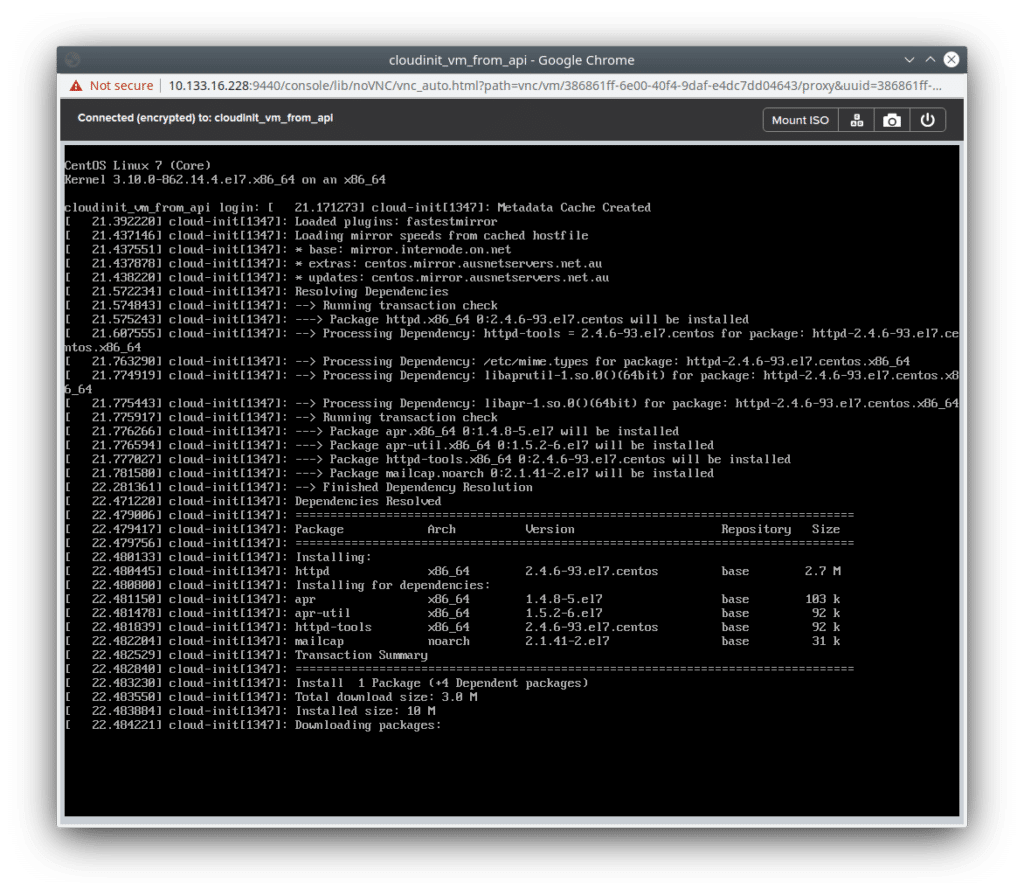
With the API request, payload and guest customisation data completed, we can send the request. The VM create request on its own isn’t overly interesting, so instead we’ll take a look at the VM as it boots. Looking at the AHV VM console, here are the highlights:
- The VM has been created with name “cloudinit_vm_from_api” (this is a little different than before, but can be anything that suits your needs)
- AHV configured the new VM with the Config Drive v2 configuration then powered the VM on
- Cloud-Init “took over” and completed the instructions specified in our Cloud-Init YAML spec
The screenshot below shows the VM booting and Cloud-Init running:
Wrapping Up
As we went through this article, we completed the following steps.
- Re-learnt how to create a basic shell VM with the Nutanix v3 API
- Built on top of the shell VM payload and created a VM with specified configuration (CPU, RAM, disks cloned from images)
- Extended the detailed VM payload with Cloud-Init guest customisation data
Using these approaches, it’s easy to see how the Nutanix v3 APIs can be used to not only create VMs, but to take advantage of industry-accepted approaches such as Cloud-Init for Linux VM customisation.
Thanks for reading and have a great day! 🙂