

Regular readers of Nutanix.dev will be familiar with the Nutanix Calm DSL. If you haven’t yet taken a dive into the Nutanix Calm DSL, please feel welcome to check out the resources below before moving on.
Isn’t that title backwards?
Depending on where you’re standing, yes it could be. Essentially what we’ll cover today is taking a blueprint that’s been designed in the Nutanix Calm UI and decompiling it into DSL Python code. We’ll also take the same blueprint, export it from the Nutanix Calm UI and then decompile it into Python code. Why? The Nutanix Calm DSL is the first Calm SDK and allows programmatic control of many Calm elements – blueprints, for example.
Again, why? In many cases, automation engineers or developers will want to interact with Nutanix Calm from their own scripts, code or applications. By allowing programmatic access to Nutanix Calm via the DSL, this becomes a relatively simple task.
The ability to decompile blueprints is actually quite new, having only been made available in the DSL master branch in mid-July 2020.
Today’s Blueprint
The contents of the blueprint aren’t particularly relevant, since we’re not making any changes to the blueprint itself. That said, I’m working with a blueprint that’s about as basic as they come.
- 1x service (VM)
- Deploys CentOS 7.8 from the public CentOS 7.8 cloud image
- Sets up the VM to allow login with SSH key pair
- Carries out some basic configuration e.g. package updates
What You’ll Need
If you are planning to follow along with the steps in this article, you’ll need to have the Nutanix Calm DSL already setup and connected to Prism Central. The easiest way to do that is to follow the article titled Introducing the Nutanix Calm DSL as it covers the installation of the Calm DSL on Linux, as well as the use of the Calm DSL via Docker Container.
Basic Calm DSL Blueprint Structure
Before getting started, let’s take a quick look at the basic structure of a Calm DSL blueprint. My blueprint, named “BasicLinuxVM”, is as follows. Note this is the structure of the blueprint after it’s been decompiled using the Calm DSL – we’ll get to that step in a moment.
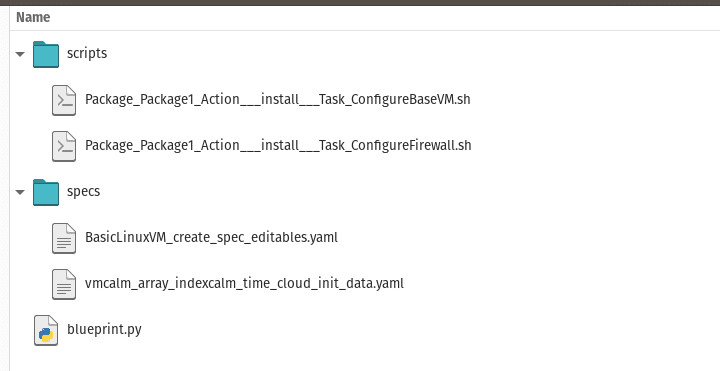
Here are the key components:
- “scripts” directory. This contains the scripts that are used at various stages during the blueprint deployment. In this example, there is a base configuration script (ConfigureBaseVM) and a firewall configuration script (ConfigureFirewall).
- “specs” directory. This contains the specs for our VM, including the Cloud-Init data that’s used during the deployment.
- “blueprint.py”. This is the blueprint itself and ties together the code required by the DSL so that the blueprint can be deployed, launched (etc).
How did we get there?
This is where we get to the main part of today’s article – blueprint decompile. Let’s consider two different blueprint “states”. Please note these shouldn’t be confused with the blueprint “state” within Calm itself e.g. draft and active. Our two states are:
- Accessible via the Nutanix Calm UI
- Available as a local JSON file. These JSON files are typically created when exporting a blueprint from the Calm UI
However, neither of those two states are editable as Nutanix Calm DSL Python blueprints. In order to prepare the blueprint for editing as Python code, we need to decompile it.
Method 1 – Decompiling Blueprint from Prism Central
As mentioned earlier, my blueprint is called “BasicLinuxVM”. With the Nutanix Calm DSL installed and available, we can decompile the blueprint from Prism Central with this simple command.
calm decompile bp BasicLinuxVMRunning that command will proceed as shown below.

Looking a bit closer, we can see the path to the decompiled blueprint is as follows:
/home/chris/Data/solutions/calm-dsl/BasicLinuxVMMethod 2 – Decompiling Blueprint from JSON file
The method above makes great use of a blueprint that you already have access to. However, what if a colleague has provided an exported blueprint from their own Calm instance, and it needs to be edited as DSL Python code? Let’s look at the command required for that. I have a copy of the BasicLinuxVM blueprint in my “~/Downloads” folder as BasicLinuxVM.json.
calm decompile bp --file ~/Downloads/BasicLinuxVM.jsonLet’s take a look at the results of running that command:

In this version, the Calm DSL has carried out an almost identical procedure to that of decompiling from Prism Central, but it has taken input from the local JSON file instead.
Similarities
It’s worth noting at this point that the decompilation of a blueprint from Prism Central and the decompilation of a blueprint from a local JSON file will produce identical results. Both folder structures are the same and contain the same “scripts” and “specs” folders as shown earlier.
Uploading the Blueprint
Now that we have the blueprint available as DSL Python code, we can edit it in any way we see fit. Let’s assume for now that we’ve made our required changes and want to go through the following steps to make the blueprint usable.
- Verify the blueprint can be compiled by the Calm DSL
- Publish the blueprint to Prism Central
Here are the commands we use to do that. Note that the blueprint I’m creating on Prism Central will be called “BasicLinuxVM_Uploaded”.
calm compile bp --file ./BasicLinuxVM/blueprint.py
calm create bp --file ./BasicLinuxVM/blueprint.py --name BasicLinuxVM_Uploaded
The first command will return a full blueprint in JSON format that can be saved to a file or used in any way you see fit. The second command will create a new blueprint on Prism Central, as follows:

At this point it’s worth noting that because the DSL has been developed using Python, it throws easily parse-able exceptions when something goes wrong. That means we can, for example, use standard Bash return code checks to make sure a command worked.
Take a look at this very short Bash script snippet:
calm decompile bp --file "$BP_FULL" > /tmp/null 2>&1
COMPILE_RESULT=$?
These two lines are decompiling a local JSON blueprint the same way as above, sending the output to /tmp/null so it’s not shown on screen and then setting a variable called COMPILE_RESULT that holds the command’s return code. If successful, that return code will be 0, with any other value typically indicating something didn’t work as expected. To expand on that a little, here’s the complete block those two lines came from:
# verify the blueprint is valid
# at this point the blueprint directory and blueprint itself have been found in the user-specified locations
calm decompile bp --file "$BP_FULL" > /tmp/null 2>&1
COMPILE_RESULT=$?
if [ ! "$COMPILE_RESULT" == "0" ]
then
        echo "$ERROR_PREFIX The specified blueprint cannot be decompiled.  Please ensure the blueprint contains valid JSON."
        exit
else
        echo "$OK_PREFIX Blueprint decompiled successfully.  Continuing."
fi
Wrapping Up
The topics and steps covered in today’s quick article may seem a little trivial when looked at in isolation. However, my recommendation is this. Think of the DSL as a way of creating and working with Nutanix Calm entities using a programming language that’s become somewhat ubiquitous amongst software engineers. Of course, this is a fairly general statement since there are literally thousands of programming languages available – around 9000, depending on where you look. Python, though, often shows up as the most popular programming language when software engineer and developer surveys are carried out by independent third parties. Here’s just one example, where Python makes up 31.73% of how often language tutorials are searched on Google. That’s a fairly solid indicator of how popular Python probably is.
Using built-in functions like blueprint decompile, application designers can easily create their apps using the beautiful Nutanix Calm UI and then pass the results to automation and software engineers for programmatic integration.
Thanks for reading and I hope this information comes in useful. Have a great day! 🙂