

Note: This is the Python version of a recent article that covered this process using PHP. If you would prefer to read the PHP version of this article, please see here: Creating custom Prism Central categories with PHP.
In a recent discussion with Frederic Lhoest, one of our highly knowledgeable and experienced customers, a question came up regarding the management of Prism Central categories. Given the nature of the Frederic’s requirements, he had created a custom package for use with PHP applications, allowing quick access to the Nutanix APIs via that package.
The idea itself isn’t uncommon, i.e. creating custom packages to streamline tasks, especially automation tasks. With the idea in mind, though, I thought I’d throw together a quick example of how I would do this with PHP, only this time the article covers the Python equivalent. The results are also available as code samples on Nutanix.dev – PHP and Python examples are available. I hope they help someone! The GitHub repository referenced through this article can be found on the NutanixDev GitHub.
The original blog posts written by Frederic, in which he outlines his requirements and steps are available here – thanks for permission to link and cross-post, Frederic! 🙂
- Nutanix : Managing Categories through API (Part 1)
- Nutanix : Managing Categories through API (Part 2)
Categories intro
Before getting into the demo any further, let’s quickly take a look at what Prism categories are:
A category is a grouping of entities into a key value pair. Typically, new entities are assigned to a category based on some criteria. Policies can then be tied to those entities that are assigned (grouped by) a specific category value.
For example, you might have a Department category that includes values such as engineering, finance, and HR. In this case you could create one backup policy that applies to engineering and HR and a separate (more stringent) backup policy that applies to just finance. Categories allow you to implement a variety of policies across entity groups, and Prism Central allows you to quickly view any established relationships.
Nutanix Prism Virtual Infrastructure (Cluster) Administration documentation
As you can see, categories form a key part of not only configuring but also securing and controlling many aspects of the Prism platform.
Environment requirements
To follow along with this article, you’ll need to have an environment that meets certain requirements. I’ve outlined them below, along with links to the various installation instructions that go with each package, if available.
- Linux, Mac or Windows PC capable of running Python >= 3.8
- My current development is Ubuntu 20.04 and Python version 3.8.5
- A connection to a Nutanix Prism Central instance. I’m currently running Prism Central pc.2021.1.0.1, the latest version as I write this.
- You will be making changes to the Prism Central configuration and, as a result, will need to access Prism Central with administrative privileges.
- A local install of
<a rel="noreferrer noopener" href="https://git-scm.com/downloads" target="_blank">git</a>– required to clone the repository from GitHub.
Demo requirements
The requirements for this demo are simple and designed in a way that allows easy explanation via blog article. The way I did this is a little different from the way the customer did, although the end results are quite similar. My requirements boiled down to a single “parent” requirement:
- The demo code actions must be customisable without the need to modify the code.
- The demo must support the specification of category names via a separate JSON file.
- The demo must support the configuration of Prism Central details (IP address and credentials) without hard-coding any of those details into the code itself.
Using the demo
To grab a copy of this demo code and use it yourself, the steps are straightforward. Follow along below and you’ll be up and running in only a few minutes.
Environment preparation
Before running the demo, I suggest creating a directory structure for your projects. If you already have one, please feel free to use that. The following commands are executed in a Linux/Mac terminal or Windows command prompt.
mkdir projects
cd projects
Clone GitHub repository
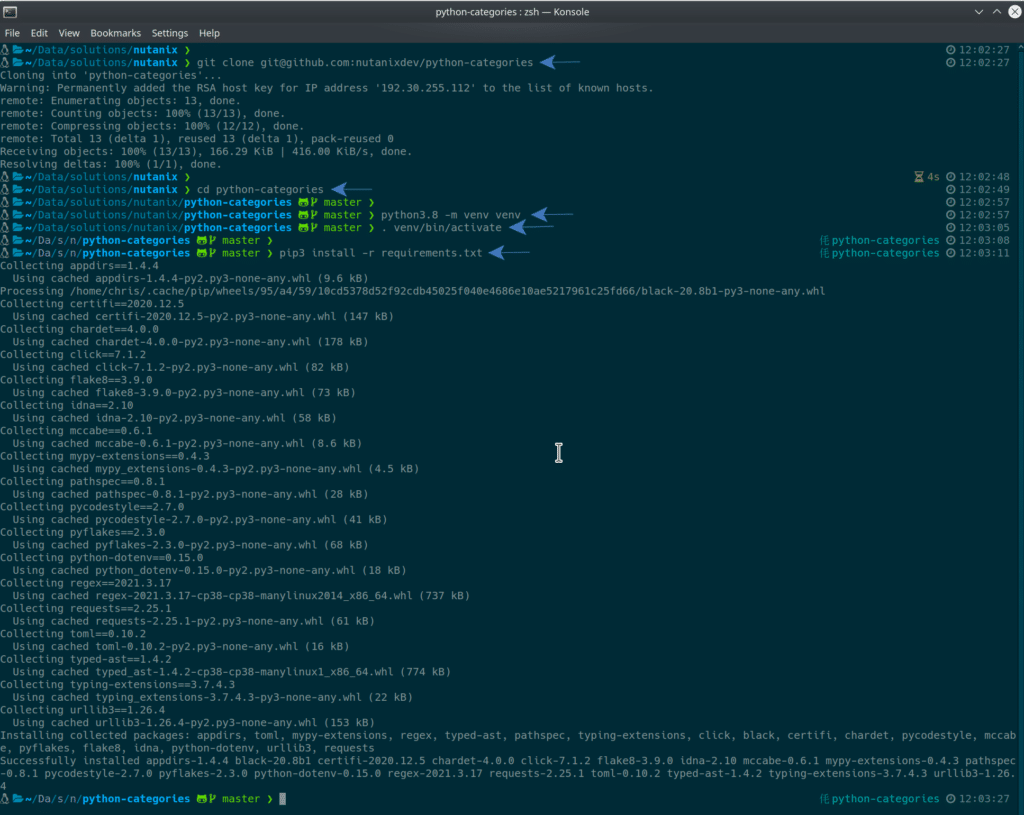
With our projects directory created, we can clone the demo source from the NutanixDev GitHub repository:
git clone https://github.com/nutanixdev/python-categories.git
cd python-categories
Configuring demo
The demo script includes a sample JSON file named categories.json and an environment configuration file named .env.example. To use the demo script, you’ll need to edit both these files, as follows:
- Edit
categories.jsonso that it matches the categories keys and values you’d like to create - Rename
.env.exampleto.envand edit it to contain your environment credentials. It is worth noting that many code repositories explicitly exclude files named.envfrom source control so that secure credentials are not accidentally pushed to public source control.
Creating virtual environment
Although opinions can vary, it is generally considered good practice to carry out Python development within a “virtual environment”. A virtual environment allows you to work with a specific version of Python and install specific dependencies, all without making changes to the global system Python environment. In my development workflow, I stick to venv – it is included in Python from version 3.3 onwards and, for me at least, “just works”.
The following steps create and activate a Python 3.8 virtual environment, then install the demo dependencies. Note these steps were carried out in my Linux development environment, but should work in a similar way on all Linux distributions as well as OS X. Please see the Python venv documentation for information on doing this in other operating systems.
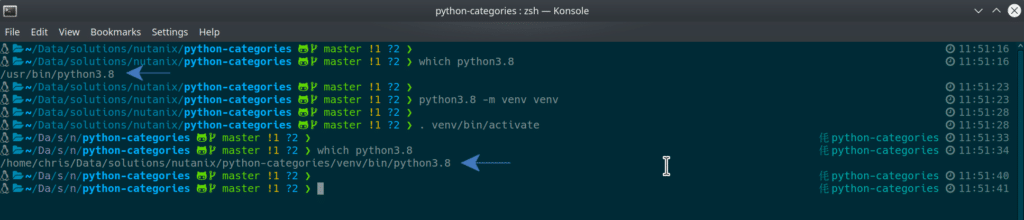
# find out where our current `python3.8` binary is
# on my system this resolves to /usr/bin/python3.8
which python3.8
# create the virtual environment
python3.8 -m venv venv
# activate the virtual environment
. venv/bin/activate
# quick check to see where our `python3.8` binary is now
which python3.8
As you can see from the screenshot below, the python3.8 binary, when not working a virtual environment, was /usr/bin/python3.8. Once the virtual environment is activated, the python3.8 binary is located within the virtual environment itself, confirming that any changes we make now are confined to the virtual environment only.
Installing dependencies
This demo script is also supplied with a file named requirements.txt. This file contains a list of the script’s dependencies, all of which can be installed using pip. In a modern Python environment such as version 3.8.5, it is possible the dependencies are already present. With that said, it can be a good idea to install the specific requirements as dictated by requirements.txt.
If we take a look at requirements.txt, we can get a better idea of what the dependencies are.
appdirs==1.4.4
black==20.8b1
certifi==2020.12.5
chardet==4.0.0
click==7.1.2
flake8==3.9.0
idna==2.10
mccabe==0.6.1
mypy-extensions==0.4.3
pathspec==0.8.1
pycodestyle==2.7.0
pyflakes==2.3.0
python-dotenv==0.15.0
regex==2021.3.17
requests==2.25.1
toml==0.10.2
typed-ast==1.4.2
typing-extensions==3.7.4.3
urllib3==1.26.4
As you can see, various modules have been specified. The ones we care about are as follows:
- “requests” version 2.25.1
- “urllib3” version 1.26.4. In this demo, the urllib3 module is used to disable insecure SSL connection warnings.
- “python-dotenv” version 0.15.0. This package allows us to read environment configuration from a file named
.env(by default). - “flake8” version 3.9.0. flake8 is a Python “linter” and is very useful for ensuring your Python code follows certain formatting recommendations, amongst other things.
- “black” version 20.8b1. “black” is a formatting tool and, while it is not required for the demo to run, is very useful for standardising the format of your code.
As a side note, it is worth noting that requirements.txt doesn’t have to be present before your script is written. For example, the requirements.txt file distributed in this repository was created using the pip freeze command. This process involves installing the required modules as you need them, then asking pip to create requirements.txt based on the modules that are currently installed:
pip3 freeze > requirements.txtAfter running the pip3 freeze command, we will have a requirements.txt file that looks as follows. Note this assumes you have already installed the requirements for the demo i.e. requests, urllib3, flake8, black and python-dotenv.
appdirs==1.4.4
black==20.8b1
certifi==2020.12.5
chardet==4.0.0
click==7.1.2
flake8==3.9.0
idna==2.10
mccabe==0.6.1
mypy-extensions==0.4.3
pathspec==0.8.1
pycodestyle==2.7.0
pyflakes==2.3.0
python-dotenv==0.15.0
regex==2021.3.17
requests==2.25.1
toml==0.10.2
typed-ast==1.4.2
typing-extensions==3.7.4.3
urllib3==1.26.4
To install the demo’s dependencies, continue as follows from the demo script’s directory. NOTE: please make sure you have completed the “Creating virtual environment” section above. This will nicely package your demo and its dependencies without impacting your global Python environment.
pip3 install -r requirements.txtThe screenshot below shows this entire process. Note this screenshot shows cloning the repository using SSH; please use HTTPS as outlined above, if you are following along with this article.
Running the script
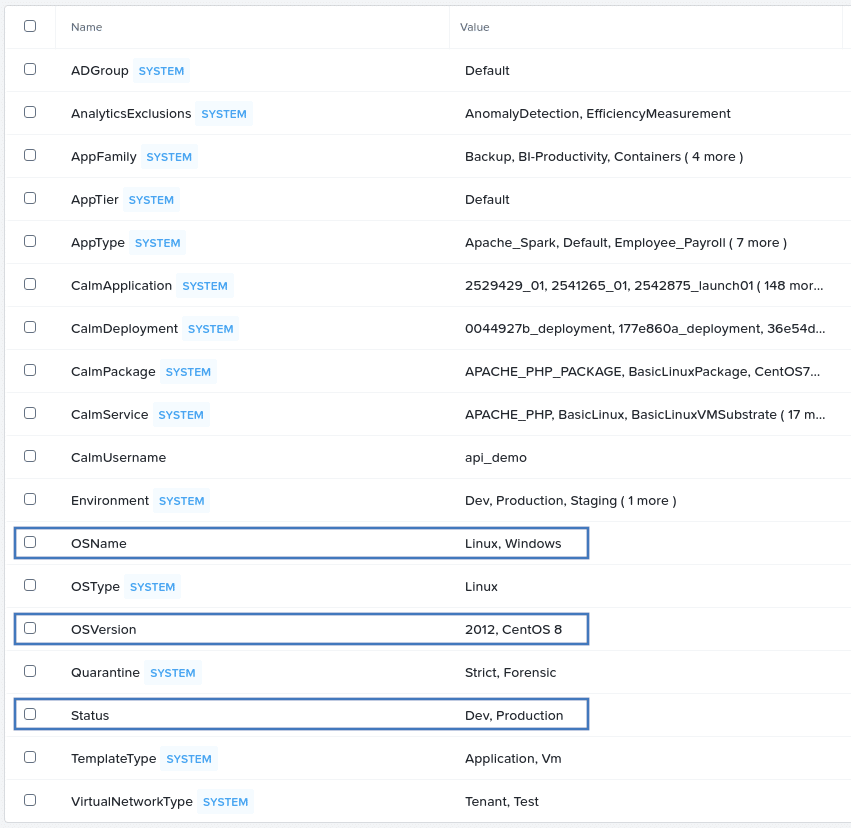
Before executing the script itself, let’s take a quick look at Prism Central and see how our categories are configured. The screenshot below shows the default categories in a Prism Central instance, along with one other category named CalmUsername, created by one of my colleagues during a recent live stream.

Now that we are familiar with the categories that come with Prism Central “out of the box”, let’s run our demo script and create a few more, but using our Python demo.
python ./categories.pyThat happened quickly!
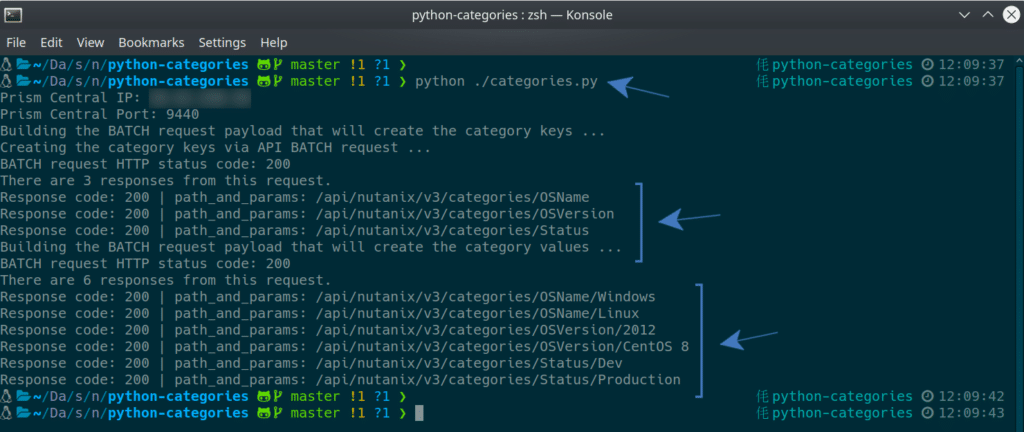
And now, if we look at Prism Central again, we’ll see the categories specified in our JSON file have been created, as expected.
How does this work?
With the “demo” part of the demo out of the way, let’s look a little deeper into how this works. First, here is how our JSON spec is formatted.
{
	"categories": [
		{
			"keys": [
				"OSName",
				"OSVersion",
				"Status"
			],
			"values": [
				{
					"key": "OSName",
					"value": "Windows",
					"description": "VMs running a Windows OS variant"
				},
				{
					"key": "OSName",
					"value": "Linux",
					"description": "VMs running an Linux OS distribution"
				},
				{
					"key": "OSVersion",
					"value": "2012",
					"description": "VMs running Windows 2012"
				},
				{
					"key": "OSVersion",
					"value": "CentOS 8",
					"description": "VMs running CentOS Linux 8"
				},
				{
					"key": "Status",
					"value": "Dev",
					"description": "VMs running in the development environment"
				},
				{
					"key": "Status",
					"value": "Production",
					"description": "VMs running in the production environment"
				}
			]
		}
	]
}
By keeping our categories definitions (keys and values) in a separate JSON file, there’s no need to edit the script itself to change which categories get created. You could look at this as good development practice, depending on your opinion re such things. That said, the need to edit an app’s code to change things like this is something I try to avoid.
Next, the following block is the opening part of our demo script. It should be noted that this demo script is meant for that purpose only – demos. It shouldn’t be used in production without the understanding that modifications will be required to make it suitable for use in that type of environment.
Here we are bringing in the dependencies that were installed using pip earlier.
"""
use the Prism REST API v3 to create Prism Central Categories
"""

import requests
import urllib3
import json
import os
import sys
from dotenv import load_dotenv
from pathlib import Path
from requests.auth import HTTPBasicAuth
From here on, all code is being run via the __main__ function. We are then loading the environment configuration from the .env file outlined earlier. We’ve grabbed the Prism Central IP address, connection port and credentials ready for use in upcoming steps.
# load the script configuration
env_path = Path(".") / ".env"
load_dotenv(dotenv_path=env_path)
PC_IP = os.getenv("PC_IP")
PC_PORT = os.getenv("PC_PORT")
PC_USERNAME = os.getenv("PC_USERNAME")
PC_PASSWORD = os.getenv("PC_PASSWORD")
This block loads the categories definitions from the categories.json file. With that information available, we can begin building our Nutanix Prism Central REST API v3 BATCH requests.
# setup a variable that can be used to store our JSON configuration
raw_json = {}

# grab and decode the category details from the included JSON file
with open("./categories.json", "r") as f:
    raw_json = json.loads(f.read())
Because we’re working with the BATCH API, we will first build the “base” of the request body. This is essentially an empty POST body that, while it will function on its own quite happily, won’t actually do anything other than return an HTTP 200 (assuming the connection was successful).
For more information on BATCH requests with the Nutanix Prism Central REST API, please see the article titled “Batch Brewing – Multiple Requests with the Nutanix APIs”, available below:
https://www.nutanix.dev/2019/11/19/batch-brewing-multiple-requests-with-the-nutanix-apis/
In this example, we are specifying that the BATCH request should continue processing the other requests, even if a request should fail. This is fine for this demo, but if a request carried out an action that must complete before the next request, “CONTINUE” above would need to be changed to “ABORT”. This means any failed request within the overall BATCH request would stop the remaining requests from being executed.
# start building the BATCH request
print(
    "Building the BATCH request payload that will " "create the category keys ..."
)
batch_payload = {
    "action_on_failure": "CONTINUE",
    "execution_order": "SEQUENTIAL",
    "api_request_list": [],
    "api_version": "3.1",
}
With this base request available, we can plug our categories definitions into it. This is done by iterating over the list of category definitions in categories.json (category keys first), and adding them to the POST body.
for key in raw_json["categories"][0]["keys"]:
    # do something with the keys here
    # probably use the API to create the keys, as shown below
    category_key_payload = {
        "operation": "PUT",
        "path_and_params": f"/api/nutanix/v3/categories/{key}",
        "body": {
            "name": key,
            "description": key,
            "capabilities": {"cardinality": 64},
            "api_version": "3.1",
        },
    }

    # add the new API request to the batch payload's BODY
    batch_payload["api_request_list"].append(category_key_payload)
Each individual request within the main BATCH request is built as follows:
- The request type is “PUT”
- The request endpoint is https://[prism_central_ip_address]:[prism_central_port]/api/nutanix/v3/categories/[category_key]
As each request is built, it is added to the list containing all requests part of this parent BATCH request.
Lastly, with the entire BATCH API request built, we can submit all category key create requests in one go – this is the beauty of using the BATCH API for multiple requests.
Note: While this demo does contain the same type of request for all members of the parent BATCH request, this isn’t mandatory. A BATCH request could create a VM, upload an image or call any other API, all from one parent BATCH request. For a more detailed look at using the BATCH API, please see Batch Brewing – Multiple Requests with the Nutanix APIs.
The BATCH request is submitted to Prism Central using the requests module, with each request returning its own HTTP response as it is processed. As part of this process we are catching any exception that occurs and returning the same message no matter what that exception was. This isn’t appropriate for most production cases and should be considered carefully before copy/pasting in your own scripts. Part of this section also parses the response from our BATCH request, and displays information about each individual request contained within it i.e. HTTP response code and the request endpoint in this demo.
# submit the BATCH request that will create the category keys
try:
    results = requests.post(
        endpoint,
        data=json.dumps(batch_payload),
        headers=request_headers,
        verify=False,
        auth=HTTPBasicAuth(PC_USERNAME, PC_PASSWORD),
    )

    # check the results of the request
    print(f"BATCH request HTTP status code: {results.status_code}")
    json_response = results.json()
    print(
        f"There are {len(json_response['api_response_list'])} "
        "responses from this request."
    )
    for response in json_response["api_response_list"]:
        print(
            f"Response code: {response['status']} | "
            f"path_and_params: {response['path_and_params']}"
        )
except Exception as error:
    print(f"An unhandled exception has occurred: {error}")
    print(f"Exception: {error.__class__.__name__}")
    sys.exit()
The remaining parts of the script are essentially identical to what we’ve looked at so far, but repeat the process for the category values.
Why is this important?
As mentioned earlier, many Nutanix products as well as Prism & Prism Central features and options can be controlled via categories. For example, Nutanix Flow can be configured so that only VMs belonging to a specific category can talk to VMs that belong to the same category. Likewise, Nutanix Calm can deploy VMs using blueprints that specify which categories a VM should belong to, once it is deployed.
Even though this article has gone into a fair amount of detail on how to programatically create categories specifically using Python, the DevOps “philosophy” makes clear the idea that automating processes and “flattening infrastructure” can simplify and streamline both operational and infrastructure processes. Being able to control this via script or code can further improve this process even more.
I hope this article was useful – thanks for reading and have a great day! 🙂