

Recently, Nutanix released the latest version of our Terraform provider, version 1.2.0. This release focused on adding functionality, as well as supporting versions 0.13 and above of Terraform. Many in the Nutanix community have been using the Terraform Nutanix provider and, in this article, we will focus on installing the Nutanix provider and on some basic use cases such as:
- Uploading an Image
- Creating a Virtual Machine
- Deleting the Virtual Machine
In upcoming articles, we plan to dig deeper into the Nutanix Terraform provider so make sure you stay tuned for those updates.
Getting Started
In order to begin, ensure you have Terraform installed on your system. The best way to get Terraform installed is to follow the official documentation provided by Hashicorp. If you do not have Terraform installed and want to follow along with this article, Hashicorp provides an excellent installation tutorial that can be used to get up and running. For the purposes of this article, following the steps up to the section titled “Quick Start Tutorial” will be sufficient.
Next, let’s get the Nutanix Terraform provider installed. This is a simple matter of creating a directory where your Terraform configuration files will live. If you are working with Terraform for your own education, creating a directory in your home directory is good enough. However, if you are part of a larger team this would be an excellent opportunity to put the configuration files in a source control repository (e.g. GitHub) and leverage a CI/CD pipeline. Let’s start by downloading the sample files from the Nutanix GitHub repository provided to support this article. The repository’s full URL is https://github.com/nutanixdev/terraform_blog.
mkdir -p ~/nutanix/terraform
cd ~/nutanix/terraform/
git clone https://github.com/nutanixdev/terraform_blog
cd ~/nutanix/terraform/terraform_blog/intro
Installing the Nutanix provider
If we now open the main.tf file provided with the repository, the first code snippet you will see is as follows. This section will download the latest provider from the Hashicorp registry.
terraform {
  required_providers {
    nutanix = {
      source = "nutanix/nutanix"
      version = "1.2.0"
    }
  }
}
With this Terraform configuration file present, we can initialise Terraform in our source directory, as follows:
[tfuser@localhost] $ terraform initIf Terraform has been installed correctly, you should see the following output:
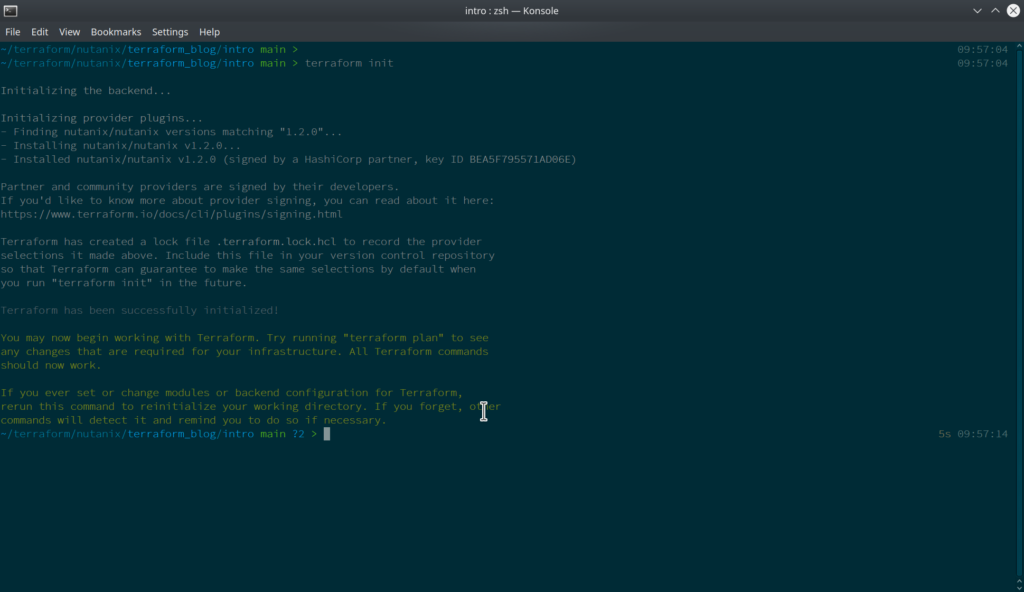
terraform initCongratulations, the Nutanix Terraform provider is installed! The next step is to upload an image and use that image to create a virtual machine. This image will be uploaded to our cluster by specifying the image’s source URL in the Terraform configuration file.
The Terraform Nutanix provider leverages v3 of the Nutanix Prism REST APIs and requires the endpoint to be the Prism Central IP or fully qualified domain name in DNS. Prism Central is included with all Nutanix licensing and there is an excellent tutorial on setting it up at https://portal.nutanix.com/page/documents/details?targetId=Acropolis-Upgrade-Guide-v5_19:upg-pc-install-cluster-c.html
In the provider nutanix block, note the following lines with their appropriate values. As you can see the username, password, and endpoint are all variables.
provider "nutanix" {
  username     = var.user
  password     = var.password
  endpoint     = var.endpoint
  insecure     = true
  wait_timeout = 60
}
However, in the GitHub repository downloaded earlier, the terraform.tfvars file only contains default values. To continue, edit the terraform.tfvars file with the values appropriate to your environment. As mentioned, please ensure the endpoint variable is the IP address or fully qualified domain name of your Prism Central instance.
Uploading a VM Image
Continuing with main.tf, we have added a section to upload an image to the AHV image repository in Prism Central. In main.tf, note the following section for an AHV cluster:
resource "nutanix_image" "image" {
  name        = "Arch Linux"
  description = "Arch-Linux-x86_64-basic-20210401.18564"
  source_uri  = "https://mirror.pkgbuild.com/images/latest/Arch-Linux-x86_64-basic-20210415.20050.qcow2"
}
In upcoming steps, when we actually configure our environment using these configuration files, an Arch Linux image will be downloaded from the specified URL and stored in the AHV Image Service.
Important note: The above Arch Linux image URL is valid at the time of writing this article. However, public image URLs are subject to change without notice; an updated image name can usually be found by browsing to https://mirror.pkgbuild.com/images/latest/, should the above URL generate an HTTP 404 (File Not Found) error. In the event an invalid URL is specified, Terraform will throw an error indicating the image creation process could not be completed.
Creating a Virtual Machine
Let’s break down the rest of the components in the main.tf file. The following two blocks retrieve information to be used for virtual machine creation:
data "nutanix_cluster" "cluster" {
  name = var.cluster_name
}
data "nutanix_subnet" "subnet" {
subnet_name = var.subnet_name
}While it is possible to hard-code the cluster information to initialize Terraform and download the Nutanix provider, it is a best practice to use variables for automation. In the code above, we set the cluster name and the subnet name as variables.
With the cluster and subnet names available as variable, we can define how to create our virtual machine with the nutanix_virtual_machine resource. Take note of the following partial block from main.tf:
resource "nutanix_virtual_machine" "vm" {
  name                 = "MyVM from the Terraform Nutanix Provider"
  cluster_uuid         = data.nutanix_cluster.cluster.id
  num_vcpus_per_socket = "2"
  num_sockets          = "1"
  memory_size_mib      = 1024
You can modify any of the values to your heart’s desire, however you will note that cluster_uuid is derived from block prior and appended with id. This is because the data block reads from the Prism Central v3 REST API and, once we define the cluster name, we bring forth any value in the API response. For now we just need the cluster_uuid.
Moving down the main.tf file we will need to create a virtual disk from the image we downloaded earlier.
  disk_list {
    data_source_reference = {
      kind = "image"
      uuid = nutanix_image.image.id
    }
  }

  disk_list {
    disk_size_bytes = 10 * 1024 * 1024 * 1024
    device_properties {
      device_type = "DISK"
      disk_address = {
        "adapter_type" = "SCSI"
        "device_index" = "1"
      }
    }
  }
Let’s summarise each of the two disks being created.
- The first section in
disk_listpoints to theimage_uuidwe downloaded, the value of which is retrieved from the Nutanix API duringterraform apply(covered shortly). If this wasn’t done using Terraform, we would need to upload the image first, make manual note of theimage_uuid, and need another action to create the VM. The provider’s integration with the Nutanix Prism Central v3 REST API allows Terraform actions to be dynamic. - The second section in
disk_listis a virtual SCSI disk configured with the specified size and properties. In this example we are creating a 10GB disk – to increase or decrease the size of the disk change the the first value indisk_size_bytes. In this example, you can see we do the math inline to get from bytes to gigabytes.
The last part of main.tf is connecting our VM to the preferred network that was defined in terraform.tfvars.
  nic_list {
    subnet_uuid = data.nutanix_subnet.subnet.id
  }
At this point we have a complete and functioning configuration ready to use. Before planning or applying any changes, it can be considered good practice to validate the configuration format. To do this, run the following command:
terraform validate
terraform validate to verify the format of our configurationOnce terraform validate returns a success, the configuration is ready to be planned and applied. To begin this process, continue with the commands below:
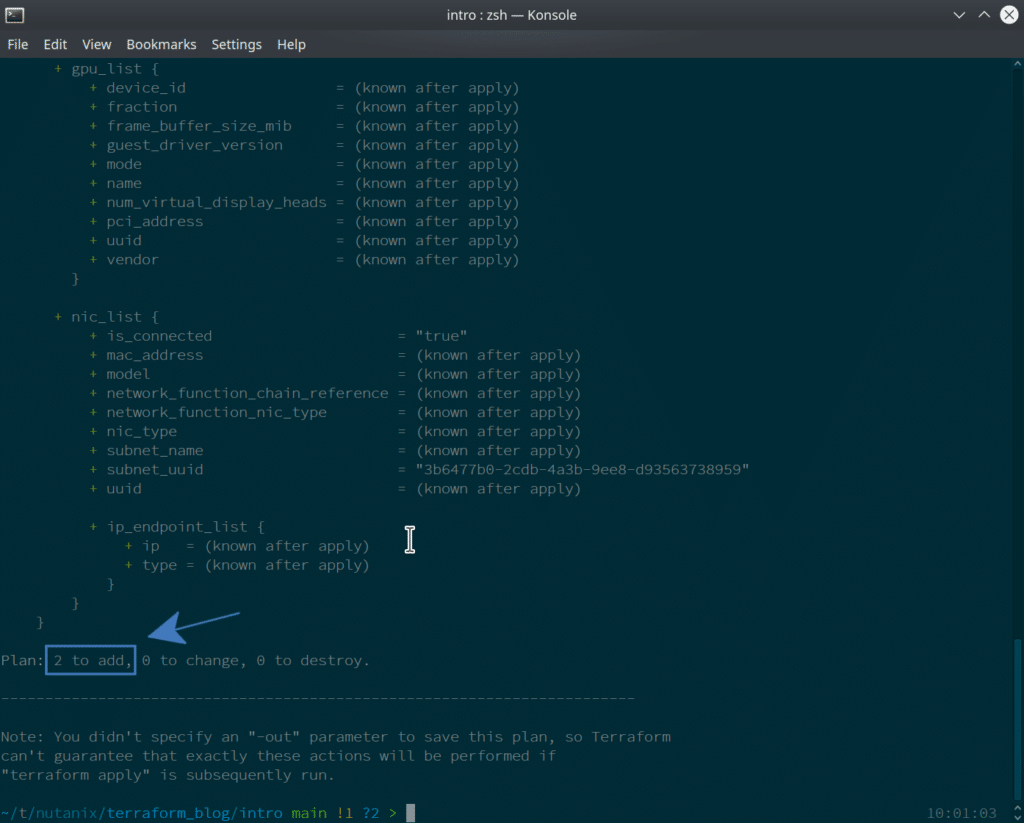
terraform planThis process will generate output that indicates two changes will be made in our environment.
- The image creation based on Arch Linux, downloaded from the URL specified in
main.tf - A single new virtual machine also configured as per the specs in
main.tf. This includes the disk specs outlined above, along with a connection to the network specified interraform.tfvars.
The output from terraform plan can be quite long, especially if a number of changes are to be made. In our example, the last few lines show that 2 additional entities are part of the plan and will be added when the plan is applied:
terraform planThese changes are now ready to be applied! Apply them as follows:
terraform applyAs a first step, this process will ask for confirmation and, after entering “yes” as the only valid option, will deploy our image and virtual machine.
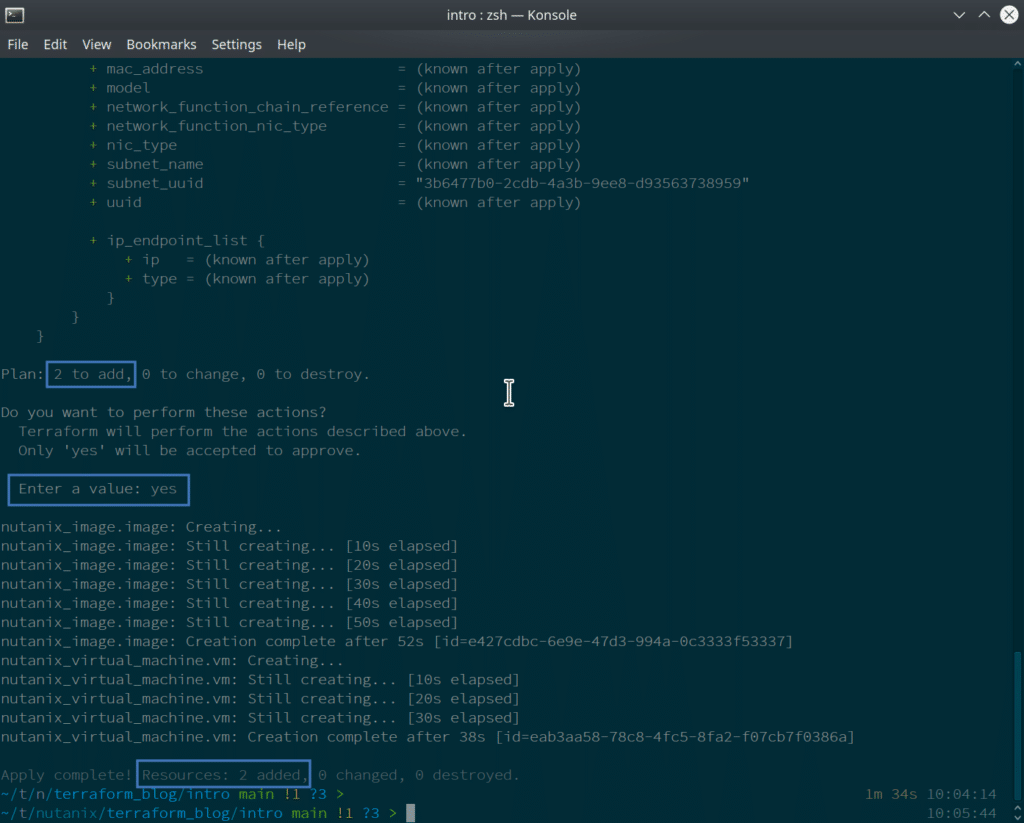
terraform apply to apply our changesAs this process runs, you should see an image being downloaded and a VM created in Prism.
Deleting the Image and Virtual Machine
As part of managing infrastructure with Terraform and the Nutanix Terraform provider, we can easily view the changes that have been applied so far. Do this now by running the following command:
terraform showThis will show the collected properties:
- The Nutanix cluster
- Subnet networks
- VM images
- Virtual machines created or leveraged from the plan
Correspondingly, the changes can be easily reversed/undone by using terraform destroy. If we run this now, our newly created AHV image and the VM that leverages it will be permanently deleted.
terraform destroyRunning this command will produce the following output:
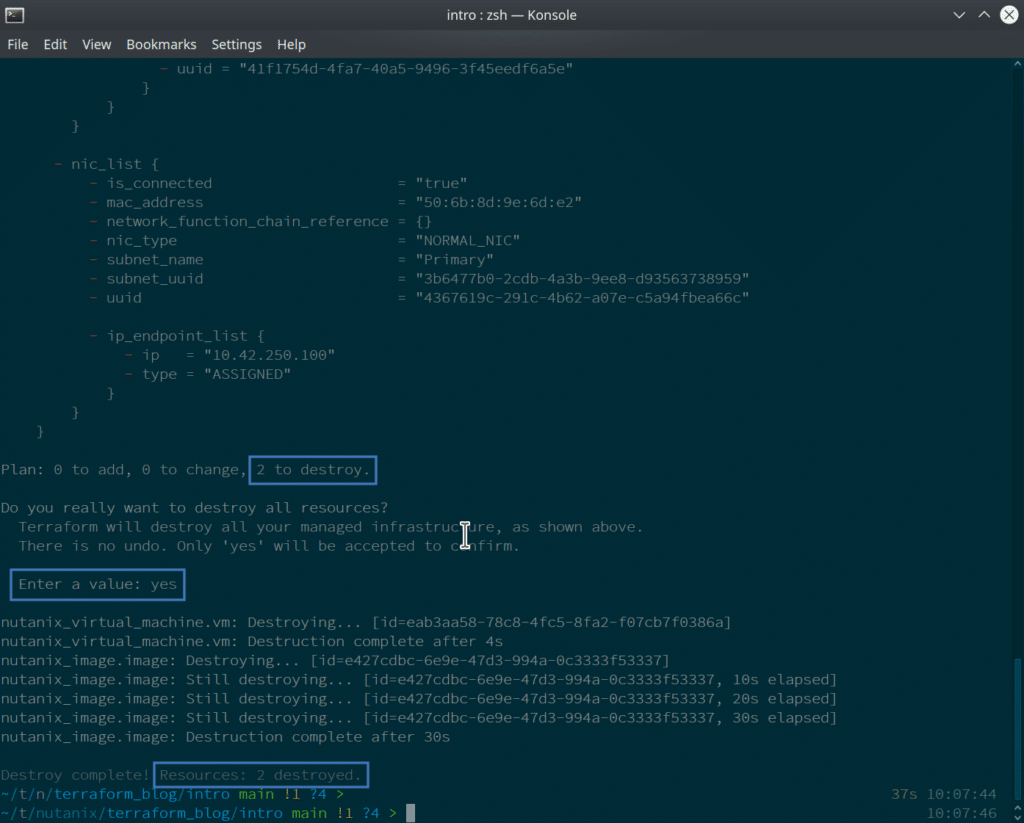
terraform destroy to reverse/undo all changes previous applied by the Nutanix Terraform provider“Monitoring” via Prism Central
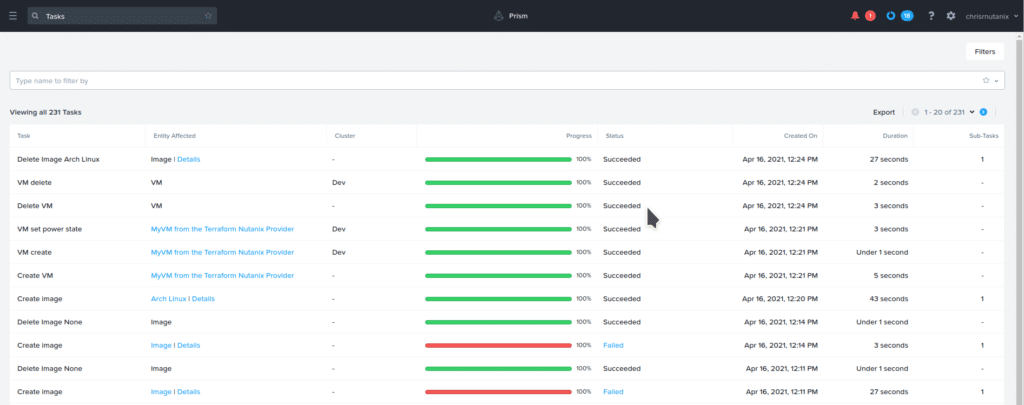
Throughout this process, each change can be easily seen as standard “actions” in Prism Central. If we were to look at Prism Central after planning, applying and then destroying our entities above, the task list would look similar to the screenshot below.
Note: The failed tasks are how HTTP 404 (File Not Found) errors are being displayed in Prism Central. In this example, the initial URL used in main.tf was for an invalid URL, hence the failure to create the image.
Wrapping Up
We hope you had as much fun creating your first VM using the Nutanix terraform provider as we had walking through the process. Feel free to play around with the files as we will be digging deeper into using the Nutanix Terraform provider later in our series.
Thanks for reading and have a great day!