

In our last blog about the Nutanix Terraform provider we walked through deploying an image, creating a VM, and cleaning up at the end. In this post we will walk through part of the day two operations – how to secure communications in a virtual environment.
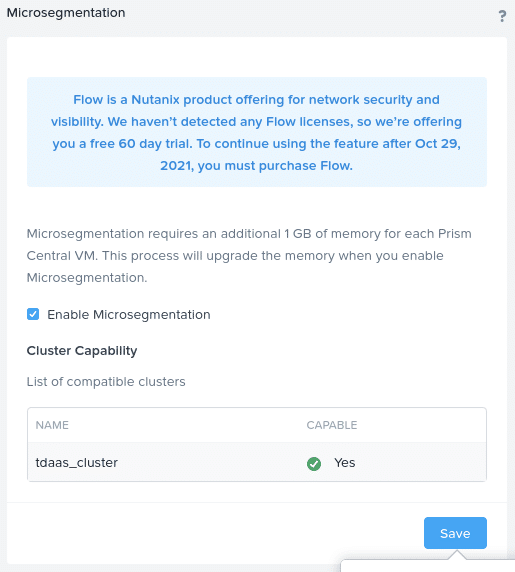
Nutanix Flow is our microsegmentation solution that allows you to do just that. As is always the Nutanix DNA, simplicity is at the heart of Flow, a very powerful stateful firewall. The steps and concepts we will follow build upon the skills we learned in our first blog post. First though, we need to log into Prism Central and enable Flow.
Download Sample Code
Let’s first clone the repository or, if you are following along from the previous article, pull the latest main branch.
git clone https://github.com/nutanixdev/terraform_blogOr, if you have already cloned the repository to a local directory, e.g. ~/terraform_blog:
cd ~/terraform_blog
git pull
Now that Flow is enabled, some of the steps will be familiar to you, such as creating an image and deploying a virtual machine. The other steps we will walk through are:
- Assign virtual machines to categories
- Define security policy
- Clean up
Configuration Files
We also broke up the Terraform files into the resources that are being used. By doing this we are enabling ourselves to better control the building of the resources, which is a key attribute when operating at scale. Let’s dive into each of the files and see what’s going on. Please note – the files referenced below are located in the repository’s network_security sub-directory.
Environment Configuration
If you would like to follow along with this article, please complete the following steps.
- Rename
terraform.tfvars-exampletoterraform.tfvars - Edit
terraform.tfvarsto match the settings for your environment - Be cautious when using source control (e.g. GitHub) and make sure
terraform.tfvaris not commited to any public repositories
Virtual Machine Specifications
In the virtual_machines.tf file you can see that we added a block to the resource that adds a category to the virtual machine. Prism Central comes pre-populated with various key:value attributes for categories and the key we are using here is “Environment” with one VM being the value of “Dev” and the other being “Production.” This small block of code is inserted immediately after we define the specs for our virtual machine, but can be anywhere within nutanix_virtual_machine<em> </em>resource.
categories {
    name = "Environment"
    value = "Production"
}
And:
categories {
    name = "Environment"
    value = "Dev"
}
Security Policy Specifications
Next we need to create a security policy that will be enforced as soon as it is applied. For that let’s take a look into the policies.tf file. As you can see the policy is set to MONITOR and can be any of the following:
- APPLY – blocks all traffic not allowed by the policy
- MONITOR – allow all traffic but log and allow visualisation of any traffic matching the security policy conditions. This allows you to fine-tune the policy before applying it.
In our example, we have a zero-trust policy that will not allow any traffic between the dev VM and the prod VM.
Looking at our policies.tf file the resource that needs to be called is nutanix_network_security_rule. We defined ours as “isolation”, since we will work on isolating VMs from each other. The other options for this resource are:
- application
- quarantine
- vdi
Give the security rule a name and description that is meaningful to you. After the isolation_rule_action, we define which VMs will be isolated from each other. Here we group all VMs with the category Environment:Dev as the first set and Environment:Production as the second set.
isolation_rule_first_entity_filter_kind_list = ["vm"]
isolation_rule_first_entity_filter_type      = "CATEGORIES_MATCH_ALL"
isolation_rule_first_entity_filter_params {
    name = "Environment"
    values = ["Dev"]
}
isolation_rule_second_entity_filter_kind_list = ["vm"]
isolation_rule_second_entity_filter_type = "CATEGORIES_MATCH_ALL"
isolation_rule_second_entity_filter_params {
name = "Environment"
values = ["Production"]
}Initialise, Plan and Apply
As we did in the prior blog this series, let’s initialize terraform in our repository. If your local copy of the repository is not located in ~/terraform_blog, please alter the commands below to reflect the correct location.
cd ~/terrafrom_blog/network_security
terrafrom init
terraform plan
terraform apply -auto-approve
If the above are successful you will see the following output
Apply complete! Resources: 4 added, 0 changed, 0 destroyed.
Testing Security Policy
Now let’s SSH into each of the VMs and test if we can ping the other VM. The VMs IP addresses can be obtained by querying the terraform state file.
terraform state listYou will see two virtual machines:
- nutanix_virtual_machine.dev
- nutanix_virtual_machine.prod
For each of the virtual machines we can find the VM’s IP address by issuing the following command (commands for each VM are shown):
terraform state show nutanix_virtual_machine.dev
terraform state show nutanix_virtual_machine.prod
After running each command, scroll up in the output and find the IP address in the nic_list_status block. Another way of programatically getting the IP address is by issuing the following command:
terraform state show nutanix_virtual_machine.dev | grep -A 5 nic_list_status | tail -1and
terraform state show nutanix_virtual_machine.prod | grep -A 5 nic_list_status | tail -1The default username and password to ssh into the virtual machines is arch:arch. Once in the dev virtual machine ping the prod virtual machine. Assuming there are no other network-related issues, you should see 100% success. The two virtual machines are not yet isolated from each other and respond to ping requests.
Let’s set the policy to APPLY and try again. Open up the policies.tf file and edit the following line as shown below:
isolation_rules_action = "APPLY"To plan these changes, run the following command. You will see that there is one change to apply.
terraform plan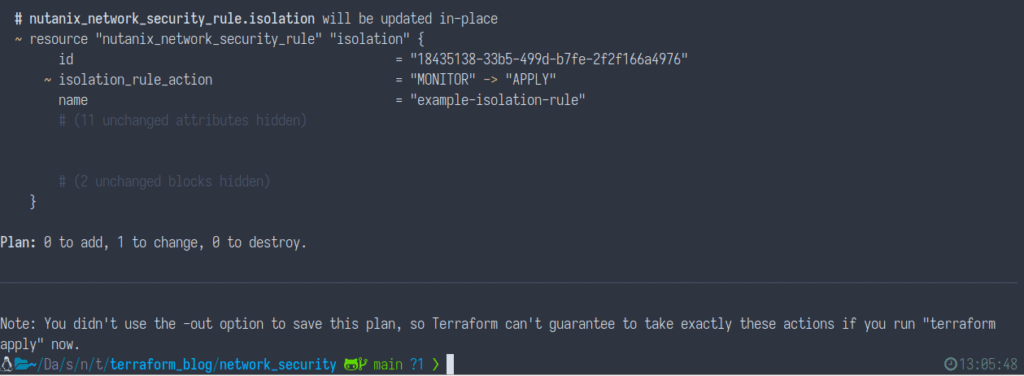
We can now apply the changes by running the following command:
terraform apply -auto-approveYou’ll see Terraform apply the changes as outlined above:

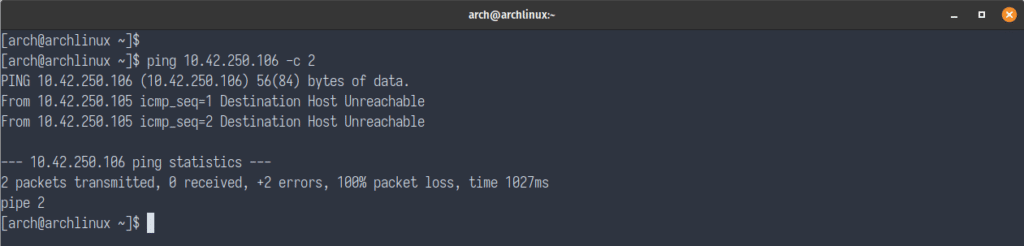
Now let’s go ahead and test pinging again. During the testing you should see 100% packet loss, since the Nutanix Flow network security policy is now being enforced.
Clean Up
At this point we have seen how Terraform can be used to not only create images and VMs, but also to create Nutanix Flow Network Security Rules (Security Policies) and apply (or monitor) them all in one step.
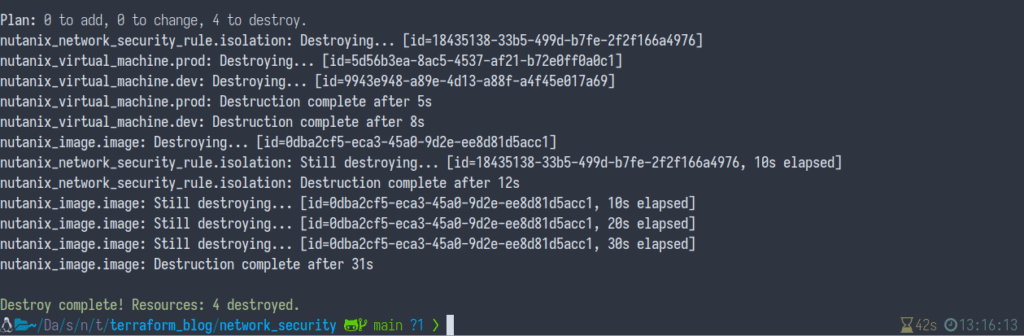
With this demo complete, we now need to destroy and clean up our environment. To do this, run the following command:
terraform destroy -auto-approveIf everything was successful, Terraform will report all images, VMs and security policies associated with this configuration have been destroyed.
Wrapping Up
I hope this blog gave you an insight into the ease of which you can secure your environment by creating Nutanix Flow Network Security Rules.
Related Resources
- Part 1 of this series: Using the Nutanix Terraform Provider
- Watch-on-demand live stream: What is HCI for Devs? Part 5: Nutanix Terraform Provider
- Code sample: Getting Started with the Nutanix Terraform provider
Thanks for reading and have a great day! 🙂