

When architecting application deployments, it’s not uncommon for a deployment to need info provided via by a third-party API. Alternatively, an application deployment may need to send info to a third-party API. Some examples of these actions could be:
- Getting an IP address from an IPAM service
- Sending deployment details to a CMDB service
- Triggering an event via API when a specific event occurs
In this article we’ll look at using Nutanix NCM Self Service (formerly Calm) to deploy a new VM and, as part of the deployment, talk to a third-party API to get a specific piece of information. To simulate this during the demo, we’ll use the Prism Central v3 API, readily available on all Prism Central instances.
Update September 2022: For the remainder of this article Nutanix Calm will be referred to by the new naming convention: Nutanix NCM Self Service. Please note this is a gradual change and both names may be used interchangeably across various Nutanix resources.
eScript
This demo makes use of the “eScript” feature of Nutanix NCM Self Service. eScript allows Python code to be run on the Prism Central in a controlled manner, exposing a selected subset of Python 2.7 modules. For detailed information on which Python modules are supported please see the NCM Self Service Administration and Operations Guide on the Nutanix Portal.
Intended Audience & Assumptions
This article assumes you have access to a running instance of Prism Central with Nutanix NCM Self Service is already enabled.
Deploying these components is beyond the scope of this article but can be completed by referring to the following documentation:
Blueprint Preparation
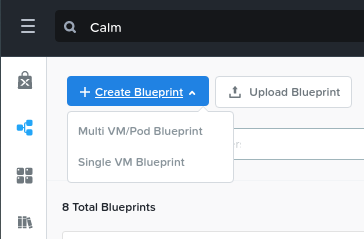
- From Prism Central, expand the “Services” menu and click “Calm”. From the NCM Self Service UI, use the “Create Blueprint” button to create a new Multi VM/Pod Blueprint; it can be named anything you like
VM Base Image
- Create a downloadable base image that can be used for deploying VMs. If your Nutanix NCM Self Service instance already has usable images, you may skip this step. Do this by clicking the “Configuration” tab within your new blueprint, clicking the plus sign next to “Downloadable Image Configuration” and using the settings below.
- Package Name: CentOSImage
- Description: CentOS 7 Downloadable Disk Image
- Image Name: CentOS-7.8-2003
- Image Type: Disk Image
- Architecture: X86_64
- Source URI: https://cloud.centos.org/centos/7/images/CentOS-7-x86_64-GenericCloud-2003.qcow2
- Product Name: CentOS
- Product Version: 7.8
- Click Back when finished

Credentials
In order for NCM Self Service to login to deployed or existing VMs, we must specify login credentials. For this article, we’ll create a credential that uses an SSH key pair. A usable SSH private key is provided in Appendix A, if you don’t have one available.
- Click the “Credentials” tab within your new blueprint, click the plug sign next to “Credentials” and use the settings below.
- Name: admin (this name is important as we will refer to it later)
- Type: Static
- Username: admin
- Secret Type: SSH Private Key
- SSH Private Key: Your own SSH private key or the sample provided in Appendix A below
- Use as default: Checked
- Click Done
- Click Back when finished
Variables
In order to avoid the need for hard-coded variables, we will now add some user-defined variables to our application. This will allow users to specify variable values at application deployment.
- On the left side of your blueprint, expand the “Application Profile” section, then expand the “Default” section
- Click the “Default” section; note the right side of the NCM Self Service UI indicates “No variables defined”
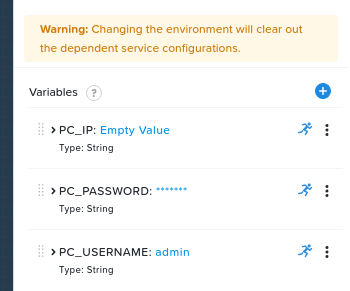
- For each of our 3 required variables, click the plus sign and configure the variables as follows, making sure to click the “person” icon to make the variable runtime-editable:
- Variable 1
- Name PC_USERNAME
- Type: String
- Value: Optional at this stage but can be entered so that it contains a default value
- Variable 2
- Name PC_PASSWORD
- Type: String
- Secret: Checked
- Variable 3
- Name: PC_IP
- Type: String
- Variable 1
VM Configuration
Now that our blueprint has a downloadable disk image and a credential, we can continue with preparing the VM configuration.
- Within the “Service” section of the blueprint, click the plus sign and use the settings below:
- Service Name: eScriptService
- Name: eScriptSubstrate
- Account: Your configured Nutanix account; this will be named NTNX_LOCAL_AZ by default
- Operating System: Linux
- VM Name: eScript-Demo-PC-API-@@{calm_time}@@
- vCPUs, Cores per vCPU, Memory (GiB): All can be set to 1
- Guest Customization: Checked and set to the Cloud-init configuration in Appendix B
- Disk Image: Clone from Image Service using CentOSImage created earlier
- Boot Configuration: Legacy BIOS, unless your image is configured for UEFI boot
- Network Adapters: Click the plus sign and make sure at least 1 NIC is connected to your configured NCM Self Service subnet
- Check log-in upon create: Checked
- Credentials
- Credential: admin, as created earlier
- Address: NIC 1
- Connection Type: SSH
- Connection Port: 22, unless your image has been configured differently
- Delay (in seconds): 60
- Retries: Default (5)
eScript and API Tasks
Now that our base blueprint is setup, it’s time to continue with the main parts of this demo application – the tasks that will talk to our external API and bring information back from the requests.
Getting info via API Request
- Within your blueprint, expand the “eScriptService” service in the left pane and click the “Create” action; note there are no tasks currently defined
- Click the “+ Task” button and note the new task is named “Task 1”
- In the right pane, rename the task to “GetClusterName”. The names defined here should be descriptive and inform other application admins exactly what the task does
- Configure the task as follows:
- Type: Set Variable
- Script Type: EScript
- Script: As defined in Appendix C, “GetClusterNameScript”
- Output: Enter CLUSTER_NAME (this is where the results of our request will be stored and made available to other actions)
What does this script do?
This small eScript will complete a number of tasks. The script will connect to Prism Central at the IP address provided by the PC_IP variable, using the credentials provided by the PC_USERNAME and PC_PASSWORD variables. Using that connection, a request will be made to the Prism Central v3 APIs that requests a list of visible clusters, the results of which will be parsed so that we can find the name of the first registered Prism Cluster.
- While still viewing the “Create” action, click the plus sign again to create another task, using the configuration below:
- Task Name: CreateTextFile
- Type: Execute
- Script Type: Shell
- Credential: admin
- Endpoint: Can be left unset
- Script: As defined in Appendix D, “CreateTextFile”
What does this script do?
This small shell script will take the variable CLUSTER_NAME that was returned from our GetClusterName eScript and create a text file matching that variable’s value. In Nutanix NCM Self Service scripts, variables are referenced using the @@{VARIABLE_NAME}@@ syntax. This demonstrates how to use eScript task variables in other tasks within the same blueprint.
Save Blueprint
Before continuing, make sure your blueprint is saved by clicking the “Save” button. Note that saving the blueprint may produce a warning indicating the task GetClusterName references a variable that has not been defined. This warning can be safely ignored as the variable is defined as part of making the API request.

Testing Application
With these steps completed, our demo application is ready to test. If everything has been configured successfully, the following deployment steps will be completed.
- Create a downloadable image named “CentOSImage”, downloading the image from public CentOS servers if the image does not already exist
- Deploy 1x virtual machine based on CentOS 7.8
- After the VM has been deployed, the two Create action tasks GetClusterName and CreateTextFile will carry out the API request and create a simple text file based on the name of our first registered cluster
To carry out the test, proceed as follows.
- Within your new blueprint, click the “Launch” button
- Enter a name for your application
- Leave the Environment and App Profile unchanged
- Make sure PC_IP, PC_USERNAME and PC_PASSWORD match the Prism Central instance you want to use for the v3 API request; unless otherwise required, it is suggested you use the same PC instance Nutanix NCM Self Service is running on
- Click the Deploy button
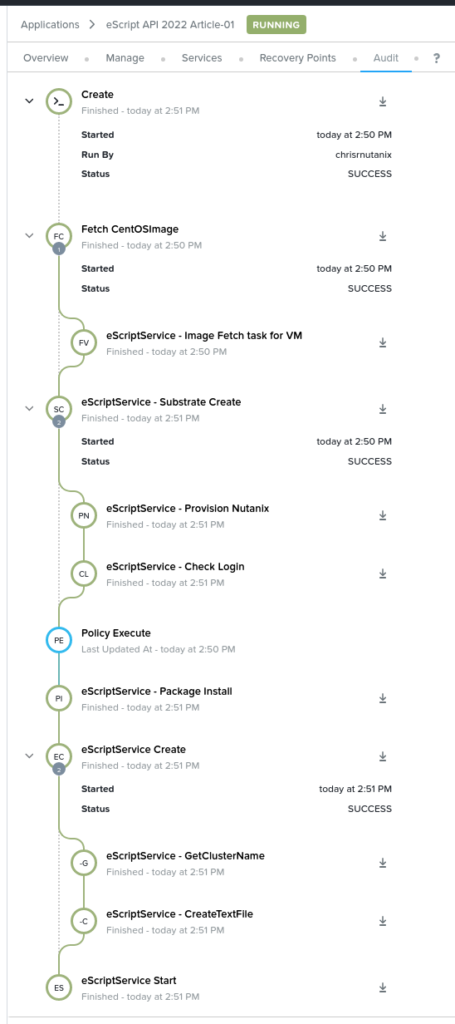
- When the deployment begins, click the Audit tab, expand the Create action and observe the deployment process as shown below.
Verifying API Request
One of the points of this app, however, is to verify that an external API request could be made from a deployment task. To do this, continue below.
- Within the “Audit” tab and after expanding the “Create” action, expand “eScriptService Create” then click the “eScriptService – GetClusterName” task. Because our eScript prints some output based on user variables and on the results of our request, we can now see some important details.
- Request status code is HTTP 200, indicating the request was successful
- CLUSTER_NAME=Dev, indicating our demo environment’s first registered Prism Element cluster is named “Dev”. This cluster is only available to us because we requested it using the Prism Central v3 APIs at the IP address specified by PC_IP.
- If the request was to fail, the same task output window would show the results there, too
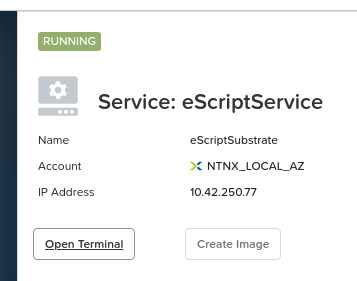
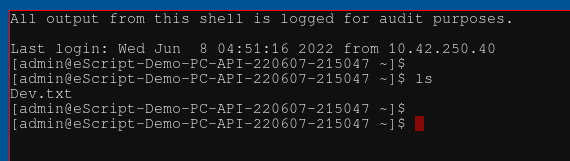
- If you would like to verify the creation of a text file matching the cluster name (Dev.txt in this example), click the “Services” tab at the top of the screen. From here, we can click the deployed VM and use the “Open Terminal” button to begin an SSH session into that deployed VM. From here it’s a simple case of running the “ls” command to check the existence of a file named “Dev.txt”
Wrapping Up
This article has shown how Python 2.7 eScript can be run during a Nutanix NCM Self Service deployment task. Our demo showed an eScript that submits an API request to the Prism Central v3 API, gets the name of our first registered Prism Element cluster then creates a text matching the name of that cluster.
Hopefully this article has shown how easy this sort of task can be and that Nutanix NCM Self Service can be used to not only deploy VMs but to talk to any API for the purposes of getting or submitting information.
Thanks for reading and have a great day! 🙂
Appendices
Appendix A: SSH Private Key
-----BEGIN RSA PRIVATE KEY-----
MIIJKQIBAAKCAgEA+POhTRLHA5CuMasr0+UsoPs9qY7yVae53QRnKt44UvEhXHpY
LGpth98B51f8mx93cXPGvkHdUXQAgqk+Rfu/fASY/FzozgJLSN+ckHfB4fI5lAB8
5sIfEFBoBSp5rMiO2l9wyxZh636d9S5RxbojTQsPb1tVfZJX01w8bqsAtuN6oBjW
KoHgmxzAR1ttTrvmIbmSgGmnDboYLWhObsPJJgm4NiiU4MVUs3GnN1lNSYoefX0u
cSKMepxABsEHqN47AYNkE+aGS4AQOLqPmR6McrG1Wmm3dl6RIvj839jWCZenGKJg
KtrjZonlgXtBT7ATzy/K5mxvqsoPxA3wVibl4xOf3qg023m/f3LEWlxfeJ4UYKTK
QZXD+5FZnh5quDniJm2W7vYVozvNVS7LOy/TEmjyuApdVC1xjtDbMLVal5Us+LXU
o6bmLeIUltaNh4efEDKqAZigGvrcOT76WjLlckW5JURQZqATfbeoW97VA0MGC5Tu
hVO9yMYafLD0HpaXMLZYf0kgL53MhFTpLuuaSfGtFn65iwkiMePyim1x9PXjmNk/
1OgXhQ17KK1xcDdv72hiVwdBwjGCPkYRv72o+QbCeBi/IhwYlxuwOzBEHpeI+lFs
04RRWaQc/gdoLPmia7X96amAAVpi3qZ9a3dOPYAoscjJ7jw6Ovh+xQ/hg+sCAwEA
AQKCAgBjjwMF0KmYKmcPY/XuEquLYY5iXdFaIe55jgY4JZB+0wHVevQCJznQaYXY
X96cprPcwkFL2wlIRszhdA98a1ZDoY8Q9ZMAt/gll4+EUvBNjNIr9xn8KsvDeXRw
BHGOgNJoUFzKSxQz2noPEEwReAQgDnlIvkztH/ZRh4R/eZGaklR67BPSAgix34ih
wNVw9EHvYMhO5HGzUqXSmvEq6M9rj92Egywuy5u4+42029jFvR++ba6B/iAR9KTC
TrXieaU9UK9YKguw6/EQzsMYqBfg0mLFWpvNEbqXMt3mI1BNm8FuX5l36fuhCSqo
YoNW/AKgC+vnxJvPwGkXrb9cpMewAz9v++i35KwGku60zPJ6sVM8NLAW7IstyW2f
GfYnwuwn+nZhdJe7J5Y4ilWx0+kT4+yt/kBr0F4MVOq9yvIop1Ro3yg+8ykYcEyt
3tkU0O0OdEGdk7IYTgwk3AyAvGPn4bIx2DHeaZMhuGUngp4ypHrVq48lw7wOPWpN
PwXoszTKsbe+xTfo1WWnJNANBuWsKWCnzNjouVqWe0s5R+WdvkEpLvqNj7peMGJG
Y2mCE8KzzKQxTUyhug3uL2KT/CIdZZu7a21URqS3DLLM4wXqeGCjFab+I3RrPmXC
nYzmd2oLJWnyPEpp7I0Ook9IPUpwBBwYGstKoCoTB7n7XCVNUQKCAQEA/kLzrsU2
L1CIFeuURhkixZJY7xHGsLufESQHAOTgfyC1fYUH1zikPVG1gnpaZLavJrcNQfAF
thxpBAlOFSeltmdHOSjI3jqSTibsMJdC2E9oI7tchm3KzXjbOJuWQVO1hgdkBvB+
zm7e0dFEoKTOfJyXHUL6iAl5kF231yW8Hs6gYp4GoG3TgUERiriTrP3HLFUXlF0/
jrnFwsFfRT/AQR/V2jFMLahXtoRxud2FapYx9ah1YV1EXt0QT0+zhcvd6uCb2rmK
zguHYJ5WLrvydfotFAM/emRJGieYjwNjc7kiEXv9t4AGQX+B1f9ciSmVTkzK8tdV
rGFa7sGF6kHEswKCAQEA+qdiUl0UTk/fm7LjQa3stXPcoqQ8TCYKvWFLmJUwu0Es
a+kJK7m1Q8zXI1oRXyjuaxDlO65ZO23VWqouwf7ZH772IN+4QFVOB1n1bxZ+uVqB
LhmdQQGaG25MVXSHoSfkfMkJHbDzkyd3D2wY1ld1saQqsEt767byaaqnPe7G3ko9
ahUNNx8ruDnxI7BW4aLb9Wv9BoEBfFk+vZgnJq7iLjxoQ2xMUovgD4JJYZT6IfzH
5WrzIJWgmUOCtvBGOyUHk4tZHDVvkgYrIns5GOhl+N/jXFsESzodWxfqQh6iyBUA
jAJmGNloBrhzlsa5Y7Mp8VU5MpH9awau96ZDOAUP6QKCAQEAnIFxpZ5WoAEeAwAj
IJLQSHSwsVdrydVzMAXRGcfIN/hWPpDoJp4C2ou1Aj917JBWd6otSu0HVvVd3tIr
cfIZmpEv0gs8uS2saNakg7RXvPYD0Bq/9S8Xqio+JjX+4u83yOw7sdnO9BpipRv+
9jL7ttBcY/Kaa6oJXceSJahgh0YAizNiONXhXqpCtfSvUchUFQG7peNP//ZxuFN2
5RU8rdl+tPOrRF9evkYACrxEJzuUPPYYanoSX6ILLAaPJkg6rRzcUmHrArEt/1b3
DYU61UvM+4iURi38oVDGIyGe0difE8wSfCUdtKtbq/Gnb/ZcpPm34oqRfa3fXx9X
4r3g6QKCAQAHrwPjlHjf4bDwG+69f7Bm65NS5Qf4KZ5gqc/gcIpa4yeSc0VVss6s
smXR7pvjt+R/Ibh1OOYBXV+R9O+UANT1FSyEW3dReYv3y7krW5ws4GpfWGeqq3rm
5l2urPDPbuKhNKRz5Y3B8A7FSUIFqA6ykF7Cor28vxH1TUbtLhmojMwPKXALRYhY
kGYk+u3e4tgtUM8j2OaLwkybEUP5+phyZGWp03MPgLwwnYTUWfXE/vO9w6aKVCvl
Jt2l7/2nKH5v9nCX3cd6yXefCfn5Gn6tv2c/2IZsK+7kcPo8ZqYEzigDIruwfVGk
Cxl4AMWEGeTqQfuL4k/LbRwF+XHMENOpAoIBAQDYUSyUQlHUh2EQcp4DI+R4xR4h
vpm7n/hdRi0GvIU4zCTw9UtUirftroiNoOqv6Rypx7ZvFlRKMWATxsQueYgPupNu
bxtbbXXsil5/sT9/+6lc7VoUSh3EhYIpPVAmA6LZU8uEmYwfjRpCN5NTKHG2w9NX
NlBiVpYlvfSaImUq2GIWB9yn/SK8EX4HWKSU30pnMOS0jei0O4ghMtOKiXiipbWu
hAAs5JaaovlZlCphFyXYLu7gjAhp4t89glhMsY5KdWnlOzThOgTv4/D/bja7HkZJ
ekC/hQgZ9A5IBMhcjDuN1PKv9VQ73yTTAHv8Qnzjz1eTASNV+3H/bQop3Rp1
-----END RSA PRIVATE KEY-----
Appendix B: Cloud-init Spec
#cloud-config
users:
  - name: @@{admin.username}@@
    ssh-authorized-keys:
      - @@{admin.public_key}@@
    sudo: ['ALL=(ALL) NOPASSWD:ALL']
Appendix C: GetClusterNameScript
pc_username = "@@{PC_USERNAME}@@"
pc_password = "@@{PC_PASSWORD}@@"
pc_ip = "@@{PC_IP}@@"

api_url = 'https://{0}:9440/api/nutanix/v3/clusters/list'.format(pc_ip)
payload = {}
headers = {"Accept":"application/json","Content-Type":"application/json"}

print('PC username: {0}'.format(pc_username))
print('PC IP: {0}'.format(pc_ip))
print('API URL: {0}'.format(api_url))
print('Payload: {0}'.format(payload))

resp = urlreq(api_url, verb='POST', auth="BASIC", user=pc_username, passwd=pc_password, params=json.dumps(payload), verify=False, headers=headers)

print('Status code: {0}'.format(resp.status_code))
print('Resp: {0}'.format(resp))
#print('JSON: {0}'.format(json.loads(resp.content)))

print "CLUSTER_NAME={0}".format(json.loads(resp.content)['entities'][0]['status']['name'])
Appendix D: CreateTextFile
#!/bin/sh

touch ~/@@{CLUSTER_NAME}@@.txt