
")
On their own, platforms and the tools they offer can greatly improve infrastructure efficiency. Consider the following high-level points.
- Virtual machines vs a collection of physical hardware
- Inserting a CD-ROM vs attaching a disk volume
- Manually following an operating system installation wizard vs deploying from a VM image
- Manually installing software on a VM after operating system installation vs scripting or automated rollouts
- Having a human reacting after an event happens vs having the system watch and react for you
The last point is what we’re going to look at today. This article forms part of an open-ended series on using Nutanix Calm APIs. The first two parts are as follows.
In this article we’ll go through setting up our Nutanix Calm Blueprint and adding our post-deployment actions. Those actions will take care of the required steps that can only happen after the app is up and running. The next part, available shortly, will be implementing the automation part of our scenario. For now, we’ll kick things off manually. A scheduled script that “watches” for events is planned for a later date.
Important note: This article isn’t a how-to for using Nutanix Calm. I’m assuming you are already familiar with Nutanix Calm blueprints, how to import them and how to edit Application Profile variables (they’re used for credentials in this mini-series). If you are new to Nutanix Calm, please see the Getting Started section of the Nutanix Calm Administration and Operations Guide.
The Scenario
We can look at today’s scenario as a simple question. What happens when an application’s existing virtual machines can’t handle the requests being sent to them? This is a very common situation, especially in web applications where load can increase and decrease unexpectedly.
Because we’re just looking at “proof of concept” today, our test application is about as simple as it gets: a single virtual machine based on CentOS Linux 7 with a default installation of Nginx. Of course, production or enterprise applications will nearly always have far more components and dependencies than this, although the same high-level concepts apply.
This single VM can sometimes experience increased CPU load, at which time we need to react automatically and deploy (“scale out”) another two instances of that virtual machine. The approaches used here also apply to the exact opposite situation i.e. to remove instances that are no longer required (“scale in”). To keep things tidy, we’ll assume that our application will never need to scale beyond three web server instances.
The Environment
To demonstrate the concepts outlined above, my test environment is setup as follows.
- Nutanix cluster running Acropolis 5.10.7 i.e. the latest version when writing this article (October 25th 2019).
- Prism Central 5.11 deployed as a single instance on the Acropolis 5.10.7 cluster.
- Nutanix Calm 2.7.1 pre-enabled on the Prism Central instance.
- A single Nutanix Calm blueprint that deploys a single CentOS Linux 7 virtual machine and Nginx.
- The same blueprint will also contain the actions to deploy two additional instances of the same VM, when required.
- An SSH public/private key pair. Please see the SSH Keys section of the Nutanix Calm Administration and Operations Guide for details on how to generate your own public/private key pair.
The Calm Blueprint
To save a little time, I’ve already created and made available the Calm Blueprint used in this article. Please grab a copy from the link and import it when you’re ready. You’ll need to modify the value of the INSTANCE_PUBLIC_KEY variable and the value of the ScalingDemoService credential private key. For more information please see the Blueprints Usage section of the Nutanix Calm Administration and Operations Guide.
Here’s what the Blueprint does:
- Deploys 1x CentOS Linux 7 virtual machine
- Updates and upgrades all Linux packages
- Installs some useful packages e.g. wget
- Installs a default instance of Nginx
- Configures the VM hostname
Post-deployment Actions
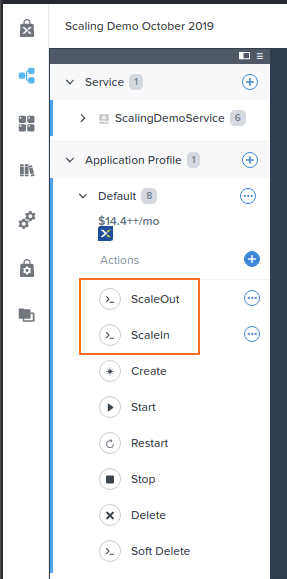
Looking at the blueprint itself, you’ll notice that the blueprint’s single service has been configured to start with a single replica. However, it has also been configured to allow a maximum of three replicas. For more information please see the Blueprints Usage section of the Nutanix Calm Administration and Operations Guide.
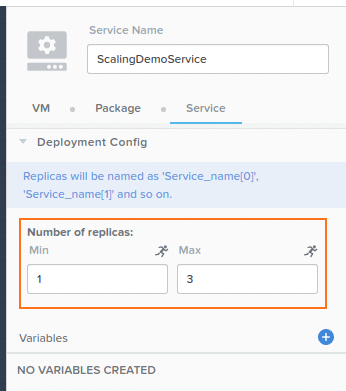
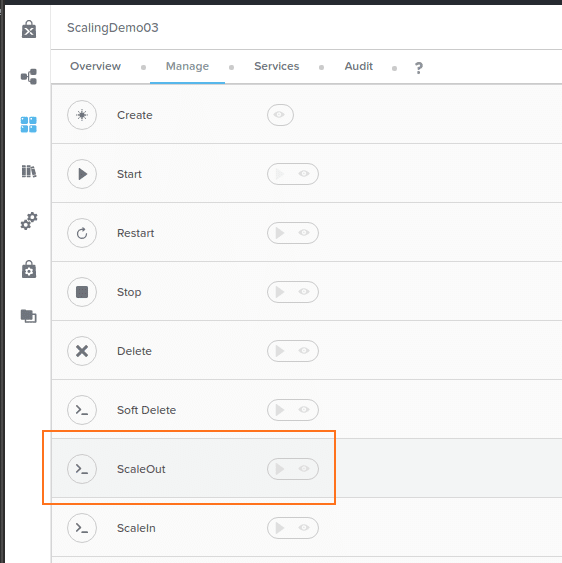
Along with the default actions (Create, etc), two additional actions have been added – ScaleOut and ScaleIn. These two actions work alongside the minimum and maximum replicas values shown above. For more information, please see the Actions Overview section of the Nutanix Calm Administration and Operations Guide.
First Blueprint Launch
Launching the blueprint for the first time runs through the blueprint steps, as shown in the screenshot below. At first launch, the ScaleOut and ScaleIn actions are not used.
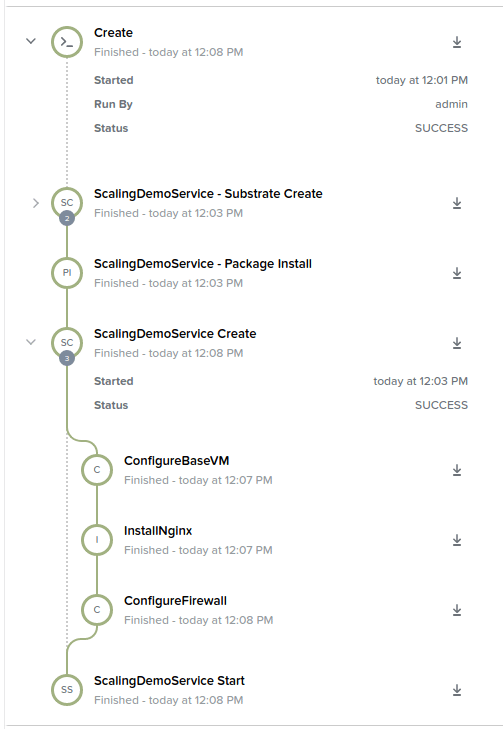
The result is a single replica of our CentOS Linux 7 service (VM) that has had all its packages updated and Nginx installed. This alone is a nice demonstration of how Nutanix Calm packages deployment steps into clearly-defined modules and scripts.
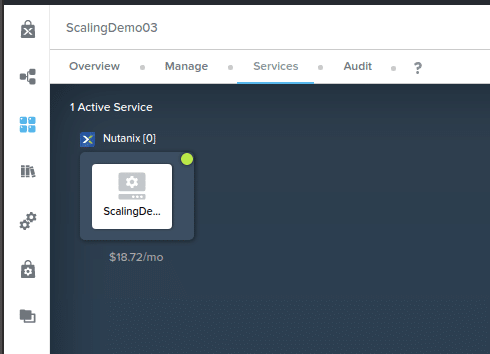
A quick look at the application details shows a single replica of our CentOS Linux 7 VM. As per the blueprint’s instructions, this first VM has been named ScalingDemo-0, indicating it is the first replica to be deployed. The zero also indicates the first member of the array, based on the @@{calm_array_index}@@ macro. We’ll get to that shortly. 🙂
Manual Scale Out
In the next step of this article we’ll be carrying out the same steps as this one, but via Nutanix Calm APIs. In this setup step, we’re doing this manually for now.
What happens when the CPU load percentage on our single VM reaches a predefined number? Let’s assume that number has been arbitrarily set at 80%. In this example, the administrator has noticed the jump in load and needs to quickly scale up the replica count to deal with that load.
Because our basic application has been launched with Nutanix Calm and has custom ScaleOut and ScaleIn actions, it’s a simple case of jumping back into Nutanix Calm, opening our running application, and kicking off the ScaleOut action.
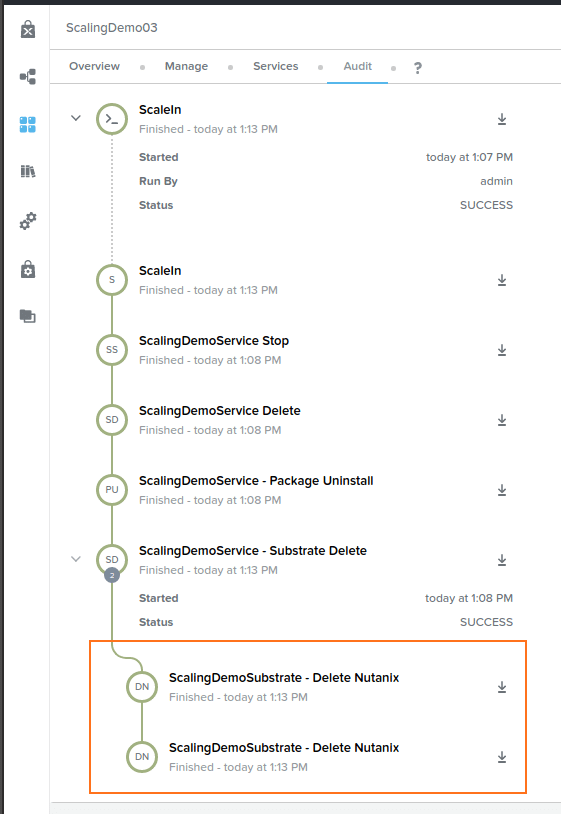
The Audit Log of our application allows us to quickly monitor the progress of the ScaleOut action. In this example blueprint, the ScaleOut action has been preconfigured to create an additional two replicas of our Nginx VM. As part of that process, the hostname step will also name each VM ScaleDemo-@@{calm_array_index}@@. The result is three replicas named as follows, with each hostname matching the value of a HOSTNAME variable with the replica’s array index concatenated.
- ScaleDemo-0 (the first replica launched when the blueprint was run)
- ScaleDemo-1
- ScaleDemo-2
If we look at the details of our application after ScaleOut has completed, we’ll see not one but three replicas of our CentOS Linux 7 virtual machine. Critically, each replica is exactly that – a replica. They’re all configured the same way, with the same OS and installation of Nginx.

Using a combination of Application Profile variables and Nutanix Calm macros, we’ve allowed our users to customise the hostname at runtime and also be assured each replica is uniquely named. Although we have statically set the ScaleOut value as 2, we could also easily set the ScaleOut value to prompt for the value at runtime.
For a full list of Nutanix Calm built-in macros, please see the Macros Overview section of the Nutanix Calm Administration and Operations Guide.
Manual Scale In
Of course, it’s unlikely (although possible) that our application’s CPU load will continue this way indefinitely. As with the manual launch of the ScaleOut action, we can apply the exact same approach to scaling the application in again.
Manually kicking off the ScaleIn action removes the two previously-deployed replicas, resulting in a single replica of our CentOS Linux 7 VM. Please note that in this sample blueprint the ScaleIn value has been statically set at two, although we could easily set this as a runtime variable. That would allow our users to select a scaling value when the action is launched.
Now, similar to what we got after launching the blueprint for the first time, we have a single replica of our CentOS Linux 7 VM.

Quick Note re Actions
This sample blueprint’s action are functional but you’ve probably noticed they aren’t overly useful in a production environment. In a production environment there would be many more steps required, including things like the following.
- Getting web server content
- Adding each new replica to a load balancer
- Deploying and scaling out a database server
The Nutanix Calm Administration and Operations Guide includes a detailed section titled Creating a Multi-VM Blueprint. This section covers many of these steps, including building the blueprint from scratch. It is strongly recommended that new Nutanix Calm users go through the official documentation as it covers a huge amount of material not covered in this basic intro article.
Summary
In this quick article we’ve gone over what our sample blueprint does and taken a look at the results of launching that blueprint. In the next part, which will be available shortly, we’ll automate some of these processes with the eventual aim of automatically reacting when the VM’s CPU usage reaches a certain number.
Thanks for reading!