

With Nutanix Self-Service 3.4 (formerly Calm), the concept of Credential Providers was introduced. With a Credential Provider account, you can make Nutanix Self-Service to retrieve secrets from an external provider such as Hashicorp Vault, CyberArk Conjur, and others.
The Credential feature has been developed to make it easier for anyone to integrate Nutanix Self-Service with any secrets manager solution in the market. It leverages Self-Service Runbooks, which let you easily create automated workflows for tasks that are not just creating a virtual machine.
In this blog post you can find:
- Deploying a Vault server for testing
- Creating a Self-Service Runbook to retrieve secrets from Vault
- Adding and using a Credential account in a blueprint
Note: A basic knowledge of Nutanix Self-Service is required to complete the steps in this blog post.
Deploying a Vault server for testing
If you don’t have a Vault server yet, you can find a blueprint in this repo for you to deploy one in AHV. The JSON file is the blueprint already compiled and ready to be uploaded into Self-Service. Additionally, if you are familiar with Self-Service DSL, you can use the Python file and the YAML configuration file if you’d like to follow the path of Infrastructure as Code, or CI/CD pipelines.
The blueprint uses the Ubuntu Focal 20.04 cloud image (link). Make sure you add the image to Prism Central Image service before continuing.
With the blueprint uploaded, let’s configure these VM parameters and credentials:
- In step 3, VM Configuration, set the following parameters:
- Cluster. Choose an AHV cluster.
- Image. Select the Ubuntu Focal cloud image previously imported.
- NIC1. Select a network with AHV IPAM or DHCP enabled.
- In step 4, Advanced Options (Optional), set the following parameters:
- Credentials.
- CRED_PC. Provide a Prism Central account with permission to edit virtual machines. The blueprint uses this to extend the size of the Ubuntu OS disk using Prism Central API and cloud-init.
- OS_CRED. Provide an SSH private key for Self-Service to be able to connect to the machine for running additional configuration.
- Credentials.
- Save the blueprint.
- (Optional) After saving the blueprint, you’ll see a warning message for Docker Hub variables. This warning message doesn’t stop you from launching the blueprint at this stage. If you have a Docker Hub account and want to avoid the known pull rate limit, you can set your Docker Hub username and password at the top by clicking on App variables (7), or providing them during launch.
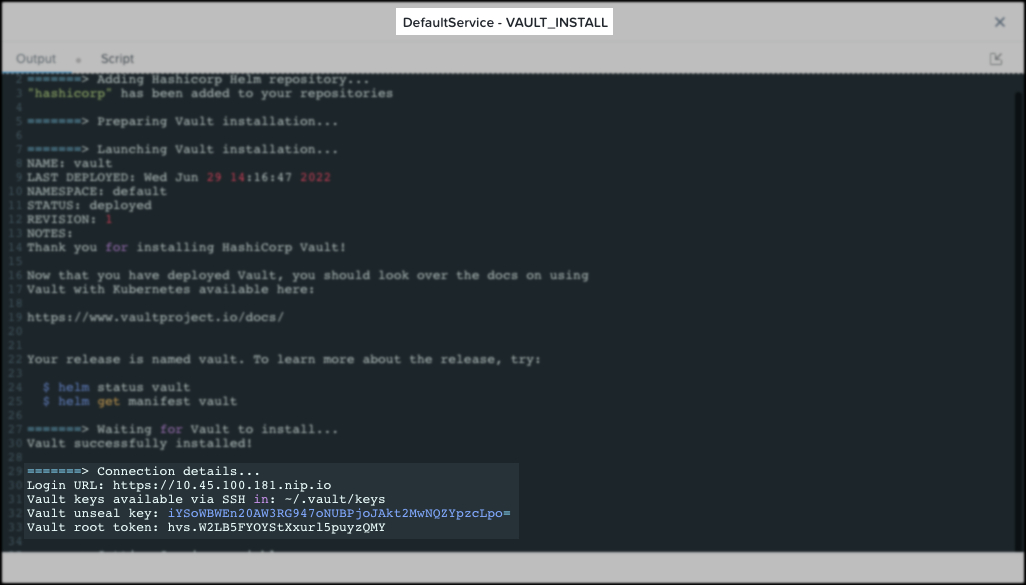
- Launch the blueprint. Once the deployment has finished, in about 5 minutes, you’ll be able to access the Vault page. The access details are available in the application Audit tab under the task Create -> DefaultService – Package Install -> DefaultService – VAULT_INSTALL.
Be aware that the unseal key and root token will be only visible if you choose to print them out during launch.
To test this integration a minimum configuration is needed in Vault. It is expected that the reader has a minimum understanding of Vault. The steps provided in this blog are intended for demonstration purposes only.
SSH into the Vault server and run the following commands:
- Export the values for the unseal key and the root token to authenticate in later commands:
export VAULT_UNSEAL=$(jq -r '.unseal_keys_b64[0]' ~/.keys)
export VAULT_TOKEN=$(jq -r '.root_token' ~/.keys)- Unseal the vault to gain access:
vault operator unseal ${VAULT_UNSEAL}- Enable the Key/Value secrets engine version 1 on the path kv-v1 where secrets will be stored:
vault secrets enable -path="kv-v1" -description="Nutanix test" kv- Create a secret called ssh-password for testing SSH password-based authentication with Nutanix Self-Service in the path kv-v1/nutanix/self-service/ssh-password:
vault kv put kv-v1/nutanix/self-service/ssh-password username=<username> secret=<password>- (Optional) Create a secret called ssh-key for testing SSH key-based authentication in the path kv-v1/nutanix/self-service/ssh-key:
vault kv put kv-v1/nutanix/self-service/ssh-key username=<username> secret=-<<EOF
-----BEGIN RSA PRIVATE KEY-----
[...]
-----END RSA PRIVATE KEY-----
EOF- Create a policy called nutanix for Nutanix Self-Service to read any key/value in the path kv-v1/nutanix/self-service:
vault policy write nutanix -<<EOF
path "kv-v1/nutanix/self-service/*" {
    capabilities = [ "read" ]
}
EOF- Enable the AppRole authentication method:
vault auth enable approle- Create a named role called nutanix that uses the previous policy, allowing just the Self-Service machine to retrieve secrets, that can be used just once:
vault write auth/approle/role/nutanix \
    token_policies="nutanix" \
    secret_id_bound_cidrs="<Nutanix_Self-Service_IP>/32" \
token_num_uses=1- Retrieve the role-id for the nutanix role and copy its value for later. The Self-Service Runbook will need it:
vault read auth/approle/role/nutanix/role-idKey Value
--- -----
role_id e93bdeb7-c7b7-9cbd-0bcb-bf864a014d0c- Get a SecretID issued against the AppRole nutanix and copy its value for later. The Self-Service Runbook will need it:
vault write -f auth/approle/role/nutanix/secret-idKey Value
--- -----
secret_id 2da51add-ed30-c224-b10d-6035ff9c397f
secret_id_accessor 08837e16-20b3-0ac8-bc05-22079e30e54c
secret_id_ttl 0sWell done, you now have a Vault setup ready!
Creating a Self-Service Runbook to retrieve secrets from Vault
As it was mentioned at the beginning, a Credential Provider account relies on Self-Service runbooks for retrieving secrets from an external provider. The process to create this runbook is slightly different to the standard process. This runbook is created as part of a Credential Provider account and cannot be shared with other accounts. Also, the runbook is not visible through the standard Self-Service Runbooks page ( ).
).
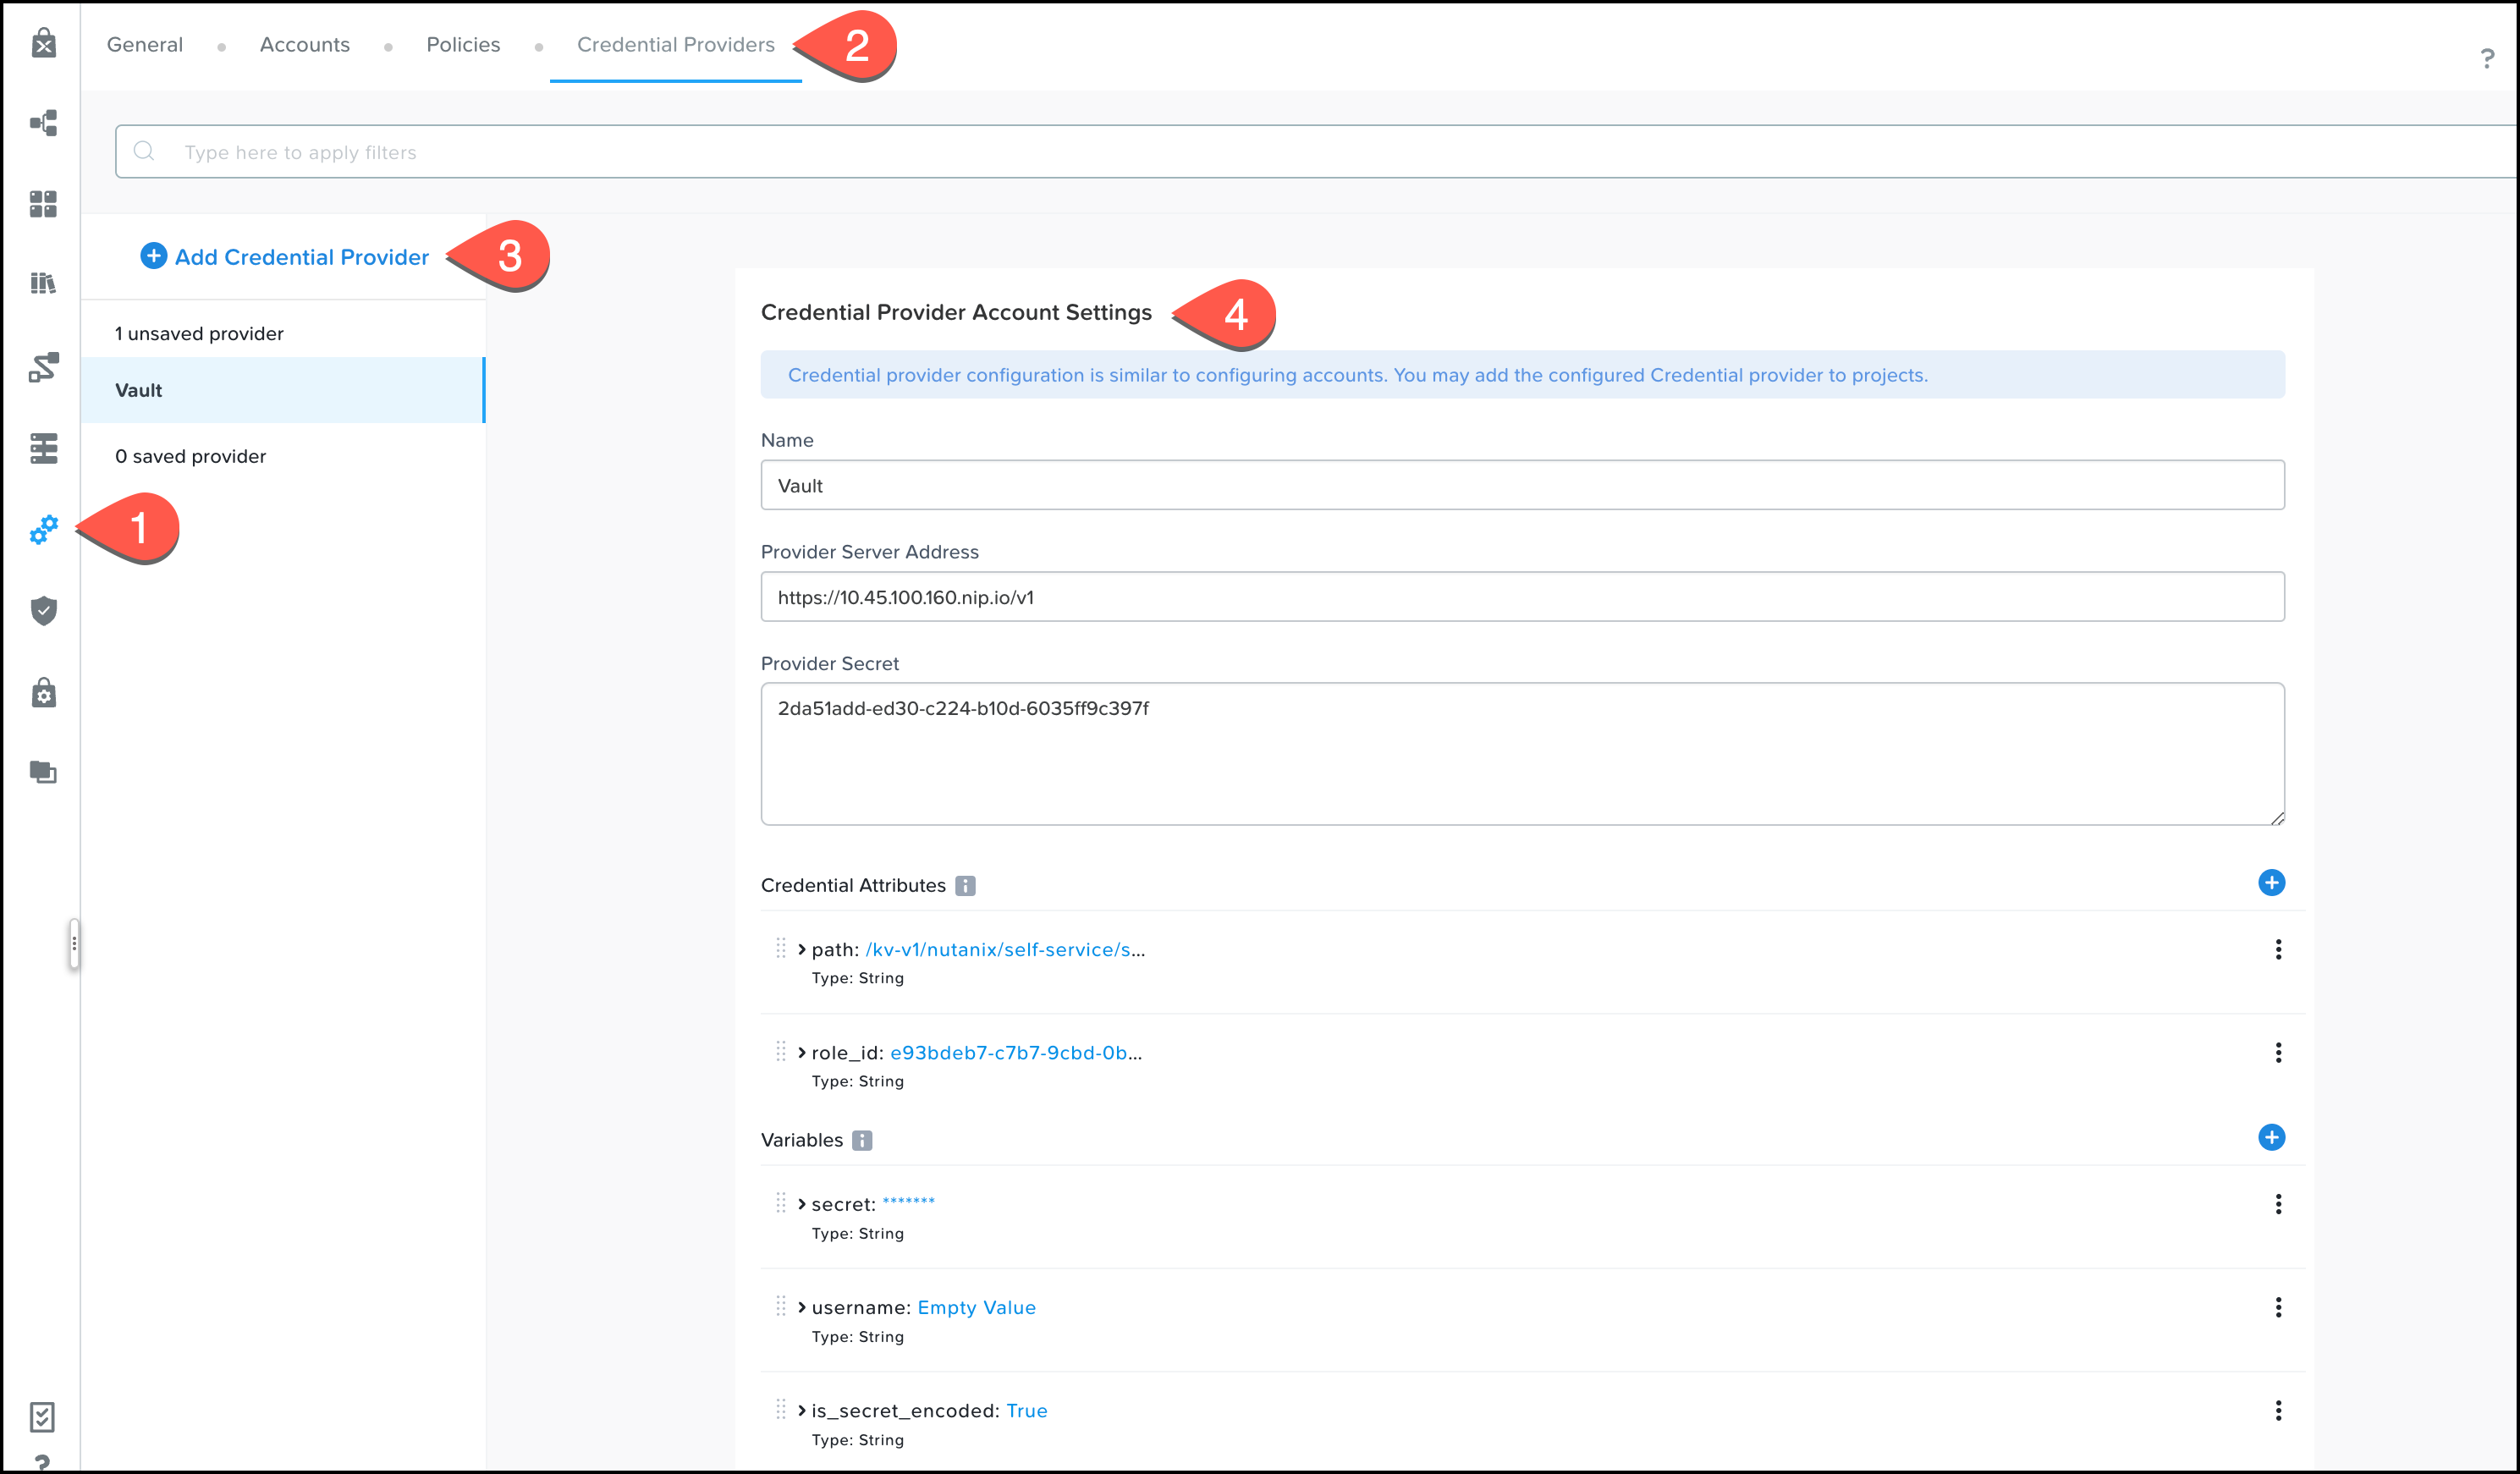
To create your first Credential Provider account head to the Settings page ( ) and click on Credential Providers.
Add a Credential Provider and complete the settings:
- Name: Vault
- Provider Server Address: https://<Vault_IP_address>.nip.io/v1
- Provider Secret: <nutanix_vault_secret_id>
- Credential Attributes. Let’s create a couple of them that the runbook will need:
- Name: path
Data Type: String
Value: /kv-v1/nutanix/self-service/ssh-password or /kv-v1/nutanix/self-service/ssh-key
Secret: unchecked - Name: role_id
Data Type: String
Value: <nutanix_vault_role_id>
Secret: unchecked
- Name: path
- Variables. These are for output values from the runbook.
- Name: secret (This default variable shouldn’t be deleted. It’s used to store the secret and is accessible in a blueprint via the credential property
.secret, ex: @@{credential_name.secret}@@ )
Data Type: String
Value: empty
Secret: checked - Name: username (optional – in this case we need this variable because our secret includes username and secret)
Data Type: String
Value: empty
Secret: unchecked - Name: is_secret_encoded (optional – in this case we need this variable because the secret is encoded. The reason for encoding is to support multiline strings such as SSH keys)
Data Type: String
Value: True
Secret: unchecked
- Name: secret (This default variable shouldn’t be deleted. It’s used to store the secret and is accessible in a blueprint via the credential property
The credential account is almost done, but we are still missing the most important part, the runbook.
- Click Configure in the Runbook section at the bottom of the Credential page.
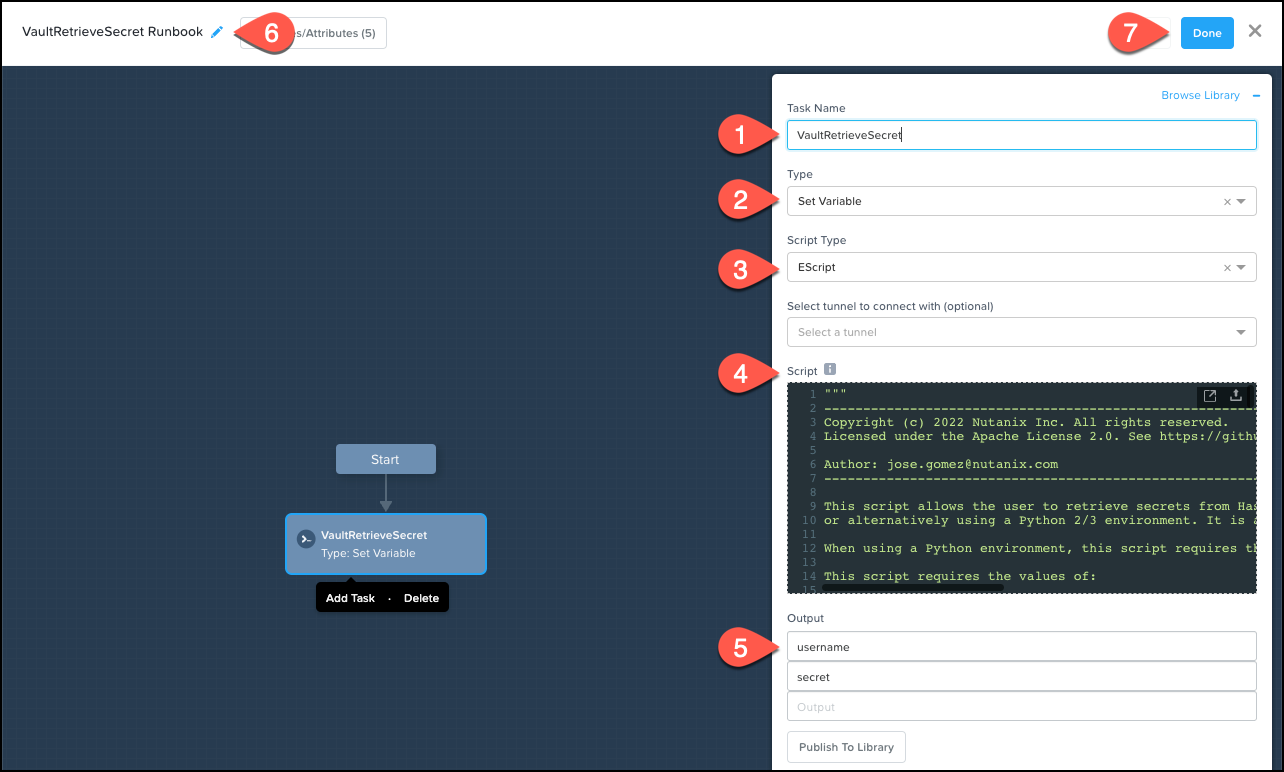
- Click + Add Task and complete the settings:
- Task Name: VaultRetrieveSecret
- Type: Set Variable
- Script Type: EScript
- Select tunnel to connect with (optional): unselected
- Output:
- username
- secret
- Script:
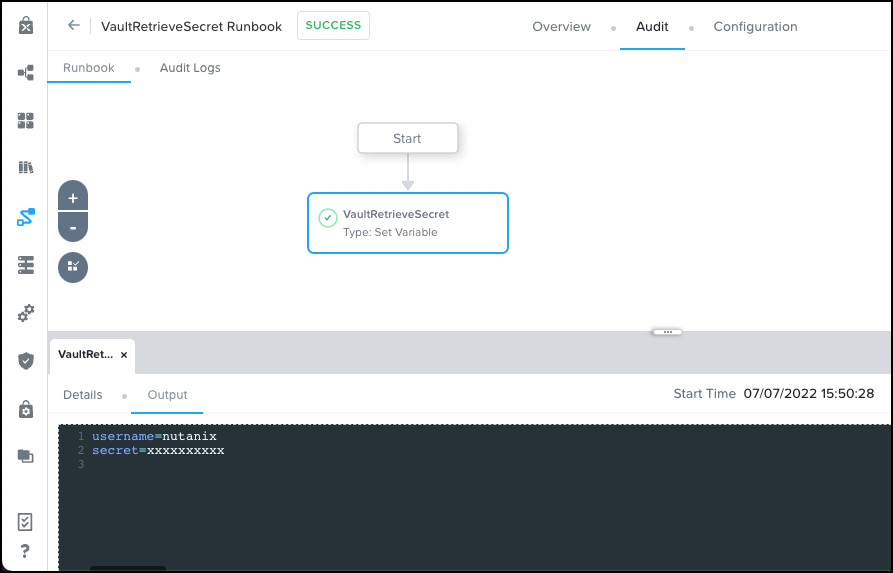
Before leaving the runbook designer, change the runbook name to VaultRetrieveSecret Runbook and click Done.
Save the account, so the test button gets enabled and the runbook can get tested. Click Test, verify the values for the path and role_id variables, and click Confirm.
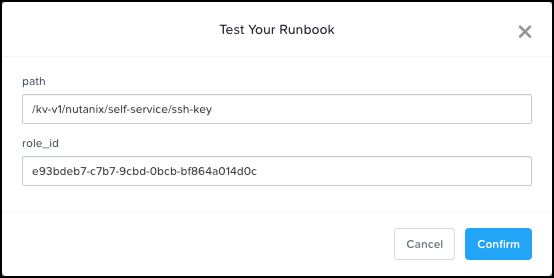
If the runbook execution fails, check the script and set DEBUG=True and re-run the test, otherwise the status should be success.
At the bottom of the page you can check the runbook output with the values for username and the secret, with the last hidden.
Adding and using a Credential account in a blueprint
Before you can use the Credential account in a blueprint, you have to add this to the project so a blueprint developer can consume it.
Go to the projects (![]() ) page, open the desired project and in Accounts add the Vault Credential account, don’t forget to save the project.
) page, open the desired project and in Accounts add the Vault Credential account, don’t forget to save the project.
If you are using project environments, make sure to include the new credential account.
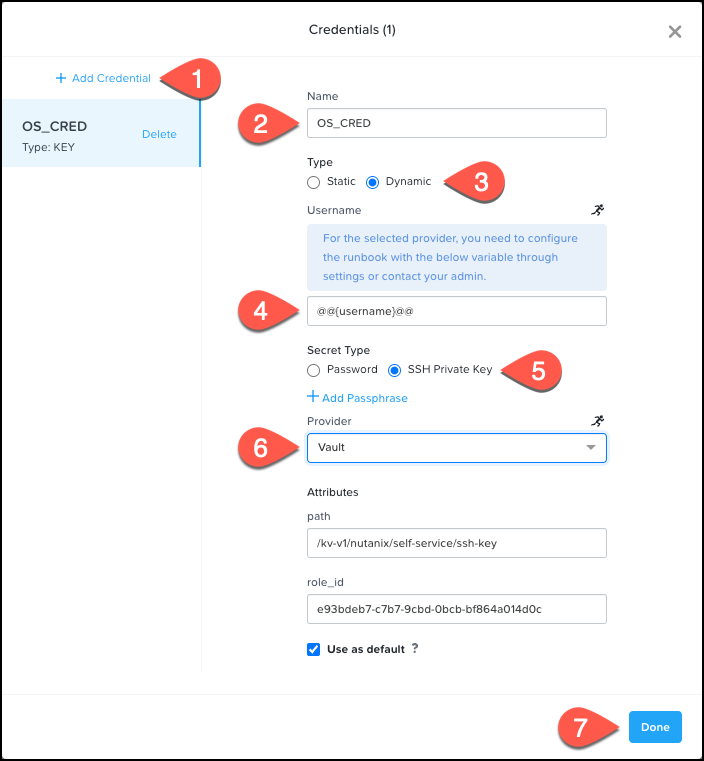
To test the credential in a blueprint you have to set the credential type to Dynamic. If the secret in Vault includes a username, ours does, you leave the default value @@{username}@@. Make sure the Secret Type matches with the sort of credential previously created in Vault, password-based or SSH key-based. Select the Vault provider and change the Attributes as needed. When finished, click Done.
Congratulations!!! You have integrated your Nutanix Self-Service with HashiCorp Vault. The same process can be followed for other secrets manager solutions.
Don’t forget to visit the Nutanix YouTube channel where you can find more content about Nutanix Self-Service.