
")
In our most recent article, Nutanix v4 APIs: Making The First Requests (Python 3 API Client), we introduced the Nutanix v4 APIs and outlined how to get started using them with Python 3. Since that intro covered using the APIs via HTTPS request, similar approaches can be used with the language of your choice. In today’s article we’ll introduce a first for Nutanix when it comes to APIs: the brand new Nutanix v4 SDKs.
The introductory parts of this article (Python venv etc) will be very familiar to those already writing Python code and can be skipped, if necessary. A complete and more detailed code sample can be found on the Nutanix.dev code samples page.
Why SDKs?
For some time Nutanix has had numerous APIs covering various products. New users of the Nutanix APIs are encouraged to look at Nutanix API versions page. That article will explain the available features in the current APIs and why a specific API version would be chosen for a specific task.
From Prism Element and Prism Central to products such as Self Service (formerly Calm) and Nutanix Kubernetes Engine (formerly Karbon), many products and management interfaces can be controlled and managed via REST API. However, the only SDK available until now has been the Nutanix Calm DSL, used to interact with Nutanix Self Service.
With the introduction of the Nutanix v4 SDKs, we’re moving towards those SDKs being the primary and recommended way of programmatically interacting with Nutanix products. This doesn’t mean the custom client methods are going anywhere so if your preferred method is interact with Nutanix products via HTTPS requests, that will continue to be fully supported.
Starting with the first EA v4 API release in Prism Central version pc.2022.6, the following language-specific SDKs are available.
- Python 3
- Java
- Javascript
- Go
There are ongoing plans to support additional languages; more information will be published as it becomes available.
Getting Started
This article will cover using the Nutanix v4 SDKs with Python 3. Future articles and code samples will cover other languages, so please stay tuned for those.
The development environment being used today is as follows.
- Linux workstation running Arch Linux and Python 3.10. Please note that Python 3.10 is being used due to this being a development environment and that Python 3.6, 3.7 or 3.8 are the officially tested and supported versions. Mac and Windows workstations running supported Python versions can be used in place of Linux, if that suits your environment.
- Prism Central
pc.2022.6 - AOS
6.0.2.4 - An environment capable of installing packages from the public PyPi repository; we’ll use a virtual environment to ensure the system’s Python install is unaffected
Creating requirements.txt
The ubiquitous requirements.txt file, a specially formatted file that outlines the package requirements, will be used for our demo project. requirements.txt for this project is as follows.
Note: Only requests and ntnx_vmm_py_client are mandatory for this demo. Black, flake8 and pylint have been added for code formatting and linting purposes only.
requests==2.28.1
black==22.6.0
flake8==5.0.4
pylint==2.14.5
ntnx_vmm_py_client==4.0.1a1
Create and activate virtual environment
When testing Python code, it is generally accepted to work in a virtual environment. We’ll use the built-in venv module, although you are welcome to use any virtual environment that suits your needs. With requirements.txt created, our virtual environment can be created, activated and the packages installed as follows.
At this stage we’re assuming Python is already installed and accessible via the python command.
Linux & Mac
python -m venv venv
. venv/bin/activate
pip install -r requirements.txt
Windows
<python_install_directory>\python.exe -m venv venv
venv\Scripts\activate.bat
pip.exe install -r requirements.txt
Verify Nutanix vmm SDK install
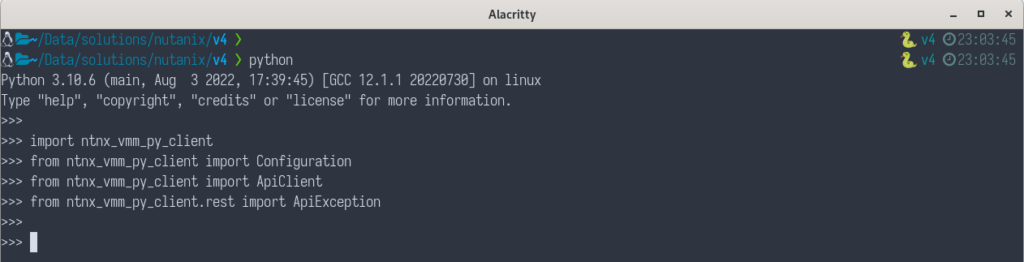
- Start the Python REPL by entering
pythonin the terminal/command prompt - The following basic commands can be used to verify the SDK has been installed correctly. Please take note of the
ntnx_vmm_py_client.restmodule name used when importingApiException.
>>> import ntnx_vmm_py_client
>>> from ntnx_vmm_py_client import Configuration
>>> from ntnx_vmm_py_client import ApiClient
>>> from ntnx_vmm_py_client.rest import ApiException
The successful completion of these commands indicates the vmm SDK has been installed and can be used as expected.
Create configuration
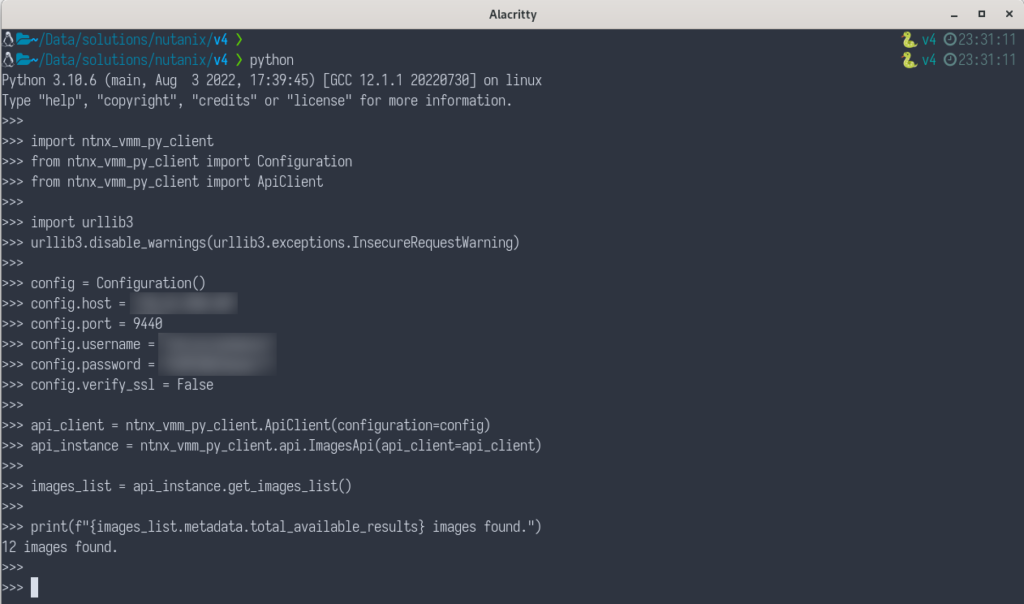
When using the Nutanix SDKs, a number of configuration properties are supported. The official SDK documentation is available on the new Nutanix Developers Portal, from which we’ll use the following Python code to create our configuration.
Note we’re continuing this in the same REPL session used earlier.
import urllib3
# disable insecure connection warnings; please be mindful of the implications if you do this in production
urllib3.disable_warnings(urllib3.exceptions.InsecureRequestWarning)

# create the configuration
config = Configuration()
config.host = "<prism_central_ip_or_fqdn_here>"
# port is optional; defaults to 9440
config.port = 9440
config.username = "<prism_central_username_here>"
config.password = "<prism_central_password_here>"
config.verify_ssl = False
Request Prism Central images list
api_client = ntnx_vmm_py_client.ApiClient(configuration=config)
api_instance = ntnx_vmm_py_client.api.ImagesApi(api_client=api_client)

# request the images list
images_list = api_instance.get_images_list()

# print a message showing how many images were found
print(f"{images_list.metadata.total_available_results} images found.")
Example Response
If everything went well and the connection to Prism Central was successful, including authentication, you’ll end up with a screenshot similar to the one shown below.
Summary so far
So far we’ve demonstrated how easily the Nutanix Python SDK can be used to retrieve a list of Prism Central images. One of the main differences between this and the methods demonstrated in the previous article is that the connection to Prism Central doesn’t need to be manually created or managed. From a development perspective this can reduce the time required to get working code running and includes the ability to use common practices like code completion.
New Features
The existing Nutanix v2.0 and v3 APIs, while extensive, are missing a couple of commonly-requested features. On both our internal support forums and in requests from customers/partners, we are often asked questions like this one:
How do I filter a list of <entity> without manually parsing a huge list of all <entities> in my cluster?
– Common question re existing APIs
The new SDKs have been written with this type of question in mind and support entity filtering following the OData v4.01 URL conventions. This means that instead of manually searching a potentially huge list of entities for the one we want, filters like the examples shown below can be used instead.
In this example we want to find all images with a name matching a specific pattern.
# this line replaces the "images_list = ..." line above
images_list = api_instance.get_images_list(_filter="startswith(name, 'U')")
# this line replaces the "images_list = ..." line above
images_list = api_instance.get_images_list(_filter="name in ('FSC 1.1.0','FSC 1.0.0')")In order, the new OData filters are being used for the following tasks, respectively:
- Find images with name starting with “U”
- Find images with name matching “FSC 1.1.0” or “FSC 1.0.0”
We can also use the orderby parameter to sort the results before they are returned to the user:
# this line replaces the "images_list = ..." line above
images_list = api_instance.get_images_list(_orderby="sizeBytes desc")
for image in images_list.data:
    print(f"{image.name} found, size {image.size_bytes} bytes.")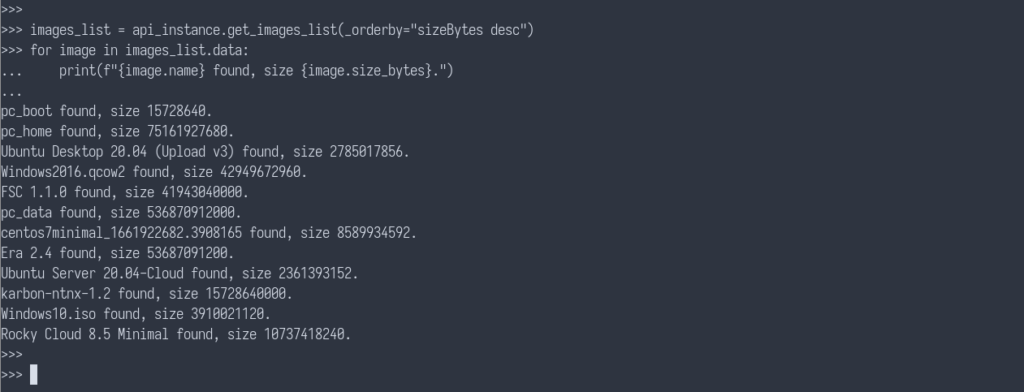
# this line replaces the "images_list = ..." line above
images_list = api_instance.get_images_list(_orderby="name asc")
for image in images_list.data:
    print(f"{image.name} found.")
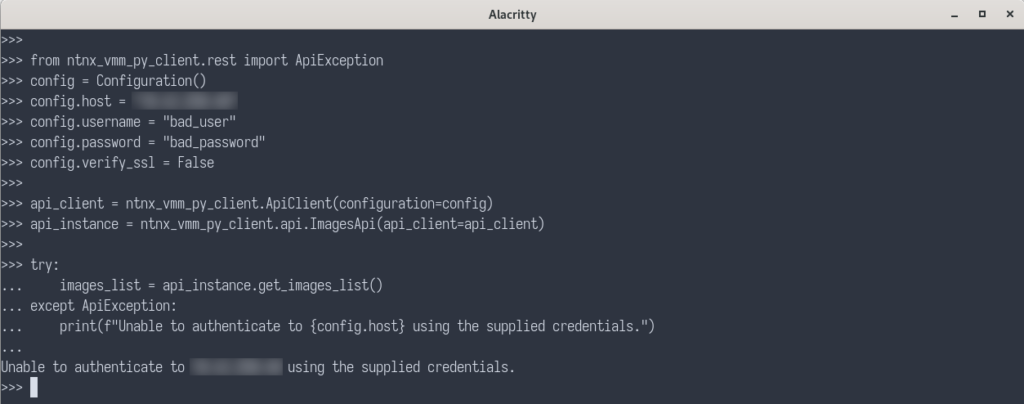
Exception Handling
The new SDKs support exception handling via the rest.ApiException module. For example, we can catch authentication errors by making only a few changes to our demo code.
# import the exception handling module
from ntnx_vmm_py_client.rest import ApiException

# create configuration; note bad username and password
config = Configuration()
config.host = "<prism_central_ip_or_fqdn_here>"
# port is optional; defaults to 9440
config.port = 9440
config.username = "bad_user"
config.password = "bad_password"
config.verify_ssl = False

api_client = ntnx_vmm_py_client.ApiClient(configuration=config)
api_instance = ntnx_vmm_py_client.api.ImagesApi(api_client=api_client)

try:
    images_list = api_instance.get_images_list()
except ApiException as ex:
    print(f"Unable to authenticate to {config.host} using the supplied credentials.")
The response, now that we’re watching for authentication errors, is as follows:
A Known Issue
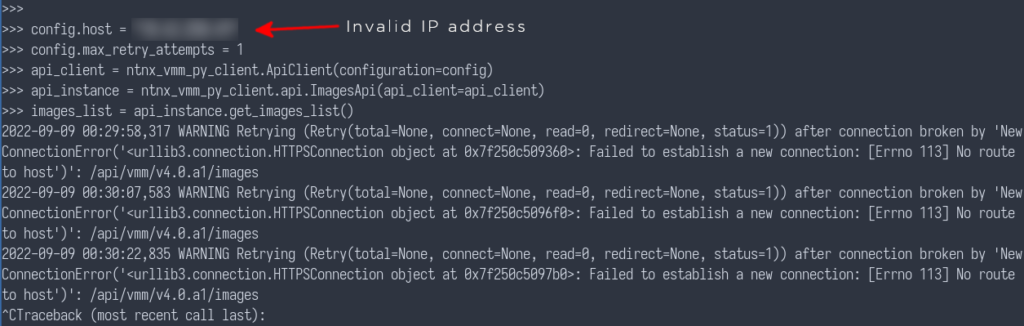
When creating the ntnx_vmm_py_client.Configuration instance or while reading the official Nutanix v4 SDK documentation, you may notice the availability of a property named max_retry_attempts. Configuring this property currently has no effect unless specific HTTP codes are returned, resulting in a potentially infinite retry loop. Nutanix Engineering is aware of this issue.
Wrapping Up
Throughout this intro article we’ve demonstrated a number of key topics.
- The Nutanix EA v4 APIs have made available a collection of EA client SDKs
- Current language implementations are Python 3, Java, Go and JS
- Using the Python SDK (in this example) is simple and can speed up development against the Nutanix APIs
- New filtering options provided much greater flexibility over exactly what is returned from a specific request
- New exception handling options allow better control of unexpected outcomes, e.g. authentication errors
Hopefully this intro has been useful. Keep an eye out for more content coming very soon. Thanks for reading and have a great a day! 🙂