

Exploring the Secured Realm
In the ever-evolving landscape of cybersecurity, one concept that stands as a fortress against potential threats is the air-gapped environment. An air-gapped system operates in splendid isolation from the vast expanse of the internet, intentionally cut off from external networks to enhance security and protect sensitive information. Financial institutions, especially those dealing with high-value transactions, may have air-gapped environments to enhance the security of financial data and prevent unauthorized access. Healthcare organizations may isolate certain critical systems or databases to protect sensitive patient information from cyber threats. Medical devices and equipment may also operate in offline mode to minimize security risks. Research facilities, especially those involved in sensitive or proprietary research, may isolate certain networks or systems to protect intellectual property from cyber espionage.
While the use cases for disconnected installations span across multiple verticals, the complexity of setting them up still remains high. In this blog, we will delve into a detailed procedure of OpenShift® disconnected installation using the installer-provisioned Infrastructure (IPI) method on the Nutanix® platform.
Architecture Diagram

- Web Server: This is used to host the OpenShift host OS image, with access to the internet to download the image. This can be hosted on an existing web server or on the Nutanix Objects Storage platform. In this lab, we will run a containerized web server on the mirror registry for simplicity. Note that the Prism Element™ and Prism Central™ subnets need access to this.
- Mirror Registry: The OpenShift components like the API server and etcd run as containers and needs to be pulled from an image registry. During Day 0 provisioning, the mirror registry is used as a target to mirror the required OpenShift images from public registries. This will also be used to download the installation binaries and tools for installation. Note that the OCP nodes subnet needs access to this.
- Bastion: Machine used to perform the OpenShift installation.
- Note that this needs access to the OCP nodes, Prism Element, Prism Central and Mirror Registry subnets.
- OCP nodes: These will be deployed in a private subnet, but require connectivity to the mirror registry and the web server hosting the OS. This needs access to Prism Central as well.
Prerequisites
- Create a Prism Central Cloud Native role for the installation user.
- Ensure that the Prism Central certificates are signed by a root CA with a subject alternative name (SAN) that includes the PC IP address or/and the FQDN. Learn more about this here.
- Generate CA-signed certificates for the mirror registry, which will replace the default self-signed certificates.
- Ensure you have sufficient IP addresses carved out for the installation.
- Two IP addresses should be reserved for API and Ingress VIP
- One IP address for the Bootstrap VM
- Three IP addresses for the control plane nodes
- One IP address for each compute node
- One IP address for each infrastructure node
- DNS entries for API and Ingress VIP and the mirror registry. More details can be found here.
Configuring the Mirror Registry
The mirror registry is a local minimal instance of the Red Hat Quay™ platform and its required components.
We have used Red Hat® Enterprise Linux 9.2 for the mirror registry VM in this lab. Running podman in the VM is one of the prerequisites since it downloads the required registry images and sets it up as a containerized service.
Please note that another option is to use an image registry that already exists in your environment. For a detailed installation workflow, please refer to the OpenShift documentation.
Validation
- In the VM, we define the FQDN as the hostname.
hostnamectl hostname mirror-registry.ntnx.local- We add the root CA certificate to the OS trust store.
#Copy the certificates to the anchors directory
sudo cp cert* /etc/pki/ca-trust/source/anchors
#update the ca trust
sudo update-ca-trust extract
Installing the mirror registry binary
- Run the code block below to download and extract the mirror registry tool from the OpenShift console.
{
wget https://developers.redhat.com/content-gateway/rest/mirror/pub/openshift-v4/clients/mirror-registry/latest/mirror-registry.tar.gz
tar -xzvf mirror-registry.tar.gz
}- Let’s create a directory to store persistent Quay storage.
mkdir /home/quay- We have copied over the public and private TLS keys signed by our trusted CA to the mirror registry VM (from the Prerequisites)
- Kick off the registry installation using the SSL certificates, Quay storage location, and password as configuration options.
./mirror-registry install --quayHostname $(hostname -f) --quayStorage /home/quay --sslCert mirror-registry-openshift.crt --sslKey mirror-registry-openshift.key --initPassword nutanix/4u- If the installation completes successfully, we should see a log message like
Quay is available at https://mirror-registry.ntnx.local:8443 with credentials (init, nutanix/4u)- Logging into the registry, we can further validate that this works as expected.
podman login -u init mirror-registry.ntnx.local:8443Download the pull secret
A pull secret is required for OpenShift to access image registries and pull images from them. Download the pull secret for your user from the OpenShift console and save it as pull-secret.txt.
- We add the mirror registry details to the pull secret.
podman login -u init --authfile pull-secret.txt mirror-registry.ntnx.local:8443- Make a copy of the pull-secret.txt as ~/.docker/config.json (this will be used for mirroring the CSI catalog later).
mkdir  ~/.docker
cp ./pull-secret.txt ~/.docker/config.json- Finally, we will generate a compact version (oneline) of the pull-secret.txt file (to be used for install-config.yaml later). We ensure that we copy this pull secret to the bastion VM from where we will perform the OCP installation.
cat pull-secret.txt | jq . -c > pull-secret-oneline.jsonNote: The jq parsing used in the preceding command also checks that the pull-secret.txt file is valid. If we do not get any error when running this command, it means that the pull-secret.txt and pull-secret-oneline.json files are valid.
Mirroring images using the oc-mirror plugin
oc-mirror is a tool that can be leveraged to mirror OpenShift images and other Operator images into the disconnected registry.
- Download and extract the oc-mirror plugin from the OpenShift console.
{
wget https://mirror.openshift.com/pub/openshift-v4/x86_64/clients/ocp/stable/oc-mirror.tar.gz
tar -xzvf oc-mirror.tar.gz
chmod +x oc-mirror
sudo mv oc-mirror /usr/local/bin/
}- We create an imageset-config.yaml file which serves as a template for the image set configuration.
oc-mirror init --registry mirror-registry.ntnx.local:8443/oc-mirror/oc-mirror-metadata > imageset-config.yaml- Update and add the highlighted sections in the imageset-config.yaml file. Note that we have specified the CSI Operator image to be retrieved. (We can add more as desired).
kind: ImageSetConfiguration
apiVersion: mirror.openshift.io/v1alpha2
storageConfig:
  registry:
	imageURL: mirror-registry.ntnx.local:8443/oc-mirror/oc-mirror-metadata
	skipTLS: false
mirror:
  platform:
	channels:
	- name: stable-4.13
  	  type: ocp
	graph: true
  operators:
  - catalog: registry.redhat.io/redhat/certified-operator-index:v4.13
	packages:
	- name: nutanixcsioperator
  	channels:
  	- name: stable
helm: {}- Finally, we run the command below to mirror the specified images to our mirror registry.
oc-mirror --config=./imageset-config.yaml docker://mirror-registry.ntnx.local:8443/oc-mirrorThe time for this process can vary depending on the network speed. On completion, we will see the results directory created which contains all the YAML files.
Example:
Rendering catalog image "mirror-registry.ntnx.local:8443/oc-mirror/redhat/certified-operator-index:v4.13" with file-based catalog
Writing image mapping to oc-mirror-workspace/results-1696428587/mapping.txt
Writing UpdateService manifests to oc-mirror-workspace/results-1696428587
Writing CatalogSource manifests to oc-mirror-workspace/results-1696428587
Writing ICSP manifests to oc-mirror-workspace/results-1696428587
[root@mirror-registry ~]# tree oc-mirror-workspace/results-1696428587
oc-mirror-workspace/results-1696428587
├── catalogSource-certified-operator-index.yaml
├── charts
├── imageContentSourcePolicy.yaml
├── mapping.txt
├── release-signatures
│   └── signature-sha256-d62495768e335c79.json
└── updateService.yaml
This completes the mirror registry setup.
Note: We will make use of some of the content of imageContentSourcePolicy.yaml later on in install-config.yaml file for release image content registry path.
Download the required binaries for OCP installation
- Run the code block below to download and install the necessary installation tools. While we have used OCP 4.13 in this exercise, please fetch your required binaries from here. OCP 4.14 is the latest and supported version at this time.
{
##Download openshift installer binary
wget https://mirror.openshift.com/pub/openshift-v4/x86_64/clients/ocp/stable/openshift-install-linux.tar.gz
tar -xvf openshift-install-linux.tar.gz

##Download cco
wget https://mirror.openshift.com/pub/openshift-v4/x86_64/clients/ocp/stable/ccoctl-linux.tar.gz
tar -xvf ccoctl-linux.tar.gz

##Download oc Client
wget https://mirror.openshift.com/pub/openshift-v4/x86_64/clients/ocp/stable/openshift-client-linux.tar.gz
tar -xvf openshift-client-linux.tar.gz

##Remove downloads
rm -r *.gz

##Make binaries executable
sudo mv ccoctl openshift-install oc kubectl /usr/local/bin
}- Copy the OpenShift installation image URL from the following command (highlighted). We will require it in the subsequent steps.
openshift-install coreos print-stream-json | less


#Search for nutanix (using /nutanix)  and get the qcow2 file
        "nutanix": {
          "release": "413.92.202307260246-0",
          "formats": {
            "qcow2": {
              "disk": {
                "location": "https://rhcos.mirror.openshift.com/art/storage/prod/streams/4.13-9.2/builds/413.92.202307260246-0/x86_64/rhcos-413.92.202307260246-0-nutanix.x86_64.qcow2",
                "sha256": "304f4e04dda1411a61f288f17f265989e361e15d75f876a364705e29e1880f15"
…
…
..- Copy the oc, openshift-install and ccoctl binaries to the bastion VM and make them executable as well following the above code block.
Configuring the Web Server
- If you have an existing web server in your environment, feel free to skip this until Step 6, else please follow along. Grab the OpenShift installation image URL and download the image on the mirror registry.
{
mkdir -p rhcos/image && cd rhcos
wget -P image/ https://rhcos.mirror.openshift.com/art/storage/prod/streams/4.13-9.2/builds/413.92.202307260246-0/x86_64/rhcos-413.92.202307260246-0-nutanix.x86_64.qcow2
}- We will create a containerized Apache webserver that will host the image.
{
cat <<EOF > Dockerfile
FROM httpd:2.4
COPY ./image/ /usr/local/apache2/htdocs/
EOF
podman build -t my-httpd-image .
podman run -d -p 8080:80 my-httpd-image
}- Validate you are able to download the image from a web browser with the below URL.
http://<mirror_registry_IP>:8080/rhcos-413.92.202307260246-0-nutanix.x86_64.qcow2OpenShift Installation
Let’s switch to the bastion VM from where we will perform the installation. We have used Red Hat Enterprise Linux 9.2 for the bastion VM.
Validation
- We verify that the Fully Qualified Domain Names (FQDN) of the API and Ingress VIP and the mirror registry resolve to the accurate IP addresses specified in the DNS. “demo-ocp” is the OpenShift cluster name and “ntnx.local” is the domain name we will be using.
dig +short api.demo-ocp.ntnx.local
dig +short *.apps.demo-ocp.ntnx.local
dig +short mirror-registry.ntnx.local- To ensure there are no certificate errors, we curl to Prism Central and Prism Element FQDN.
curl https://pc.ntnx.local:9440- We add the root CA certificate to the OS trust store.
#Copy the certificates to the anchors directory
sudo cp cert* /etc/pki/ca-trust/source/anchors


#update the ca trust
sudo update-ca-trust extract
Installation
We will use our familiar installer-provisioned infrastructure (IPI) method to install OCP. A detailed procedure can be found in this blog. Once the install-config.yaml file has been generated by the installer, we will open it and add the following extra parameters.
additionalTrustBundle: <rootCA certificate>- The rootCA cert will be added to the RHCOS trust store in the OpenShift nodes and it can communicate with Prism Central and the mirror registry
additionalTrustBundlePolicy: Always- By setting this to “Always”, we do not have to create additional Proxy manifests, which are required if using “Proxyonly”
imageContentSources:
- mirrors:
  - mirror-registry.ntnx.local:8443/oc-mirror/openshift/release-images
  source: quay.io/openshift-release-dev/ocp-release
- mirrors:
  - mirror-registry.ntnx.local:8443/oc-mirror/openshift/release
source: quay.io/openshift-release-dev/ocp-v4.0-art-dev- Add details of the mirror registry hosting the OpenShift images. These can be obtained from imageContentSourcePolicy.yaml we created earlier.
platform.nutanix.clusterOSImage: <path_to_image_in_webserver>- Add the path to the RHCOS boot image
- pullSecret must be the “pull-secret-online.json” we created earlier.
machineNetwork:
- cidr: <OpenShift VM node network>- Add the OpenShift VM nodes subnet details
This is an example of the install-config.yaml file.
additionalTrustBundlePolicy: Always
apiVersion: v1
baseDomain: ntnx.local
imageContentSources:
- mirrors:
  - mirror-registry.ntnx.local:8443/oc-mirror/openshift/release-images
  source: quay.io/openshift-release-dev/ocp-release
- mirrors:
  - mirror-registry.ntnx.local:8443/oc-mirror/openshift/release
  source: quay.io/openshift-release-dev/ocp-v4.0-art-dev
credentialsMode: Manual
additionalTrustBundle: |
  -----BEGIN CERTIFICATE-----
  MIIENTCCAx2gAwIBAgIIJg90dX5b5vAwDQYJKoZIhvcNAQELBQAwazEWMBQGA1UE
  .
  .
  BKPUMpmzF3wwnmAmG8wmMOphDzQmm6gNRg==
  -----END CERTIFICATE-----
compute:
- architecture: amd64
  hyperthreading: Enabled
  name: worker
  platform:
    nutanix:
      cpus: 8
      coresPerSocket: 1
      memoryMiB: 8192
      osDisk:
        diskSizeGiB: 160
  replicas: 2
controlPlane:
  architecture: amd64
  hyperthreading: Enabled
  name: master
  platform:
    nutanix:
      cpus: 4
      coresPerSocket: 1
      memoryMiB: 16384
      osDisk:
        diskSizeGiB: 160
  replicas: 3
metadata:
  name: demo-ocp
networking:
  clusterNetwork:
  - cidr: 10.128.0.0/14
    hostPrefix: 23
  machineNetwork:
  - cidr: 10.48.58.0/23
  networkType: OVNKubernetes
  serviceNetwork:
  - 172.30.0.0/16
platform:
  nutanix:
    clusterOSImage: http://10.48.59.203/rhcos-413.92.202307260246-0-nutanix.x86_64.qcow2
    apiVIP: 10.48.59.220
    ingressVIP: 10.48.59.219
    prismCentral:
      endpoint:
        address: pc.ntnx.local
        port: 9440
      password: ******
      username: admin
    prismElements:
    - endpoint:
        address: 10.48.58.212
        port: 9440
      uuid: 0006067e-4ad4-4f8e-5214-ac1f6b3db3c4
    subnetUUIDs:
    - 9d95b921-1d29-437c-bde1-58507fc63fdd
publish: External
pullSecret: ''
sshKey: ''
We generate the manifests and create the cluster following this. Ensure this is run from the same directory where the install-config.yaml file is located.
openshift-install create manifests
openshift-install create cluster
Great, the cluster has been installed successfully! However, there is one final step that has to be done.
Post Installation
By default, OpenShift looks up Operators from the OperatorHub, which is sourced with content provided by Red Hat and community projects. We will have to disable this and point to the registry we created where we can control the catalog sources.
Let’s switch to the mirror registry VM and login to the OpenShift cluster.
- We run the following command to disable the default catalog sources. Once patched, we should not see any operators from the OCP console.
oc patch OperatorHub cluster --type json -p '[{"op": "add", "path": "/spec/disableAllDefaultSources", "value": true}]'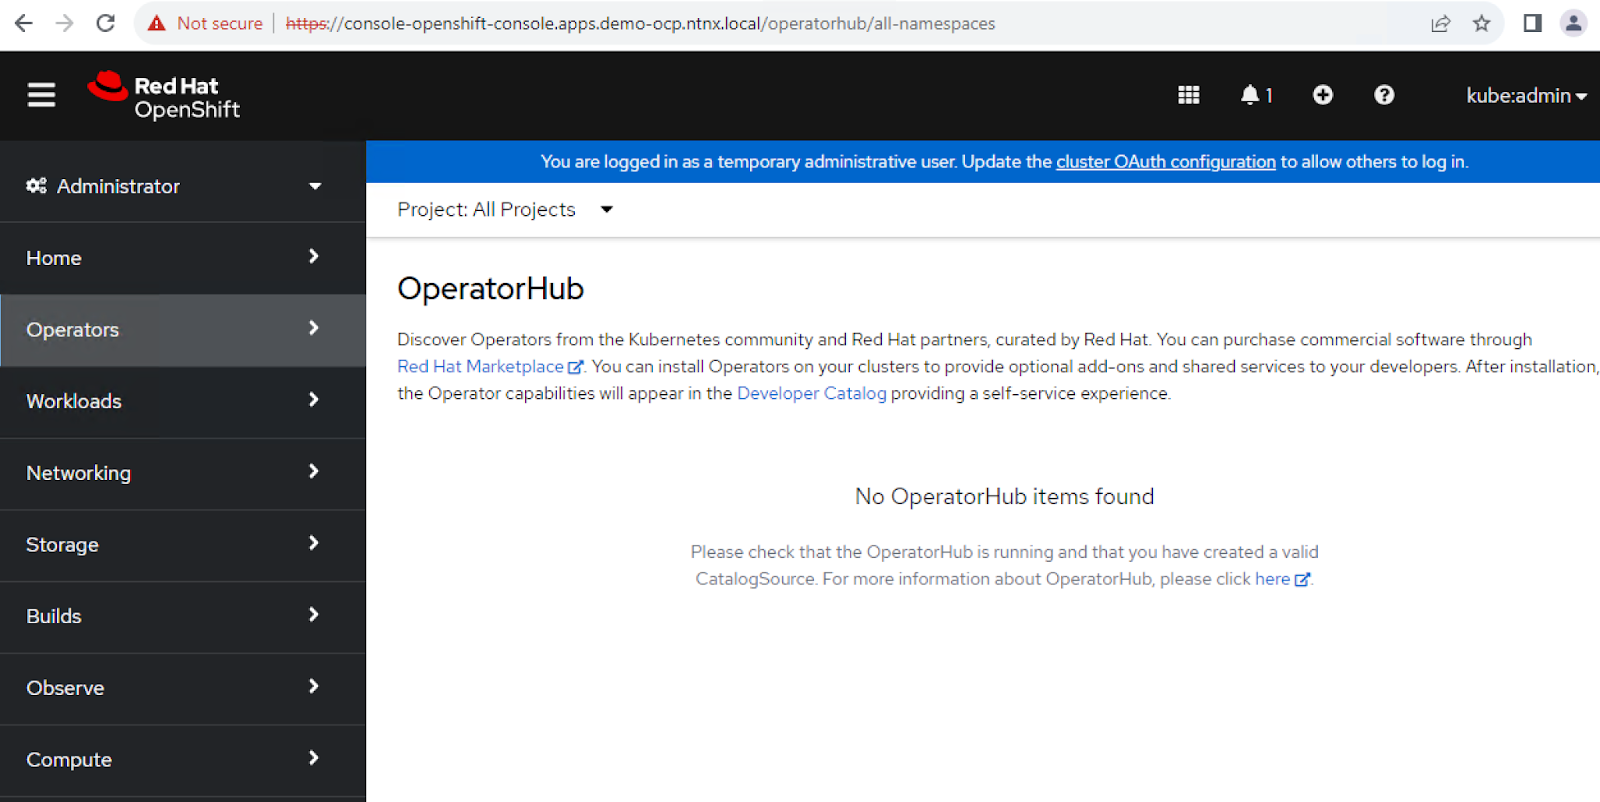
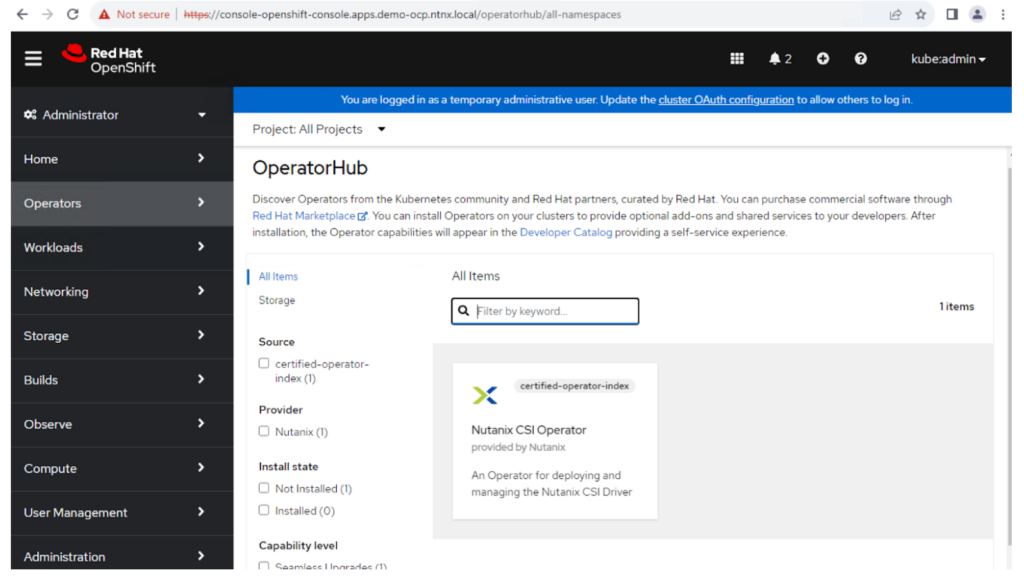
- We will now point the cluster to the mirror registry for all requests.
oc apply -f ./oc-mirror-workspace/results-1696428587/This will use the ImageContentSourcePolicy object to pull OpenShift release images and CatalogSource object to pull and install Operators, both from our mirror registry where we would update the image source as required.
Once the above is done, the Nutanix CSI Operator will be visible as the screenshot below.
Closing Thoughts
By overcoming the challenges posed by a lack of internet connectivity, this installation process demonstrates the robust capabilities of both Openshift and Nutanix in meeting the evolving needs of modern IT infrastructures. The end result is a self-contained, secure, and highly scalable container platform that can power your organization’s applications with efficiency and agility.
Check out our free Test Drive to find out more about OpenShift on Nutanix.
If you are interested in related content, please check out the OpenShift on Nutanix Tech Note which covers a lot of other components you would require in your architecture designs as well as the Nutanix Validated Design spearheaded by our wonderful colleague Wolfgang Huse from our Solutions Engineering team. The joint OpenShift on Nutanix solution has been tested and validated at scale with upto 360 worker nodes that can readily be consumed by customers, massively reducing the time to value and deployment risk. You can find them here.
© 2023 Nutanix, Inc. All rights reserved. Nutanix, the Nutanix logo and all Nutanix product, feature and service names mentioned herein are registered trademarks or trademarks of Nutanix, Inc. in the United States and other countries. Other brand names mentioned herein are for identification purposes only and may be the trademarks of their respective holder(s). This post may contain links to external websites that are not part of Nutanix.com. Nutanix does not control these sites and disclaims all responsibility for the content or accuracy of any external site. Our decision to link to an external site should not be considered an endorsement of any content on such a site. Certain information contained in this post may relate to or be based on studies, publications, surveys and other data obtained from third-party sources and our own internal estimates and research. While we believe these third-party studies, publications, surveys and other data are reliable as of the date of this post, they have not independently verified, and we make no representation as to the adequacy, fairness, accuracy, or completeness of any information obtained from third-party sources.