

Introduction
In September 2023, Nutanix announced certification of the Nutanix AHV® hypervisor for NVIDIA® AI Enterprise 4.0 suite. NVIDIA AI Enterprise is a suite of enterprise-grade AI software for accelerating AI initiatives. In this blog post, we’re going to set up one of the components of the software stack – the Triton™ Inference Server. Triton Inference Server simplifies and optimizes the deployment of AI models at scale.
For officially supported Nutanix® platforms and NVIDIA GPU cards for NVIDIA AI Enterprise, refer to NVIDIA’s Certified Systems List. The usage of platforms and GPU cards outside of this list are for demo purposes only.
Hugging Face is a community that provides an open source platform and tools to enable the collaboration of AI development. In this blog, we’ll set up the Triton Inference Server on the Nutanix Cloud Platform™ solution and show how to load a model from Hugging Face into the server.
Create a GPU-enabled VM
Let’s first set up our VM. NVIDIA AI Enterprise is supported on the Ubuntu® LTS operating systems. For this demo, we’ll be installing Ubuntu 22.04 LTS, and you should have the Ubuntu 22.04 cloud image downloaded to your workstation, or the download URL available. In our example, we are using this image: https://cloud-images.ubuntu.com/jammy/current/jammy-server-cloudimg-amd64.img
Upload OS Image
- Log into the Nutanix Prism Central™ user interface.
- From the Infrastructure menu, navigate to Compute & Storage > Images
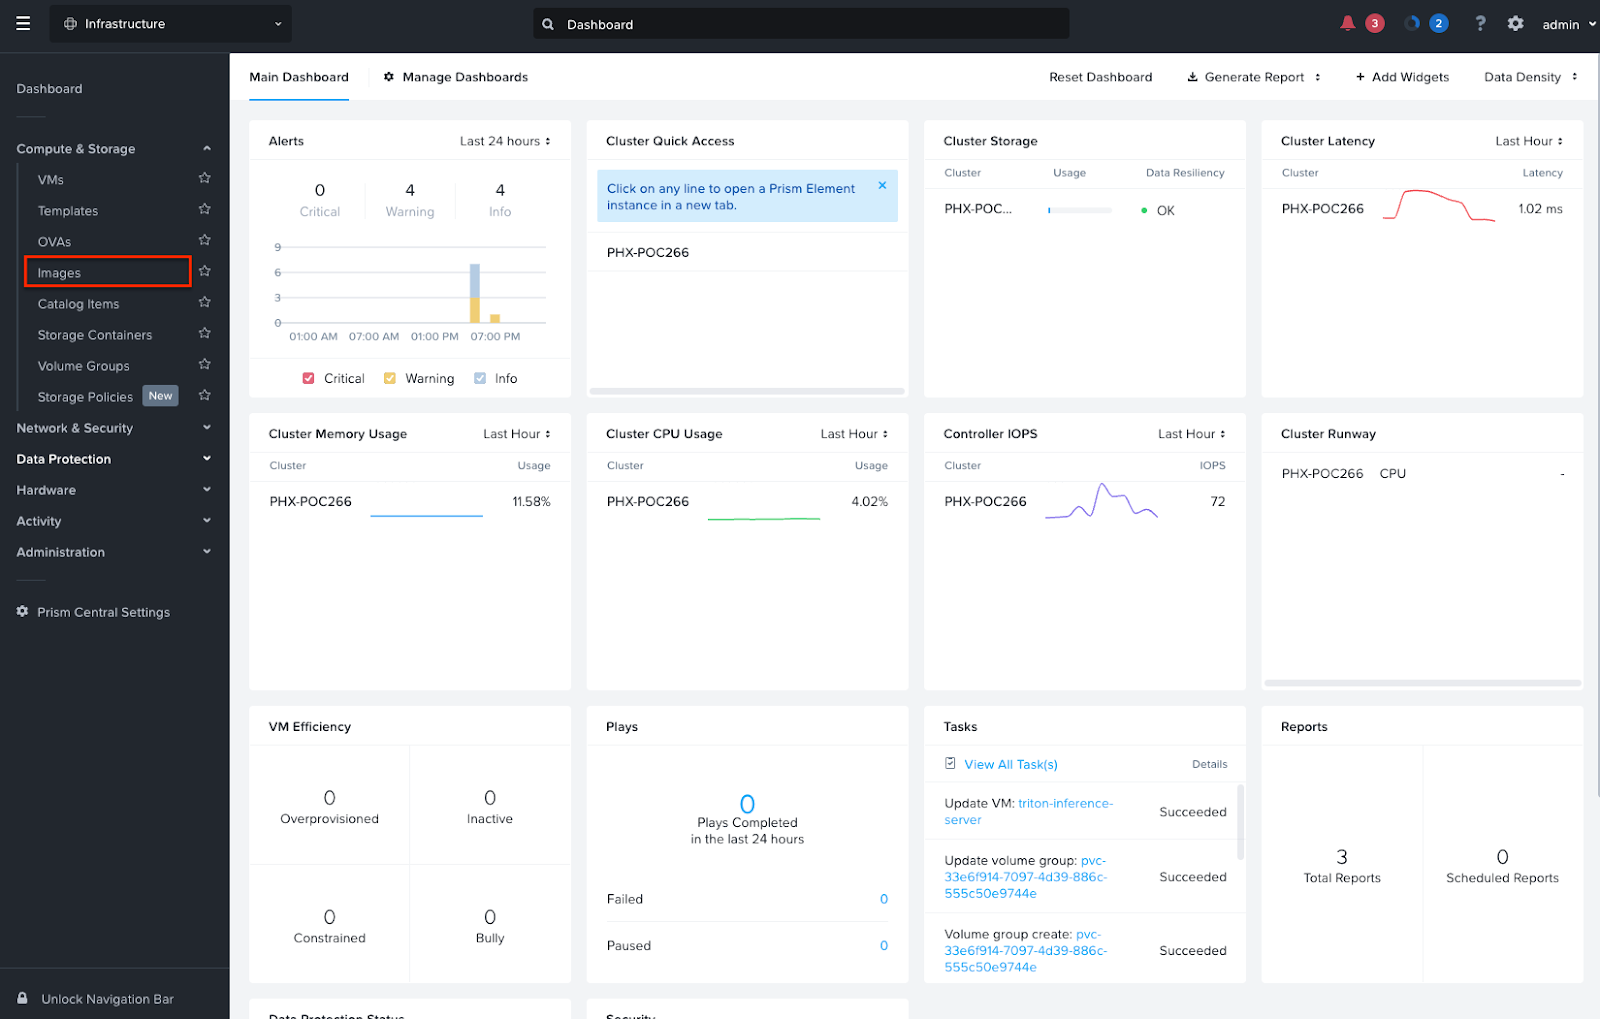
- Click Add Image.
- Select Image File, and upload the Ubuntu 22.04 cloud image from your workstation. Alternatively, you can select the URL radio button and point to the URL of the image.
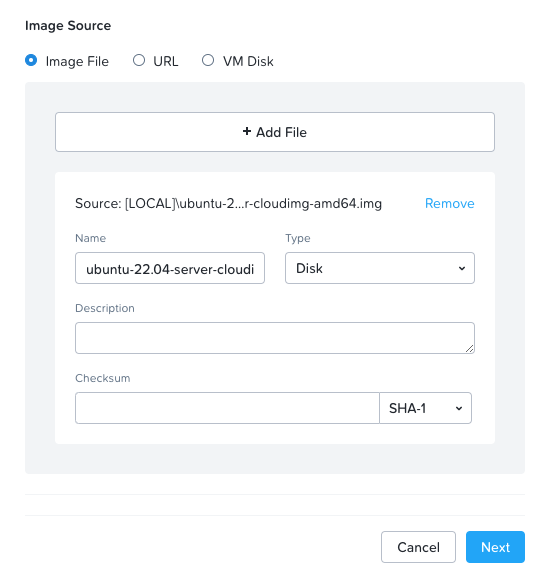
- Click Next then Save.
Create VM
- Once the image has been uploaded, navigate to Compute & Storage > VMs
- Click on Create VM
- On the Configuration screen, give the VM a name, for example triton-inference-server and give the VM the following resources:
- CPU: 4
- Cores Per CPU: 1
- Memory: 24
- Click Next
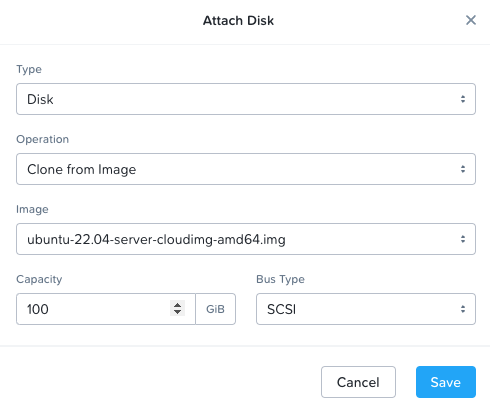
- On the Resources screen attach the disk, network, and GPU.
- Disk: Clone from Image – select image uploaded in previous section and increase disk capacity to 100GiB (Figure 3)
- Network: Connect to a subnet with internet access
- GPUS:
- GPU Type: Passthrough
- Attach the appropriate GPU
- Click Next
- On the Management screen, add the VM to any required categories, set the timezone, and provide a cloud-init script for logging into the cloud image. A cloud-init example is shown below that sets the username and password to ubuntu:nutanix/4u and sets the shell to bash:
#cloud-config
users:
  - name: ubuntu
    sudo: ['ALL=(ALL) NOPASSWD:ALL']
    shell: /bin/bash
chpasswd:
  list: |
    ubuntu:nutanix/4u
  expire: False
ssh_pwauth: true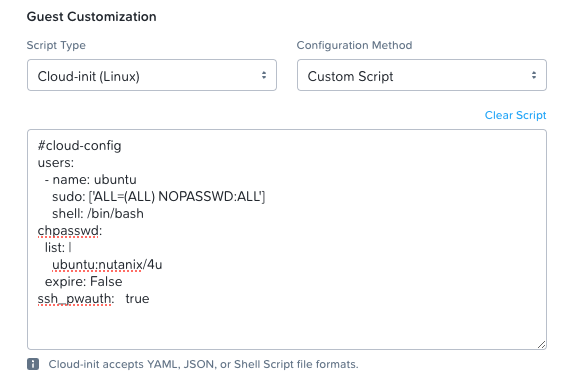
- Click Next
- Your VM configuration summary should look similar to this:
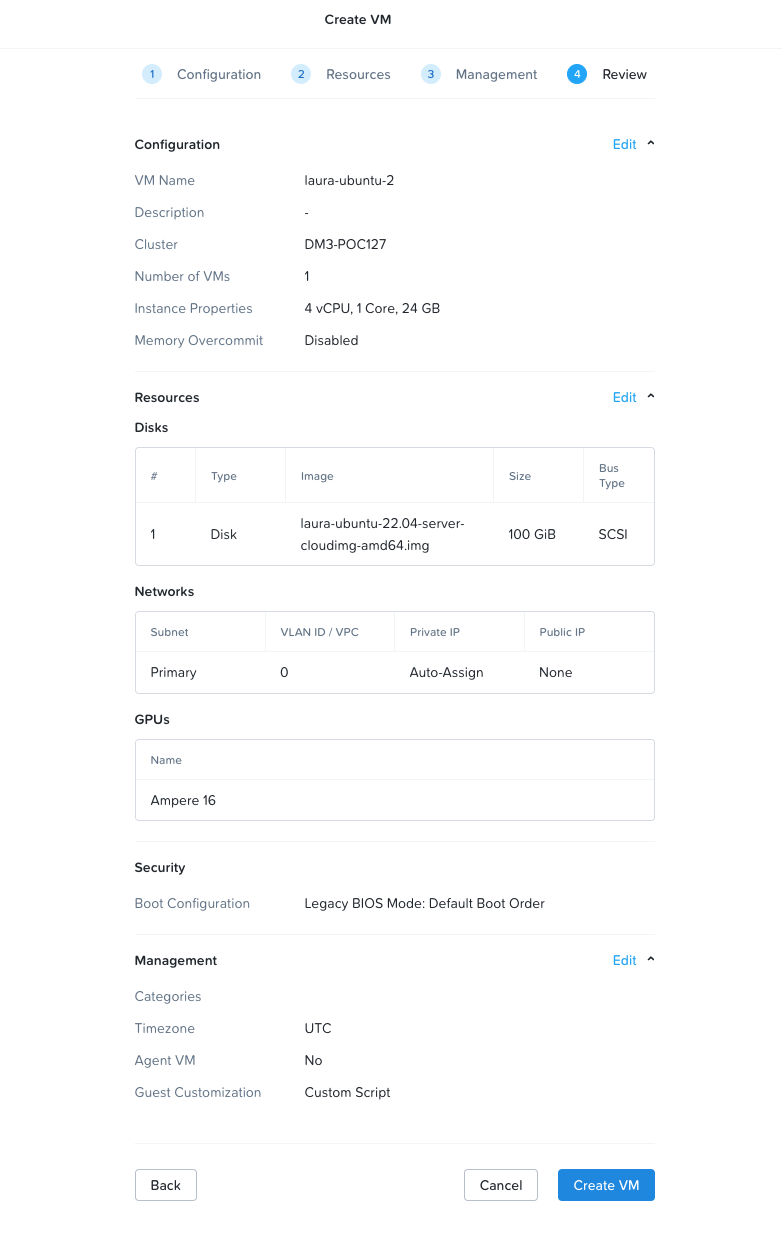
- Click on Create VM to create the VM.
Configure the VM
- Once the VM has been created, power it on by selecting the VM and clicking Actions > Power On

- Obtain the IP address from the VMs list and log in to the VM via ssh.
ssh ubuntu@<ip-address>Note: If the connection fails with an error saying Received disconnect from <ip-address> port 22: Too many authentication failures, try updating the command as follows:
ssh ubuntu@<ip-address> -o IdentitiesOnly=yes- Install the NVIDIA drivers.
sudo apt-get update
sudo apt install ubuntu-drivers-common
sudo ubuntu-drivers install- Reboot the VM to ensure the drivers are loaded properly.
sudo reboot- Check that the drivers are loaded properly
cat /proc/driver/nvidia/versionThe output should look something like this:
NVRM version: NVIDIA UNIX x86_64 Kernel Module  535.113.01  Tue Sep 12 19:41:24 UTC 2023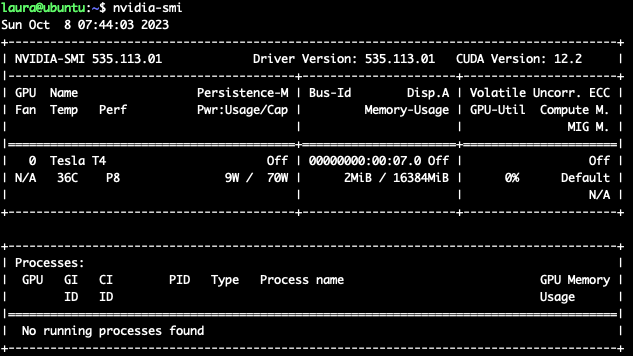
GCC version:nvidia-smishould also now be installed, to verify the GPU you can run it to verify:
- Install docker. This is the recommended way to run the Triton Inference Server.
curl -fsSL https://get.docker.com -o get-docker.sh
sudo sh get-docker.sh- Install the NVIDIA Container Toolkit. This is required in order to use GPUs with docker. We’ll follow the instructions to configure apt and then docker:
curl -fsSL https://nvidia.github.io/libnvidia-container/gpgkey | sudo gpg --dearmor -o /usr/share/keyrings/nvidia-container-toolkit-keyring.gpg \
  && curl -s -L https://nvidia.github.io/libnvidia-container/stable/deb/nvidia-container-toolkit.list | \
    sed 's#deb https://#deb [signed-by=/usr/share/keyrings/nvidia-container-toolkit-keyring.gpg] https://#g' | \
    sudo tee /etc/apt/sources.list.d/nvidia-container-toolkit.list \
  && \
    sudo apt-get update

sudo apt-get install -y nvidia-container-toolkit
sudo nvidia-ctk runtime configure --runtime=docker
sudo systemctl restart docker- Install miniconda. This is required for packaging up our dependencies for the Triton Inference Server.
mkdir -p ~/miniconda3
wget https://repo.anaconda.com/miniconda/Miniconda3-latest-Linux-x86_64.sh -O ~/miniconda3/miniconda.sh
bash ~/miniconda3/miniconda.sh -b -u -p ~/miniconda3
rm -rf ~/miniconda3/miniconda.sh
~/miniconda3/bin/conda init bash
Run the Triton Inference Server Quickstart
Now, we can run through the steps to test the Triton Inference Server. We’re using the latest release as of this writing.
Fetch the Models
git clone -b r23.09 https://github.com/triton-inference-server/server.git
cd server/docs/examples
./fetch_models.sh
Launch Triton
sudo docker run -d --gpus=1 --rm --net=host -v ${PWD}/model_repository:/models nvcr.io/nvidia/tritonserver:23.09-py3 tritonserver --model-repository=/modelsThis takes a few minutes to pull down all the required images.
Check Container Status
Find the container ID by running:
sudo docker ps -a | grep tritonExample output:
CONTAINER ID   IMAGE                                   COMMAND                  CREATED         STATUS         PORTS     NAMES
cf1b98eb722f   nvcr.io/nvidia/tritonserver:23.09-py3   "/opt/nvidia/nvidia_…"   2 minutes ago   Up 2 minutes             suspicious_blackwell
Check the logs by running:
sudo docker logs -f <triton_container_id>In the example above, we would run the following:
sudo docker logs -f cf1b98eb722fThe Triton server is running successfully when you see the following:
I1030 22:19:54.323009 1 grpc_server.cc:2513] Started GRPCInferenceService at 0.0.0.0:8001
I1030 22:19:54.323207 1 http_server.cc:3620] Started HTTPService at 0.0.0.0:8000
I1030 22:19:54.364162 1 http_server.cc:187] Started Metrics Service at 0.0.0.0:8002
If you scroll up, you should see the models that were loaded:
I1030 22:19:54.273991 1 server.cc:662]
+----------------------+---------+--------+
| Model                | Version | Status |
+----------------------+---------+--------+
| densenet_onnx        | 1       | READY  |
| inception_graphdef   | 1       | READY  |
| simple               | 1       | READY  |
| simple_dyna_sequence | 1       | READY  |
| simple_identity      | 1       | READY  |
| simple_int8          | 1       | READY  |
| simple_sequence      | 1       | READY  |
| simple_string        | 1       | READY  |
+----------------------+---------+--------+
Send an Inference Request
From a separate console window, run the following to launch the client SDK container and run the client application to classify an image:
sudo docker run -it --rm --net=host nvcr.io/nvidia/tritonserver:23.09-py3-sdk /workspace/install/bin/image_client -m densenet_onnx -c 3 -s INCEPTION /workspace/images/mug.jpgThe output should look like this:
Request 0, batch size 1
Image '/workspace/images/mug.jpg':
    15.349566 (504) = COFFEE MUG
    13.227467 (968) = CUP
    10.424896 (505) = COFFEEPOT
Stop the Triton Container
From the first console window, press Ctrl-C to stop viewing the container logs, then stop the Triton container.
sudo docker stop <triton_container_id>Loading a Hugging Face Model into Triton
Now that we have Triton running successfully, let’s load a Hugging Face model into Triton. Hugging Face is a popular machine learning platform and model hub.
Triton supports a variety of model backends. The easiest way to use Hugging Face models with Triton is to use the Python® backend to call Hugging Face APIs using Hugging Face pipelines.
Set up Conda Environment with Miniconda
At a high level, the Python backend allows you to define a model as a Python script. In order for Triton to run the Python script, we need to package up the dependencies and provide a custom execution environment. The Python backend currently supports conda-pack for this.
Run the following commands to set up your conda environment and export it to a .tar.gz file for later use.
# Set current working directory to user's HOME directory
cd ~

# This ensures python modules are installed in the local conda environment even if they exist on the system. Otherwise, your archive may not contain all the required dependencies
export PYTHONNOUSERSITE=True

# Create new conda environment
conda create -k -y -n hf-env python=3.10
conda activate hf-env

# Install gcc
conda install -c conda-forge gcc=12.1.0

# Install required Python modules
pip install conda-pack numpy huggingface-hub
pip install torch==2.1.0
pip install transformers==4.34.0

# Create the conda pack (this will take a few minutes)
conda pack -o hf-env.tar.gz
Hugging Face Pipelines
Hugging Face Pipelines make it very easy to use a pre-trained model for inference. All you need to do is install the transformers Python library and then you can make inference requests in just a few lines of Python code, which you can try out in your environment. In the interest of simplicity, we’re using the gpt2 model, which is a small model just for testing. You can try out any other model available on Hugging Face simply by replacing gpt2 with the model path on Hugging Face. Note that larger models may take longer to initialize and download.
To get started, launch the Python REPL:
pythonRun the following Python code within the new Python REPL session:
from transformers import pipeline
generator = pipeline("text-generation",model="gpt2",device=0)
input_string = "My favorite food is "
generator(input_string, do_sample=True, min_length=50, max_new_tokens=100)
Note: Setting device=0 ensures GPU usage on CUDA device :0
Example Output:
[{'generated_text': 'My favorite food is iced coffee. I am also obsessed with chocolate. I can\'t take it for granted that they are the source for all of my chocolate. Maybe it is an ingredient I\'m not aware of. It is certainly possible that it is used in desserts, but I am never going to do anything with it for the rest of my life. But I find it fascinating that iced coffee makes my favorite chocolate. The sweet almond sugar is sweet and creamy.\n\nIn your recent blog post you mentioned "'}]The next step is to take this code and load it in Triton Inference Server. We’ll look at how to do that in the next few sections.
Model Repository
Triton Inference Server serves models from a model repository in a specific format. This repository can be on a locally accessible filesystem (for example, NFS), S3, or other cloud storage.
For the Python backend, the minimum configuration for the model repository folder structure looks like this, with model.py being the wrapper for the model to be loaded into Triton.
<model-repository-path>/
  <model-name>/
    config.pbtxt
    1/
      model.py
In our environment, our folder structure looks like this:
models/
  gpt2/
    config.pbtxt
    hf-env.tar.gz
    1/
      model.py
Press Ctrl-D to exit the Python REPL session, then create the directory structure as follows:
# create directory structure
mkdir -p models/gpt2/1
Move the hf-env.tar.gz file into place:
mv ~/hf-env.tar.gz ~/models/gpt2hf-env.tar.gz was created in the “Set up Conda environment” section. This is the environment that will be loaded into Triton as a custom execution environment.
Model Code
Here is what our model.py looks like. The required structure of model.py is found in the Triton documentation.
Create model.py in ~/models/gpt2/1, as follows.
import triton_python_backend_utils as pb_utils
import numpy as np
from transformers import pipeline

class TritonPythonModel:
    def initialize(self, args):
        print("Initializing model")
        self.generator = pipeline("text-generation", model="gpt2")

    def execute(self, requests):
        responses = []
        for request in requests:
            # Convert InferenceRequest object into Tensor object and decode it into a string
            input = pb_utils.get_input_tensor_by_name(request, "prompt")
            input_string = input.as_numpy()[0].decode()

            # Call the model pipeline with the input string
            pipeline_output = self.generator(input_string, do_sample=True, min_length=50, max_new_tokens=100)
            generated_text = pipeline_output[0]["generated_text"]
            output = generated_text

            # Encode the string back to a Tensor object and wrap it in an InferenceResponse object
            inference_response = pb_utils.InferenceResponse(
            output_tensors=[
                pb_utils.Tensor(
                    "generated_text",
                    np.array([output.encode()]),
                    )
                ]
                )
            responses.append(inference_response)

        return responses
Let’s break this down.
The first 3 lines are importing required libraries:
triton_python_backend_utils: This is a library available in every Triton Python model and is required for creating and receiving inference requests. It also has some useful utility functions for converting Triton input/output data types into numpy typesnumpy: This is the Python library for multi dimensional array computingtransformers: This is a library developed by Hugging Face that provides APIs and tools for downloading and training models
Then, the TritonPythonModel class is defined. This is the required class name as per the documentation.
Within the class, we first define the initialize function, which is called when the model is being loaded. This is where we will use the pipeline function from the transformers library to download and cache our desired model from Hugging Face. Note that we don’t specify device argument here as the Triton server will already be leveraging the GPU.
The execute function gets called when we make an inference request to Triton. First, it initializes an array of responses. Every request received is an InferenceRequest object. For every request, it does the following:
- Calls the get_input_tensor_by_name function from the Triton backend utils to convert the InferenceRequest object into a Tensor object
- Uses numpy to convert the Tensor object to a byte tensor
- Decodes the byte tensor into a string to pass to the model pipeline
- Calls the pipeline with the input string and stores the output in pipeline_output, which contains a dict
- Extracts the value of generated_text from the dict and stores that value in generated_text and output
- Constructs the InferenceResponse object (an array of tensors) by encoding the output string into a byte tensor and converts it back to a Tensor object that is stored in the array, and appends the response to the array of responses.
- Finally, it returns the responses array.
Model Config
We also need a config.pbtxt that defines the model configuration. This is also where we will define our execution environment.
Create config.pbtxt in ~/models/gpt2.
name: "gpt2"
backend: "python"
input [
  {
    name: "prompt"
    data_type: TYPE_STRING
    dims: [-1]
  }
]
output [
  {
    name: "generated_text"
    data_type: TYPE_STRING
    dims: [-1]
  }
]

parameters: {
  key: "EXECUTION_ENV_PATH",
  value: {string_value: "$$TRITON_MODEL_DIRECTORY/hf-env.tar.gz"}
}

instance_group [
  {
    kind: KIND_GPU
  }
]
Run the Inference Server
Once we have everything in place, we can now run the inference server again with the following command. Make sure your current directory is your home directory before running this command:
cd ~
sudo docker run -d --gpus=1 --rm --net=host -v ${PWD}/models:/models nvcr.io/nvidia/tritonserver:23.09-py3 tritonserver --model-repository=/models
In the logs, you should see a line like the following, indicating that we’re using our custom environment:
I1030 23:53:14.012897 1 python_be.cc:1756] Using Python execution env /models/gpt2/hf-env.tar.gzAs well as:
I1030 23:53:56.151130 1 model_lifecycle.cc:818] successfully loaded 'gpt2'Send an Inference Request
If required, press Ctrl-C to stop viewing container logs. In your home directory, create a file called sample.txt with your input, for example:
echo '{
   "inputs":[
   {
    "name": "prompt",
    "shape": [1],
    "datatype": "BYTES",
    "data":  ["My favorite food is"]
   }
  ]
}
' > sample.txt
Then you can run inference using curl:
$ curl -X POST 'http://localhost:8000/v2/models/gpt2/infer' --header 'Content-Type: application/json' -d@./sample.txt

{"model_name":"gpt2","model_version":"1","outputs":[{"name":"generated_text","datatype":"BYTES","shape":[1],"data":["My favorite food is homemade! We use to make mac and cheese sandwiches, mac and cheese sandwiches, and other homemade options. And when we make those things, we make them with some of our friends' favorite ingredients. These vegan snacks can have a huge impact on us, because they're made with so much fresh fresh food.\n\n2.) How do you cook your burgers?\n\nWe spend days before the big game doing everything we can to cook our burgers. In fact, last night, last Sunday's"]}]}
Conclusion
For customers leveraging NVIDIA AI Enterprise, this new certification enables you to run your NVIDIA AI Enterprise workloads while leveraging all of the benefits of the underlying Nutanix Cloud Platform with Nutanix AHV. With the Nutanix Cloud Platform and NVIDIA AI Enterprise, you empower your organization to achieve optimal performance, scalability, and operational efficiency, ensuring that your AI initiatives are well-positioned for success in today’s competitive landscape.
References:
- https://ubuntu.com/server/docs/install/step-by-step
- https://docs.nvidia.com/deeplearning/triton-inference-server/user-guide/docs/user_guide/model_repository.html#python-models
- https://github.com/triton-inference-server/tutorials/tree/main/HuggingFace
- https://github.com/triton-inference-server/python_backend
- https://huggingface.co/docs/transformers/main_classes/pipelines
- https://github.com/triton-inference-server/python_backend#creating-custom-execution-environments
- https://github.com/triton-inference-server/server/blob/main/docs/user_guide/model_configuration.md
© 2023 Nutanix, Inc. All rights reserved. Nutanix, the Nutanix logo and all Nutanix product, feature and service names mentioned herein are registered trademarks or trademarks of Nutanix, Inc. in the United States and other countries. Other brand names mentioned herein are for identification purposes only and may be the trademarks of their respective holder(s). This post may contain links to external websites that are not part of Nutanix.com. Nutanix does not control these sites and disclaims all responsibility for the content or accuracy of any external site. Our decision to link to an external site should not be considered an endorsement of any content on such a site. Certain information contained in this post may relate to or be based on studies, publications, surveys and other data obtained from third-party sources and our own internal estimates and research. While we believe these third-party studies, publications, surveys and other data are reliable as of the date of this post, they have not independently verified, and we make no representation as to the adequacy, fairness, accuracy, or completeness of any information obtained from third-party sources.