

Understanding Windows Containers
There is increased interest in Microsoft Windows® containers due to the Kubernetes® container orchestration system becoming the go-to technology for container workload orchestration. The prospect of managing both Linux® and Windows workloads within a single system, such as Kubernetes, is an appealing one, especially for organizations with existing investments in Windows applications. This approach offers the potential to achieve the same operational efficiencies on Windows as is typically seen with Linux in a Kubernetes environment. The ecosystem of tools and cloud-native knowledge that has typically been enjoyed by Linux can also be leveraged for Windows. This allows Windows developers to take advantage of self-service cloud-native tools for building and scaling applications like never before. The ability to containerize existing apps and eliminate hardware to cut costs, as well as simplify migration from end-of-support operating systems, are among the key advantages of running Windows containers in Kubernetes.
In this blog, we will explore running Windows containers using the Red Hat OpenShift® software on the Nutanix® platform.
Pre-requisites
- Supported Windows Server version – Windows Server 2022, OS Build 20348.681 or later
- Red Hat OpenShift Container Platform 4.14 and later
- Nutanix AOS™ 6.5.2.7 and later
- Nutanix AHV® 20220304.392 and later
- Nutanix Prism Central™ pc.2023.1.0.1 and later
- In addition to the two DNS entries for api.<cluster_name><base_domain> and *.apps.<cluster_name>.<base_domain>, you will need one more entry for api-int.<cluster_name><base_domain>, pointing to the API VIP.
Creating the Nutanix Windows VM Golden Image
- We create a new Windows VM in AHV ensuring to use the latest VirtIO drivers available from the Nutanix portal. Here is a detailed procedure for the process.
- Once the VM is ready, we install cloudbase-init in it. Cloudbase-Init is designed to complement the sysprep process by extending the customization capabilities for Windows instances in cloud environments. It works by processing cloud-init data, which typically includes information provided by the cloud platform, such as user data, metadata, and configuration settings specific to the instance.
- We clone the VM so as to run sysprep in the clone and create a reusable image from it.
- In the cloned VM, we run the Windows Sysprep tool with the following command. Sysprep involves generalizing the Windows OS, so that when new VMs are provisioned from that template, they each have that individuality and function correctly in a Windows domain network.
C:\Windows\System32\Sysprep\sysprep.exe /generalize /oobe /shutdown /unattend:<path_to_unattend.xml>Note that by specifying the /shutdown option, the VM will power off after the Sysprep command finishes running.
We have used a sample unattend.xml below, which is taken from the official OpenShift documentation. It has all the changes needed to configure Windows instances. There are two items in this template that you will have to modify before using it in your setup
- ComputerName, which will be the name of the Computer inside the guest VM
- Value for the AdministratorPassword, which should be the Administrator account password.
<?xml version="1.0" encoding="UTF-8"?>
<unattend xmlns="urn:schemas-microsoft-com:unattend">
  <settings pass="specialize">
      <component xmlns:wcm="http://schemas.microsoft.com/WMIConfig/2002/State" xmlns:xsi="http://www.w3.org/2001/XMLSchema-instance" name="Microsoft-Windows-International-Core" processorArchitecture="amd64" publicKeyToken="31bf3856ad364e35" language="neutral" versionScope="nonSxS">
        <InputLocale>0409:00000409</InputLocale>
        <SystemLocale>en-US</SystemLocale>
        <UILanguage>en-US</UILanguage>
        <UILanguageFallback>en-US</UILanguageFallback>
        <UserLocale>en-US</UserLocale>
      </component>
      <component xmlns:wcm="http://schemas.microsoft.com/WMIConfig/2002/State" xmlns:xsi="http://www.w3.org/2001/XMLSchema-instance" name="Microsoft-Windows-Security-SPP-UX" processorArchitecture="amd64" publicKeyToken="31bf3856ad364e35" language="neutral" versionScope="nonSxS">
        <SkipAutoActivation>true</SkipAutoActivation>
      </component>
      <component xmlns:wcm="http://schemas.microsoft.com/WMIConfig/2002/State" xmlns:xsi="http://www.w3.org/2001/XMLSchema-instance" name="Microsoft-Windows-SQMApi" processorArchitecture="amd64" publicKeyToken="31bf3856ad364e35" language="neutral" versionScope="nonSxS">
        <CEIPEnabled>0</CEIPEnabled>
      </component>
      <component xmlns:wcm="http://schemas.microsoft.com/WMIConfig/2002/State" xmlns:xsi="http://www.w3.org/2001/XMLSchema-instance" name="Microsoft-Windows-Shell-Setup" processorArchitecture="amd64" publicKeyToken="31bf3856ad364e35" language="neutral" versionScope="nonSxS">
        <ComputerName>winworker</ComputerName>
      </component>
  </settings>
  <settings pass="oobeSystem">
      <component xmlns:wcm="http://schemas.microsoft.com/WMIConfig/2002/State" xmlns:xsi="http://www.w3.org/2001/XMLSchema-instance" name="Microsoft-Windows-Shell-Setup" processorArchitecture="amd64" publicKeyToken="31bf3856ad364e35" language="neutral" versionScope="nonSxS">
        <AutoLogon>
            <Enabled>false</Enabled>
        </AutoLogon>
        <OOBE>
            <HideEULAPage>true</HideEULAPage>
            <HideLocalAccountScreen>true</HideLocalAccountScreen>
            <HideOEMRegistrationScreen>true</HideOEMRegistrationScreen>
            <HideOnlineAccountScreens>true</HideOnlineAccountScreens>
            <HideWirelessSetupInOOBE>true</HideWirelessSetupInOOBE>
            <NetworkLocation>Work</NetworkLocation>
            <ProtectYourPC>1</ProtectYourPC>
            <SkipMachineOOBE>true</SkipMachineOOBE>
            <SkipUserOOBE>true</SkipUserOOBE>
        </OOBE>
        <RegisteredOrganization>Organization</RegisteredOrganization>
        <RegisteredOwner>Owner</RegisteredOwner>
        <DisableAutoDaylightTimeSet>false</DisableAutoDaylightTimeSet>
        <TimeZone>Eastern Standard Time</TimeZone>
        <UserAccounts>
            <AdministratorPassword>
              <Value>nutanix/4u</Value>
              <PlainText>true</PlainText>
            </AdministratorPassword>
        </UserAccounts>
      </component>
  </settings>
</unattend>- When the process is complete, the VM will power off. Finally, we will create the Windows golden image from the VM’s disk following the process described here, after which it will be available to be consumed as a Prism Image.
OpenShift Installation
We follow the IPI method of installation for OpenShift. We have to ensure that the networkType is set to OVNKubernetes in the install-config.yaml file.
After the installation is complete, there’s an additional configuration we must do to be able to run Linux and Windows worker nodes in the same cluster.
We patch the network Operator with hybrid overlay configuration.
oc patch networks.operator.openshift.io cluster --type=merge \
-p '{
  "spec":{
    "defaultNetwork":{
      "ovnKubernetesConfig":{
        "hybridOverlayConfig":{
          "hybridClusterNetwork":[
            {                "cidr": "10.132.0.0/14",
              "hostPrefix": 23
            }
          ]
        }
      }
    }
  }
}'
Please change the cidr and hostPrefix as per your needs, ensuring it does not overlap with the cluster network CIDR.
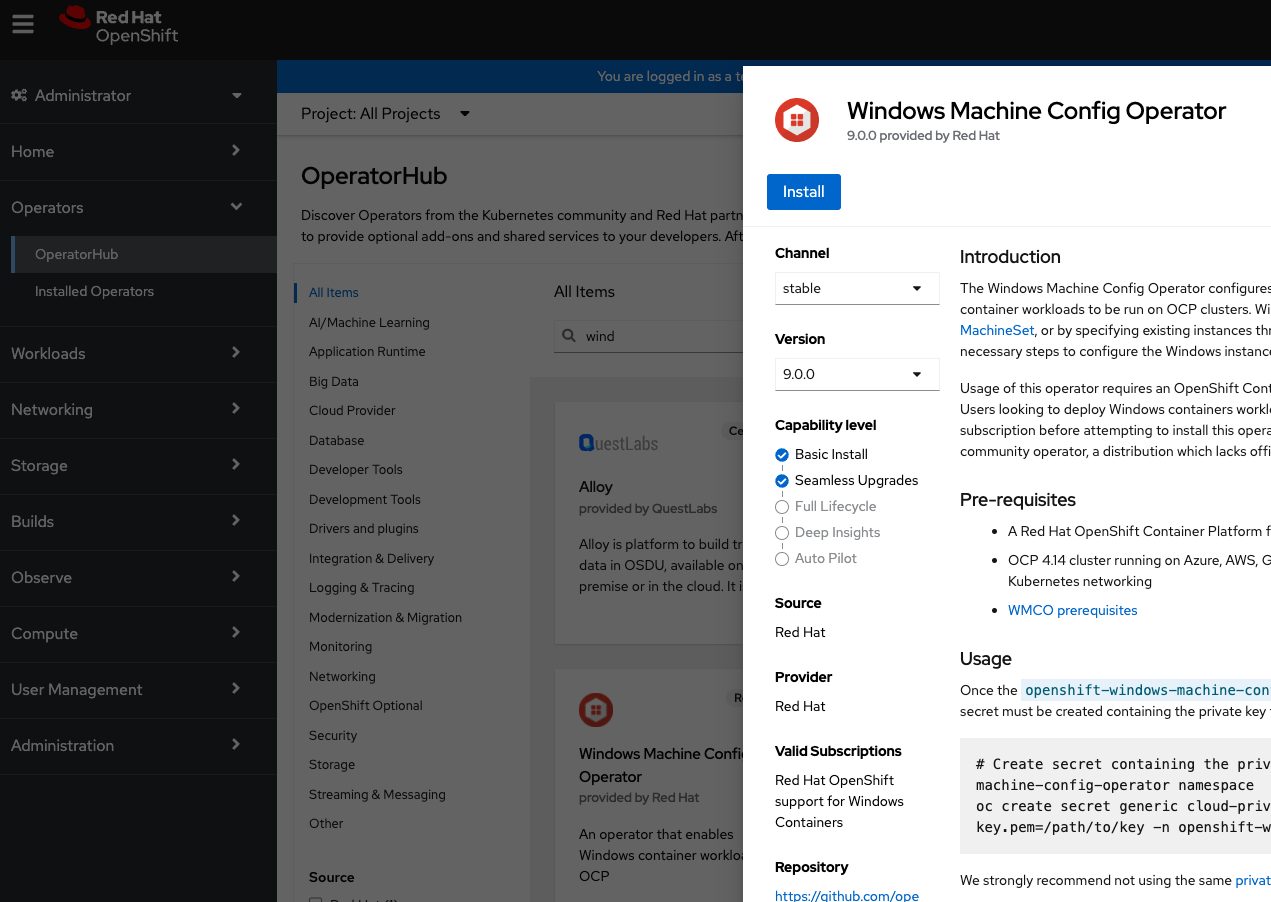
Windows Machine Config Operator (WMCO)
The Windows Machine Config Operator (WMCO) has to be installed in the OpenShift cluster, which will orchestrate the necessary configuration required to add a Windows worker node to the cluster. The WMCO configures Windows instances by either creating a MachineSet with Windows Machines or by configuring existing Windows instances (Bring Your Own Host).
The WMCO can be installed from the OperatorHub in the OpenShift web console. Please note the requirement of version 9.0.0 and above for Nutanix support.
Let’s verify the pods are in a Running state.
$ oc get po -n openshift-windows-machine-config-operator

NAME                                             READY   STATUS    RESTARTS   AGE
windows-machine-config-operator-9f8cf56f-kx4r2   1/1     Running   0          42s
We will also have to create a secret in the WMCO namespace containing a private key. The secret “cloud-private-key” will be used by OpenShift to access the Windows machines.
$ oc create secret generic cloud-private-key --from-file=private-key.pem=/path/to/key -n openshift-windows-machine-config-operator
secret/cloud-private-key created
The cluster is now ready to create and add Windows worker nodes.
Machineset Creation
We will create a Windows MachineSet to onboard two Windows nodes. This process is similar to the regular process of creating MachineSets, with the exception of some additional parameters. A sample manifest is available in the OpenShift documentation which can be copied and modified. Pay special attention to the windows labels used.
The WMCO operator scans for the secret we created earlier, and creates another one “windows-user-data” with the data that is required to interact with the Windows server using SSH. After the SSH connection is established, the Operator configures the nodes and adds the Windows instances to the cluster.
Let’s grab the IP address assigned to a Windows VM from Prism and monitor the process. This could take roughly 15-20 minutes. In our example below, 10.38.19.157 is the worker node’s IP address, and in the final log message, we confirm the instance has been configured as a worker.
$ oc get pods -n openshift-windows-machine-config-operator
NAME READY STATUS RESTARTS AGE
windows-machine-config-operator-9f8cf56f-kx4r2 1/1 Running 0 23m
$ oc logs -f windows-machine-config-operator-9f8cf56f-kx4r2 -n openshift-windows-machine-config-operator | grep 10.38.19.157
{"level":"info","ts":"2024-01-11T12:34:53Z","logger":"controller.windowsmachine","msg":"processing","windowsmachine":{"name":"win-machineset-2km9f","namespace":"openshift-machine-api"},"address":"10.38.19.157"}
{"level":"info","ts":"2024-01-11T12:42:04Z","logger":"wc 10.38.19.157","msg":"configuring"}
{"level":"info","ts":"2024-01-11T12:43:04Z","logger":"wc 10.38.19.157","msg":"rebooting instance"}
.
.
.
{"level":"info","ts":"2024-01-11T12:44:27Z","logger":"wc 10.38.19.157","msg":"configured","service":"windows-instance-config-daemon","args":"controller --windows-service --log-dir C:\\var\\log\\wicd --kubeconfig C:\\k\\wicd-kubeconfig --namespace openshift-windows-machine-config-operator"}
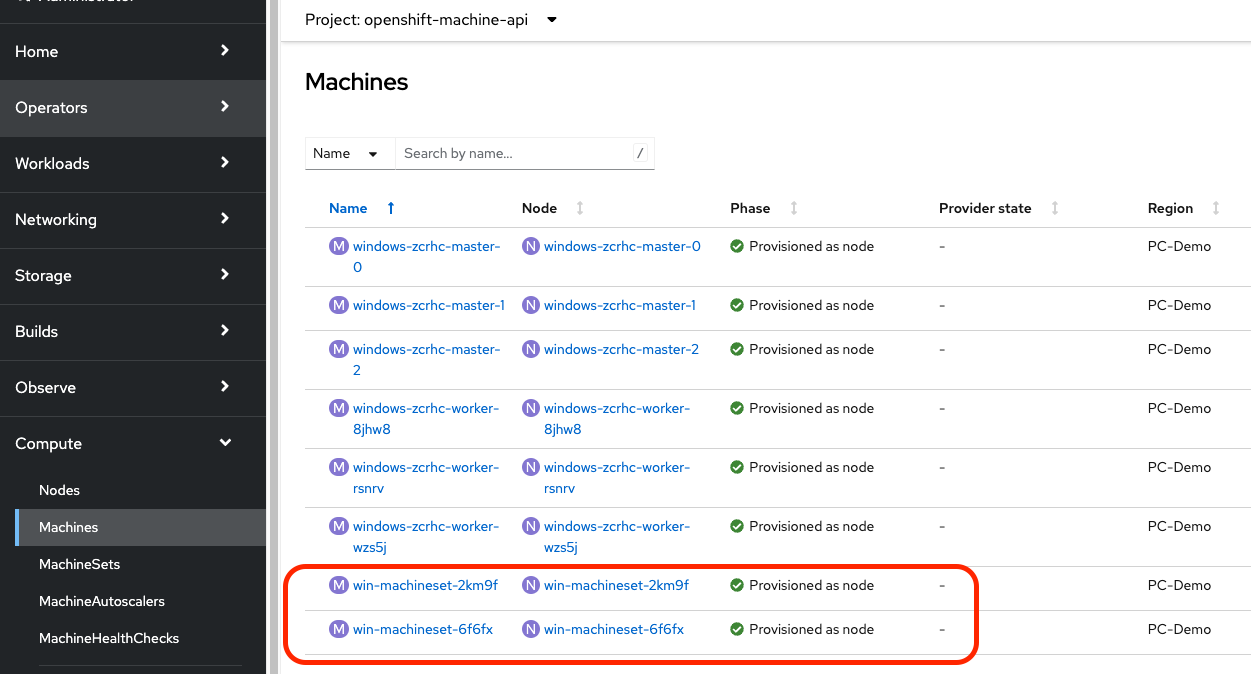
{"level":"info","ts":"2024-01-11T12:45:42Z","logger":"nc 10.38.19.157","msg":"instance has been configured as a worker node","version":"9.0.0-9456533"}From the OpenShift console, we are able to verify the same.
Sample Windows application
Let’s test our Windows nodes with a sample application. Below is a sample webserver application with three replicas that will be scheduled on the Windows workers. The container image used has been taken from the Microsoft Artifact Registry.
The Windows nodes are provisioned with a taint so that they do not schedule any workloads on them. This is done to prevent Linux workloads from landing on these nodes and not being able to run. Note that we have added a nodeSelector and a matching toleration in the deployment spec to run on the Windows worker nodes.
apiVersion: apps/v1
kind: Deployment
metadata:
  labels:
    app: win-webserver
  name: win-webserver
spec:
  selector:
    matchLabels:
      app: win-webserver
  replicas: 3
  template:
    metadata:
      labels:
        app: win-webserver
      name: win-webserver
    spec:
      tolerations:
        - key: "os"
          value: "Windows"
          Effect: "NoSchedule"
      containers:
        - name: windowswebserver
          image: mcr.microsoft.com/windows/servercore:ltsc2022
          imagePullPolicy: IfNotPresent
          command:
            - powershell.exe
            - -command
            - $listener = New-Object System.Net.HttpListener; $listener.Prefixes.Add('http://*:80/'); $listener.Start();Write-Host('Listening at http://*:80/'); while ($listener.IsListening) { $context = $listener.GetContext(); $response = $context.Response; $content = '<html><body style="background-color:#f0f0f0;"><H1 style="color:#00A1F1;">Windows Container Workloads on <span style="color:#ff0000;">Red Hat OpenShift</span> and <span style="color:#7855FA;">Nutanix Cloud Platform</span></H1></body></html>'; $buffer = [System.Text.Encoding]::UTF8.GetBytes($content); $response.ContentLength64 = $buffer.Length; $response.OutputStream.Write($buffer, 0, $buffer.Length); $response.Close(); };
          securityContext:
            runAsNonRoot: false
            windowsOptions:
              runAsUserName: "ContainerAdministrator"
      nodeSelector:
        kubernetes.io/os: windows
      os:
        name: windows
After the pods are created, let’s create a service for them and expose the service with a route.
$ oc expose deployment win-webserver --port=80
service/win-webserver exposed
$ oc expose service win-webserver
route.route.openshift.io/win-webserver exposed
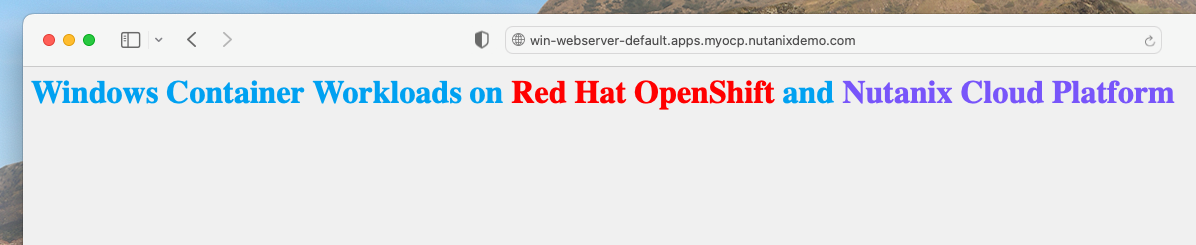
$ oc get route
NAME HOST/PORT PATH SERVICES PORT TERMINATION WILDCARD
win-webserver win-webserver-default.apps.myocp.nutanixdemo.com win-webserver 80 NoneIf we open the route on a web browser, we should see the webserver’s default page!
That was over quickly, wasn’t it? We have just seen how OpenShift on Nutanix simplifies the process of running your Windows containers in Kubernetes. For enterprises with a stronghold in Windows applications, the appeal of smoothly managing workloads on both Linux and Windows under a single Kubernetes environment is exciting.
Check out nutanix.dev for more related blogs and tutorials.