
Solution Overview
A Virtual Private Cloud (VPC) is an independent and isolated IP address space that functions as a logically isolated virtual network. A VPC could be made up of one or more subnets that are connected through a logical router, also called a virtual router. The IP addresses within a VPC must be unique within that VPC. However, IP addresses may overlap across VPCs. Since VPCs are provisioned on top of another IP-based infrastructure (connecting AHV nodes), they are often referred to as the overlay networks. Tenants may spin up VMs and connect them to one or more subnets within a VPC. Check out the diagram below for a VPC overview:
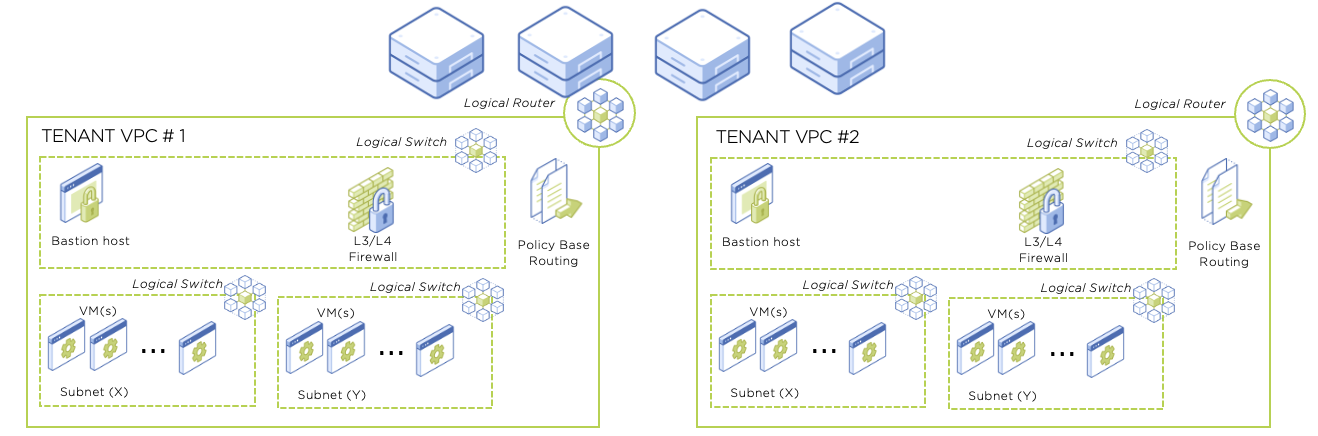
A VPC is a virtualized network of resources that are specifically isolated from other resource pools. VPCs allow you to manage the isolated and secured virtual network with enhanced automation and scaling.
In order to provide connectivity to the VMs in a VPC, each VPC requires connectivity to the external environment. This connectivity can be either NAT (Network Address Translation) or No-NAT and is VLAN based. The network used for external connectivity is called an external subnet. In a NAT scenario, the IP address of the VM will be translated when it exits the logical router of the VPC, whilst in the No-NAT scenario the IP address of the VM will not be translated when it exits the logical router of the VPC.
Use Cases and Design Considerations for NAT Connectivity
- For compliance reasons where the source IP address of the virtual machine should be hidden
- For devices that are assigned private IPs but require access to the internet.
- To resolve overlapping IP subnet issues; some typical examples are highlighted as per below.
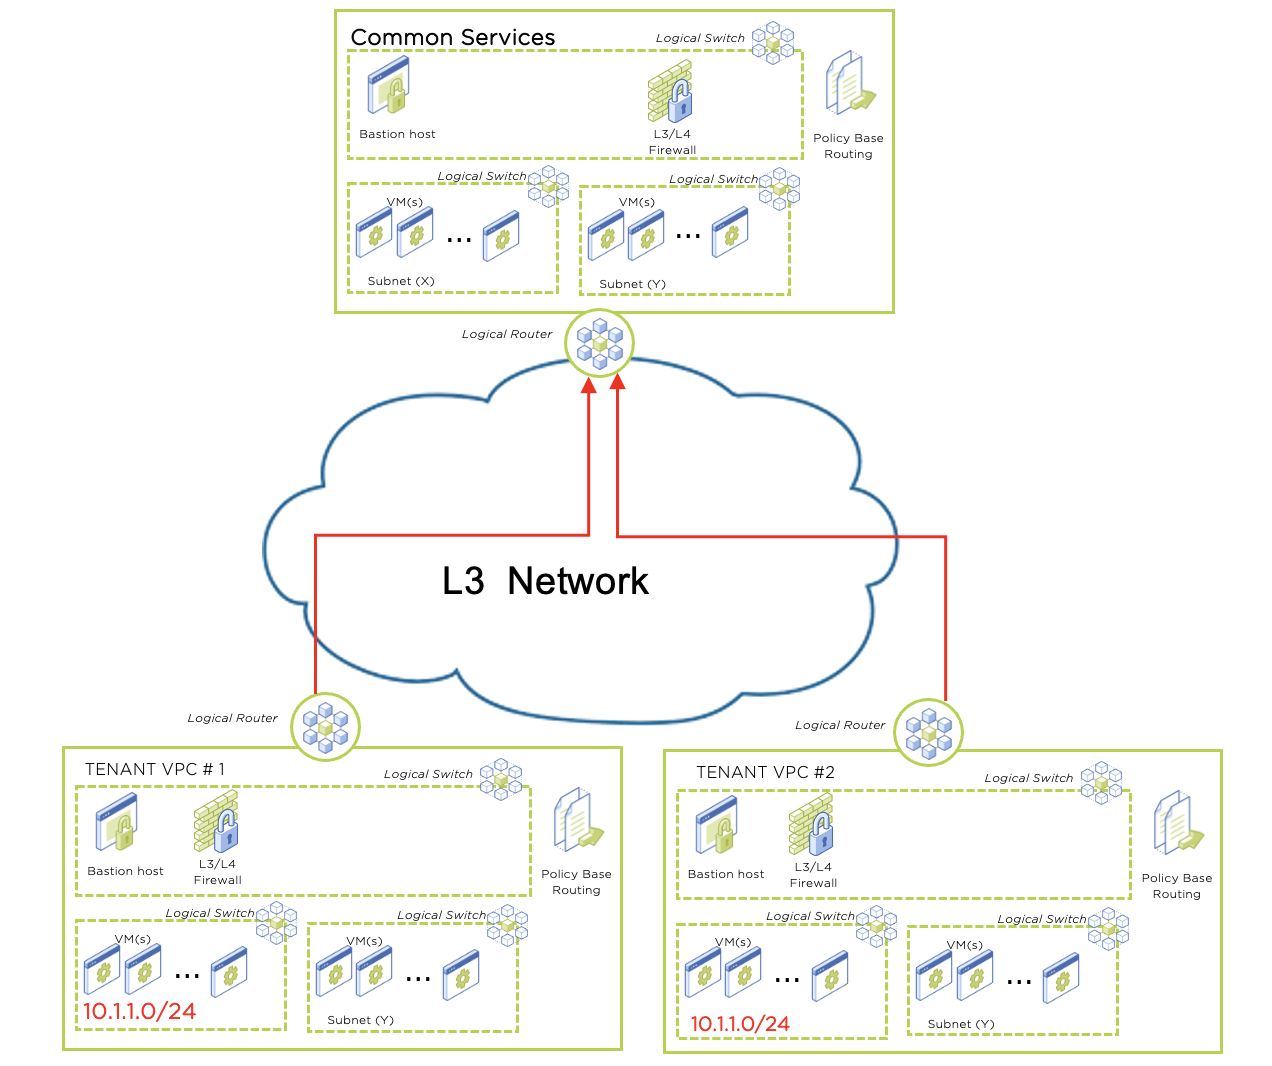
In this example, both tenant VPC #1 and tenant VPC #2 require access to a common segment. Unknowingly there is an IP conflict between the tenants. When the traffic enters the Common Services segment, connectivity issues will arise as it would not be able to differentiate traffic between tenant VPC 1 or tenant VPC 2. Thus in this scenario, it would be best to use a NAT external subnet on those servers that require access to the Common Services Segment.

In this example above, both the tenants have overlapping IP space conflicts. In order for the systems to communicate with each other, we will have to perform NAT on the network.
Use Case and Design Considerations for No-NAT Connectivity
- An example of where NAT usage is not optimal is when 2 endpoints are behind NAT and trying to communicate with each other. The port that each NAT gateway is mapping endpoints to is unknown to the endpoints, they only know the destination IP but not the NAT port. There are ways around this, either with TCP hole punching techniques, as well as using No-NAT instead.
- In environments where security tools are monitoring the network traffic with a tap or port mirror, the use of NAT on the network would be cumbersome for the correlation of the packet flows; as the source IP address of the packet is changed on the VPC before it exits into the external network.
Ultimately, deciding between NAT or No-NAT is very specific to the use case and the environment in which the VPC is to be configured. The needs of your application and the design of your existing physical network will help decide whether to use NAT or No-NAT. Consider the following factors:
Is the VPC going to be dynamic, or static? A dynamic VPC, where it gets spun up for test/dev purposes then deleted, would be a good candidate for NAT since it is faster to implement because it doesn’t need any configuration for routers. A static VPC would be a better candidate if it is to be deployed for a longer term as it would justify creating static routes for traffic management.
Is policy based routing a requirement in the VPC? Policy based routing can be used to send VM east-west traffic to an intermediate subnet/endpoint before going to its final destination. This configuration enables the use of load balancers, 3rd party firewalls, or IDS, whereas this cannot be done with NAT.
Nutanix understands the need to support both scenarios, and as such each VPC can be associated with a single NAT and a single No-NAT external network if desired. This provides the flexibility for the administrator and network architect to selectively choose certain traffic to be NATed whilst some are not based on IP routing destination prefixes. For more information on how to configure a NAT and No-NAT network within a VPC, please refer to the Nutanix portal under documentation: https://portal.nutanix.com/page/documents/details?targetId=Nutanix-Flow-Virtual-Networking-Guide-vpc_2022_6:ear-flow-nw-attaching-subnet-vm-pc-t.html
Configuring a NAT External Network
The steps to configure a NAT external network are divided into 6 steps:
- Create the External Subnet
- Associate the External Subnet to the VPC
- Add an overlay subnet to the VPC
- Attach a VPC overlay subnet to a VM
- Create a Default Route in the VPC
- Associate a Floating IP to a VM (For NAT deployment with Floating IP) Note: This is an optional step and source NAT can be used by itself depending on the requirements.
Step 1: Create the External Subnet
- Create the external subnet inside Prism Central. Navigate to “Network & Security”, Click on the Subnets option, after that click on “Create Subnet”

- Specify the Subnet name, for external connectivity. Select the type as VLAN and select the relevant cluster. An external subnet exists on a single Nutanix cluster.
- Once a cluster has been selected, options will appear for VLAN ID and Virtual Switch. Enter the VLAN number that corresponds to the subnet. If you want a DHCP server in the subnet, check the IP address management box and you will be prompted to enter the DHCP scope. Finally, select the virtual switch – in most cases, there is a single virtual switch that contains subnets for the cluster, vs0.

- Click on the “External Connectivity for VPCs” button to indicate this subnet is used for external connectivity. Once that is done, more options will be displayed as per the screenshot below.
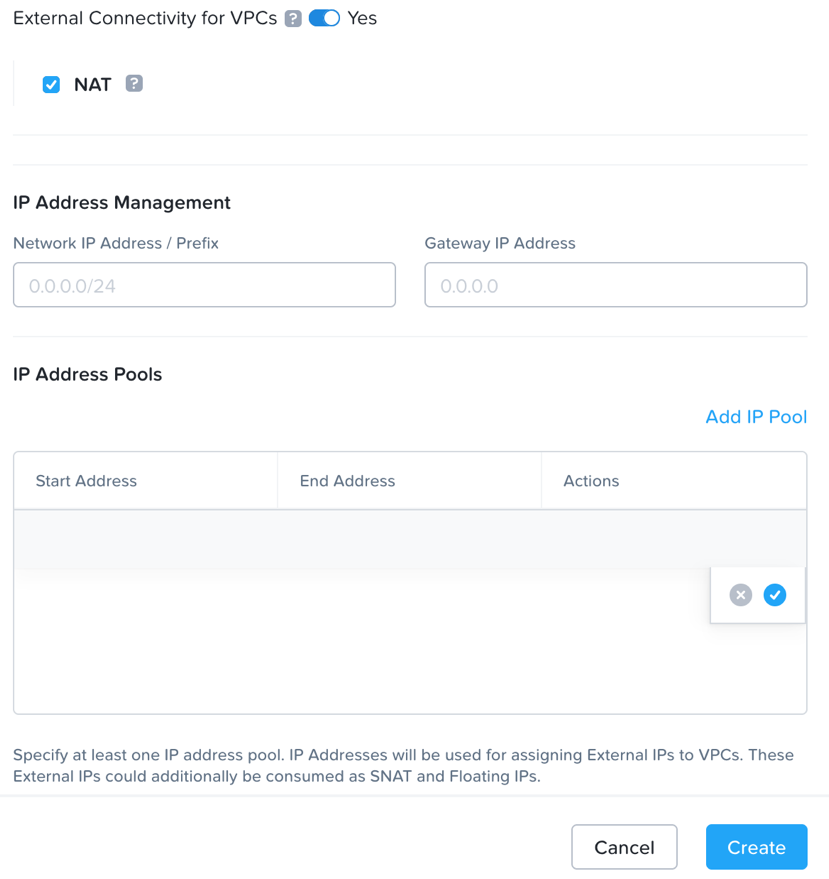
- Select the “NAT” radio button to use Network Address Translation in this external subnet.
- On the Network IP Address / Prefix field, specify the network address of the external subnet and the prefix. Specify the Gateway IP address of this subnet. This is the real IP address of the existing physical router in the selected VLAN. You can usually get this from the network team.
- The IP address Pool field defines the IP address space available for use by the logical router external interfaces and Floating IPs in the Nutanix cluster. Any additional IP address can also be used as the Floating IP address of VMs in VPCs that are configured to use this subnet as an external connected network.
- Once done click on the Create button. Now this external subnet can be used by one or more VPCs.
Step 2: Associate the External Subnet to the VPC
Once the external subnet is created, apply the following steps to associate a VPCwith the external subnet.
- Navigate to “Network & Security”. Click on the Virtual Private Cloud option.
- If you are going to associate the external subnet to a new VPC click on “Create VPC”.
- If you are going to associate the external subnet to an existing VPC, click on the selected VPC, click “Actions” and select the “Update Option”.
- If you are creating a new VPC, specify the new VPC name. Under the external subnet option, select the external subnet that was newly created in “Configuration Steps for Creating the External Subnet” to associate the subnet with the new VPC.
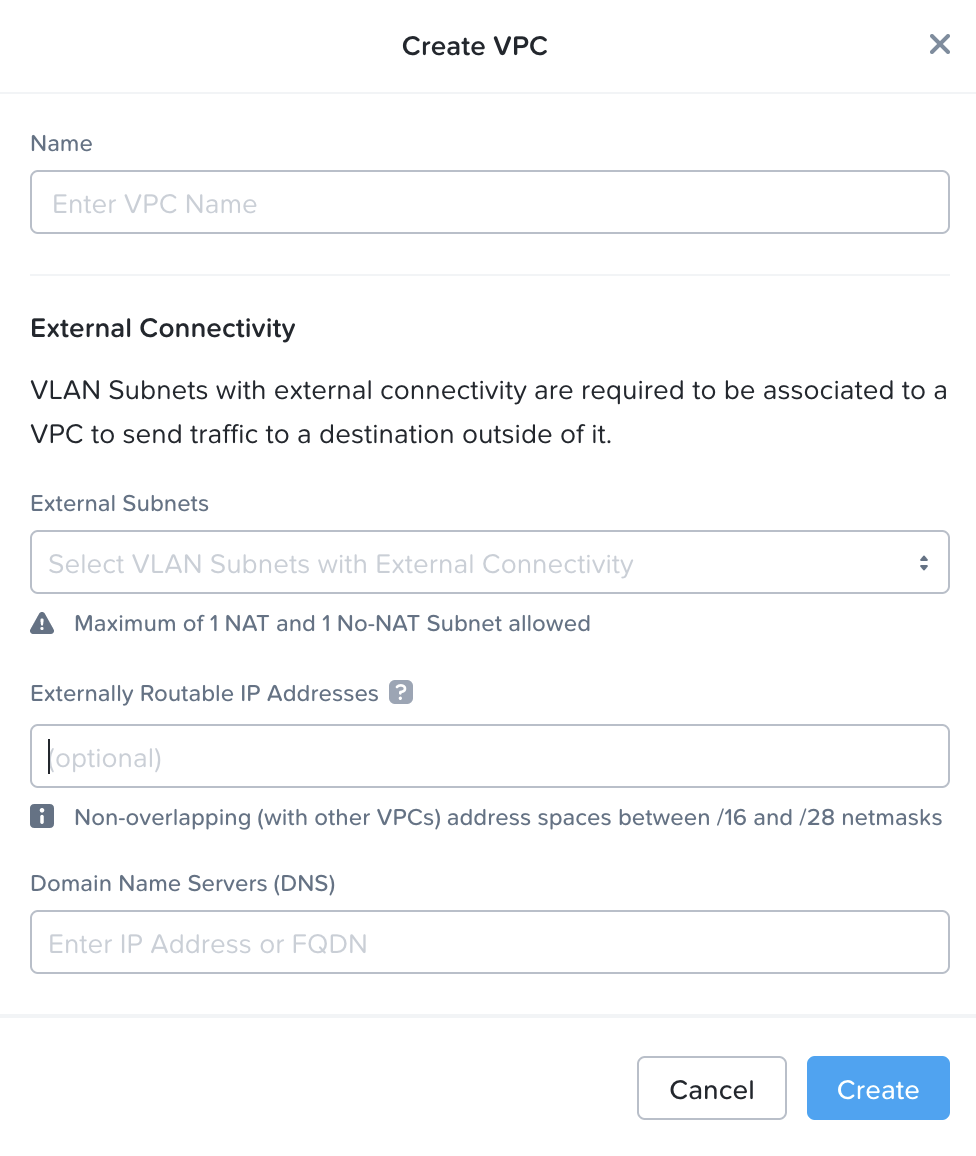
- In this scenario, we are using a NAT external subnet, and are assuming that all VPC traffic is NATed to the external subnet via the SNAT IP address which is taken from one of the available IPs in the external subnet which was created in the previous section. Therefore, there is no need to fill in the “External Routable IP address” option, which would be used in a No-NAT scenario.
- Specify the DNS Server (optional).
- Click on Create to create the VPC.
Step 3: Add an overlay subnet to the VPC
- The VPC can have subnets that are associated within it. To create a VPC subnet, navigate to Network & Security – Virtual Private Clouds.
- Choose the VPC you created in the previous step.
- From the VPC navigation bar, choose Subnets.
- Click Create Subnet.
- Add a name. The type will be default (Overlay). Add an IP pool and IPAM information for the VPC subnet. This determines the IP addresses assigned to VMs inside the subnet.
- Add any Domain Settings for the VPC subnet. These are optional, please refer to the Flow Virtual Networking Guide on the Nutanix portal for VM IP Address Management for a detailed discussion on use cases.
- Click Create.
Step 4: Attach a VPC overlay subnet to a VM
- Go to the Computer & Storage, VM, List View in PC
- Select the VM you want to attach to the VPC
- Click Update. In the Update VM dialog box, click Add NIC.
- Select the Subnet from the drop down list. Note that subnets within VPCs will show up as two names, the first name refers to the subnet, the second, separated by a colon, is the VPC name.
- Choose the connection state (i.e. connected or disconnected) and the IP assignment (DHCP or static)
- Click save.
- Note that you can also follow the above steps when creating a VM and configuring its NIC.
Step 5: Create a Default Route in the VPC
There are two main configuration components to routing traffic with VPCs – policies and routes. Routes are the same as they are in a non-VPC environment. Routes control traffic between subnets as well as traffic into and out of the VPC. By default, static routes are created for the directly connected subnets only. To allow traffic out of the VPC you MUST manually create a static route for the external destination (usually 0.0.0.0/0) that points to the external subnet. For the sake of this document, only static routes will be discussed. Please refer to the upcoming How-To Guide: Policies in a VPC subnet for information on policies.
To create a static route for a VPC:
- Select the VPC you want to create the route for.
- On the top of the section are 4 sections – Summary, Subnets, Policies, Routes. Select Routes.

In this example, note that a route has been automatically added for the subnet configured in the VPC (10.10.10.0/24) so that any traffic destined for the VPC subnet is sent to the externally routable IP of the external subnet assigned to the VPC (the VPC name shows up in the ‘next hop’ field in the table of routes).
- Click Manage Static Routes – this will allow creation of outbound static routes from the VPC.

- Click Add Static Route. For the default route (which will apply to any traffic destined for an endpoint not in the VPC subnet), enter 0.0.0.0/0 in the Destination Prefix. In the Next Hop box, select the external subnet that was assigned to the VPC.
- Click Save.
Currently, there are only static routes offered for VPC subnets.
Step 6: Associate a Floating IP to a VM
- If there is a need to specify a fixed external IP address for a VM in the VPC (Static 1-to-1 NAT), a floating IP address can be applied to the VM and its associated NIC. A floating IP is not the same as SNAT (source NAT). SNAT is used for any VM without a floating IP, and will allow VMs from inside the VPC to access endpoints outside of it, but in the reverse direction, no outside endpoints can access the VMs inside the VPC. All VMs in the VPC use the SNAT IP by default unless a floating IP is assigned to them. When you decide to use a floating IP, an IP is taken from the pool of available addresses in the external subnet you created and since that IP is an external one, it will be reachable from endpoints outside the VPC. If you need a single VM to be accessible from outside endpoints, this is a good option as you don’t need to configure any routing. When you assign a floating IP to a VM, that VM no longer uses the SNAT IP for outbound traffic.
- A floating IP needs to be requested before it is available for assignment to a VM in the VPC. Go to Network & Security – Floating IP’s. In the dialogue box, select the External Subnet created in previous steps.

Click on Request Floating IP, and enter the number of Floating IPs you need (there is a 5 Floating IP maximum per single request, but you can always make a new request) and check the box for Assign Floating IPs.
In the dialog box, highlight the VM, and choose the VM you want to assign a Floating IP. Once you have selected the Floating IP for the VM (or VMs, up to 5), click Save.
- An alternative method is to go to the Compute & Storage,, VM, List View in Prism Central.
- Select the VM you want to assign a floating IP.
- Click Update. In the Update VM dialog box, click on the pencil icon in the networks section to update the NIC.
- Select the floating IP address to be associated with the VM.
Diagram as per below:

Configuring a No-NAT External network
The steps to configure a No-NAT external network are divided into 5 main steps
- Create the External Subnet
- Associate the VPC to an External Subnet
- Create a subnet within the VPC
- Create a default route in the VPC pointing to the external subnet.
- Attach a VM to the VPC subnet
Step 1: Configuration Steps for Creating the External Subnet
- To create the external subnet, navigate to the Network & Security section in Prism Central and click on the subnets option. After that, click on “Create Subnet”
- Specify the subnet name for external connectivity. Select the type as VLAN, and select the relevant cluster.
- Once a cluster has been selected, options will appear for VLAN ID and Virtual Switch. Enter the VLAN number that corresponds to the subnet, and enable External Connectivity for VPCs. The Virtual Switch field will drop, and the IP Address Management fields will show up. Uncheck the NAT box, since this will be a NoNAT external subnet. In the IP address management section, enter the network IP address, the gateway address, and enter start and end IP addresses for the pool that will be managed in the subnet.

- Once done, click on the Create button
Step 2: Configuration Steps for associating the external subnet with a VPC
Once the external subnet is created, apply the following steps to associate the external subnet with the VPC:
- Navigate to “Network & Security”, Click on the Virtual Private Cloud option
- If you are going to associate the external subnet to a new VPC click on “Create VPC”
- If you are going to associate the external subnet to an existing VPC click on the check box next to the VPC, click “Actions” and select the “Update Option”
- If you are creating a new VPC, specify the new VPC name. Under the external subnet option, select the external subnet that was newly created in “Step 1 – Configuration Steps for Creating the External Subnet” to associate the subnet with the new VPC.
- In the Externally Routable IP Addresses field, enter the network prefix and subnet mask to designate which IP addresses from the external subnet will be routable. Note that static routes will need to be created to route traffic to the VPC.
- Specify the DNS Server (optional)
- Click on Create to “Create the VPC”
Step 3: Configuration Steps for creating a subnet in the VPC
- The VPC can have subnets that are associated within it. To create a VPC subnet, navigate to Network & Security, Virtual Private Clouds.
- Choose the VPC you created in the previous step.
- From the VPC navigation bar, choose Subnets.
- Click Create Subnet.
- Add a name. The type will be default (Overlay). Add an IP pool and IPAM information for the VPC subnet.
- Add any Domain Settings for the VPC subnet. These are optional, please refer to the Flow Virtual Networking Guide on the Nutanix portal for VM IP Address Management for a detailed discussion on use cases.
- Click Create.
Step 4: Configuration Steps to attach a VPC subnet to a VM
- Go to the Compute & Storage, VM, List View in Prism Central
- Select the VM you want to attach to the VPC.
- Click Update. In the Update VM dialog box, click Next to get to the Resources section.
- Select Attach to Subnet in the Networks box. In the Subnet box, select the VPC subnet you want to connect the VM NIC to. (Note that subnets within VPC’s will show up as two names, the first name refers to the subnet in the VPC, the second, separated by a colon, is the VPC name).
- Choose the connection state (connected or disconnected) and the IP assignment (DHCP or static).
- Click Save.
- Note that you also can follow the above steps when creating a VM and configuring its NIC, vs. updating an existing VM.
Step 5: Final Configuration Steps for No-NAT VPC subnets – Routing
As mentioned in the solution overview, No-NAT VPCs will need routing for the VPC VMs to communicate with endpoints outside the VPC. Note that within a VPC, VM to VM traffic routing is done by the virtual router of the VPC.
There are two main configuration components to routing traffic with VPCs – policies and routes. Routes are the same as they are in a non-VPC environment. Routes control traffic between subnets as well as traffic into and out of the VPC. By default, static routes are created for the directly connected subnets only. To allow traffic out of the VPC you MUST manually create a static route for the external destination (usually 0.0.0.0/0) that points to the external subnet. For the sake of this document, only static routes will be discussed. Please refer to the upcoming How-To Guide: Policies in a No-NAT VPC subnet for information on policies.
To create a static route for a VPC:
- Select the VPC you want to create the route for.
- On the top of the section are 4 sections – Summary, Subnets, Policies, Routes. Select Routes.

In this example, note that a route has been automatically added for the subnet configured in the VPC (10.10.10.0/24) so that any traffic destined for the VPC subnet is sent to the externally routable IP of the external subnet assigned to the VPC (the VPC name shows up in the ‘next hop’ field in the table of routes).
- Click Manage Static Routes – this will allow creation of outbound static routes from the VPC.

- Click Add Static Route. For the default route (which will apply to any traffic destined for an endpoint not in the VPC subnet), enter 0.0.0.0/0 in the Destination Prefix. In the Next Hop box, select the external subnet that was assigned to the VPC.
- Click Save.
Currently, there are only static routes offered for VPC subnets.
Conclusion
Flow Advanced Networking gives infrastructure managers a flexible set of tools to create overlay networks which allow the creation of virtual private clouds that have IP / network space completely separate from any networks created on other virtual private clouds in the same Nutanix cluster. Virtual private clouds can easily and quickly be created, along with subnets and routing policies and/or NAT to connect VM’s within the virtual private cloud to endpoints outside of it.