
Solution Overview
The purpose of this document is to outline the procedure to enable Flow Virtual Networking for all AHV clusters connected to a Prism Central. There are some important considerations when planning to enable Flow Virtual Networking, called Advanced Networking in Prism Central settings, and these are outlined in the first two sections of this guide.
Prerequisites
- Nutanix Cluster running AHV
- AOS 6.01 / PC 2021.7 or above
- Choose the X-Large PC VM size for Flow Virtual Networking deployments. Small or large PC VMs are not currently supported for Flow virtual networking. Three-node scale-out PC with X-Large (extra large) size: (14 vCPU, 60GB RAM, and 2.5TB SSD) is the supported configuration. This is the base PC XL size and has enough RAM, CPU, and storage to accommodate Flow Virtual Networking. Please note that additional resources will be required for the PC VM if any of the following services are required: Flow Network Security, Intelligent Operations, and Self-Service.
- Ensure that microservices platform (MSP) on Prism Central is enabled. See the Prism Central Guide for information about microservices infrastructure. There are caveats that need to be reviewed when enabling microservices on PC, these are listed in the reference section at the end of this document.
Caveats
- Although Flow Virtual Networking may be enabled on a single-node PC, Nutanix strongly recommends that you deploy a three-node scale-out Prism Central for production deployments. The availability of Advanced Networking services in Prism Central is critical for performing operations on VMs that are connected to overlay networks. A three-node scale-out Prism Central ensures that Advanced Networking containers continue to run even if one of the PC VMs fails.
Please note the prerequisite of X-Large PC VM size. - You cannot unregister the Prism Element cluster that is hosting the Prism Central deployment where you have enabled Flow Virtual Vetworking from Prism Central. You can unregister other clusters being managed by this Prism Central deployment from Prism Central.
- You cannot perform Prism Central One-click Disaster Recovery operations on MSP-enabled Prism Central.
- Nutanix recommends increasing the MTU (maximum transmission unit) to 9000 bytes on the virtual switch vs0 and ensuring that the physical networking infrastructure supports higher MTU values (jumbo frame support). The recommended MTU range is 1600-9000 bytes. This is recommended, because Flow Virtual Networking uses Geneve encapsulation and this makes the Ethernet frames larger than the standard MTU of 1,500 bytes (see below)
- Nutanix CVMs use the standard Ethernet MTU of 1,500 bytes for all the network interfaces by default. The system advertises the MTU of 1442 bytes to guest VMs using DHCP to account for the extra 58 bytes used by Generic Network Virtualization Encapsulation (Geneve). However, Windows VMs ignore the MTU advertisements in the DHCP response. Therefore, to ensure that Flow Virtual Networking functions properly with Windows VMs, enable jumbo frame support on the physical network and the default virtual switch vs0.
- If you cannot increase the MTU of the physical network, decrease the MTU of every VM in a VPC to 1442 bytes in the guest VM console.
Prepping the Clusters for Flow Virtual Networking
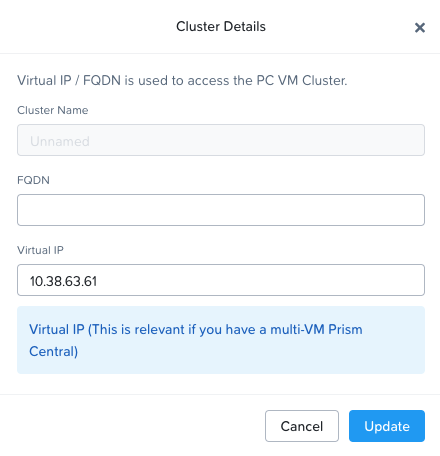
Create a VIP for Prism Central
A Prism Central Virtual IP is a prerequisite for enabling MSP on Prism Central.
- Log into the Prism Central Dashboard
- Select the
button and go to Settings
- Under Settings, select → Prism Central Management
- In the Prism Central Summary widget click the edit button
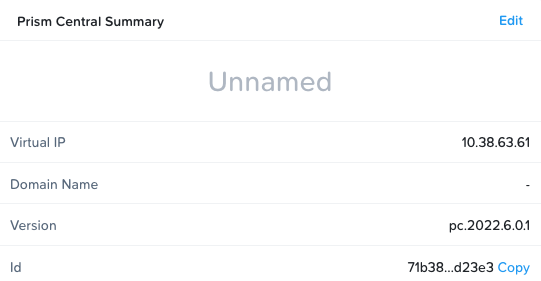
- Create a virtual IP (VIP) for PC. The VIP should be an unused IP address that is in the same network subnet as the PC VMs. A fully qualified domain name (FQDN) can be added as well, but is not mandatory.
- Click Update to complete the operation.
Enable Microservices infrastructure on Prism Central
- Go to dashboard – Settings – Prism Central Management
- In the center of the screen, at the bottom is the Prism Central on Microservices Infrastructure.
- Click the Enable Now button, then → Continue
- Enable Microservices Infrastructure
- Prism Central Services Domain Name
- Select a 3 level domain name such as: my.ntnxlab.local
- This domain name can be any name you like as long as it has three levels. The name only matters if you are planning to use NKE and DNS forwarding with service discovery. If you are not planning to use NKE (Karbon) and DNS forwarding with service discovery, just make up a name that does not overlap with any existing DNS names.
- Internal Network
- The default selection Private Network [default] is a pre-configured private VXLAN network.
- Choose the Default for this example.
- Prism Central Services Domain Name
- Click the Validate button
- When the config is validated click the Enable button

- Enabling Microservices Infrastructure in the Prism Central widget will report on the installation progress. This will take several minutes and may lead to several logouts and unavailability of Prism Central. Refresh your browser once this process completes.

Note: you will have to log out of Prism Central and then back in again in order to get the Prism Central on Microservices Infrastructure widget to display properly:

Enable Flow Virtual Networking (Advanced Networking)
- Select the
- Click the Enable Button
- Prism Central will check the prerequisites for Advanced Networking with the registered AHV clusters. Click the Enable button if the prerequisites are met. If the prerequisites are not met, correct the issues and try the Enable button again.
- Upon completion, Advanced Networking functionality will be available in the PC instance.

Reference
Considerations before enabling microservices infrastructure on PC:
- Once MSP is enabled with a single node PC, PC Scale Out to three nodes is supported on PC 2022.1 and higher.
- PC Backup/Restore and PC migration are no longer supported when Objects is enabled.
- Changing PE Data Service IP, PE VIP and PC VIP is no longer supported after enabling MSP.
- Unregistration of the Prism Element that is hosting the Prism Central is not supported after enabling MSP. Other Prism Elements can be unregistered.
- Objects manager needs to be upgraded to version 3.1.1 or greater for deploying Objects.
- Enabling MSP might cause a brief downtime of Objects services.
Advanced Networking – Recommended Configuration Maximums
| Flow Virtual Networking Attribute | Tested supported number |
|---|---|
| VPCs | 500 |
| Subnets | 5,000 |
| Endpoints (VM ports/NICs) | 50,000 |
| Floating IPs | 2,000 per networking controller-enabled PC |
| Routing Policies | 1,000 per VPC 10,000 per networking controller-enabled PC |